篇幅有限
完整内容及源码关注公众号:ReverseCode,发送 冲
FART框架简介
在对于整体保护来说,Dalvik和Art通用的解决方案都是寻找一个合适的时机点去dump内存中完整的dex。整体加固存在致命的弱点,就是在内存中是连续的。由此进入函数抽取的时代,即二代壳的开始,而FART的出现要解决的问题就是函数抽取的方案。FART是一个框架,不只是ART下的,事实上也可以在Dalvik下实现。

ART下脱壳原理
InMemoryDexClassLoader源码分析
1 | static jobjectCreateSingleDexFileCookie(JNIEnv* env,std::unique_ptr<MemMap>data) |
DexClassLoader源码分析
1 | OpenAndReadMagic(filename,&magic, error_msg); |
dex2oat编译流程
1 | 2965int main(int argc, char** argv) { |
apk安装时进行的dex2oat的编译流程
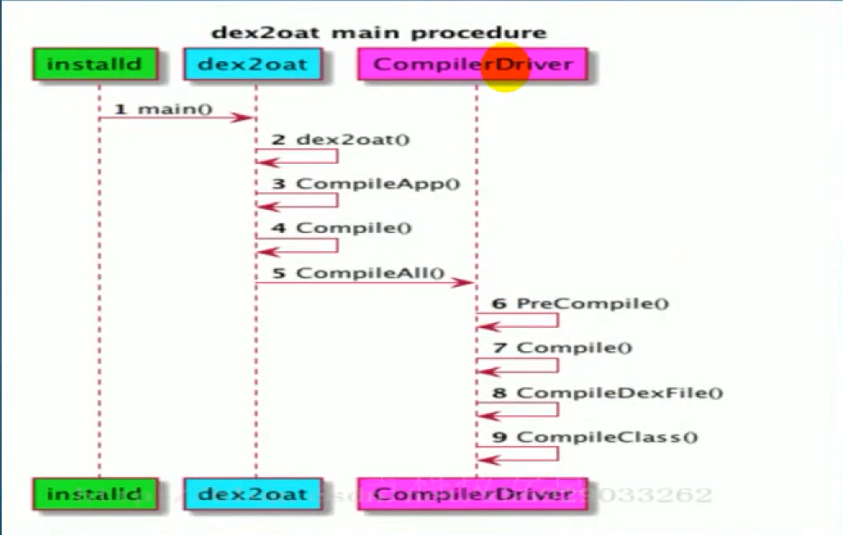
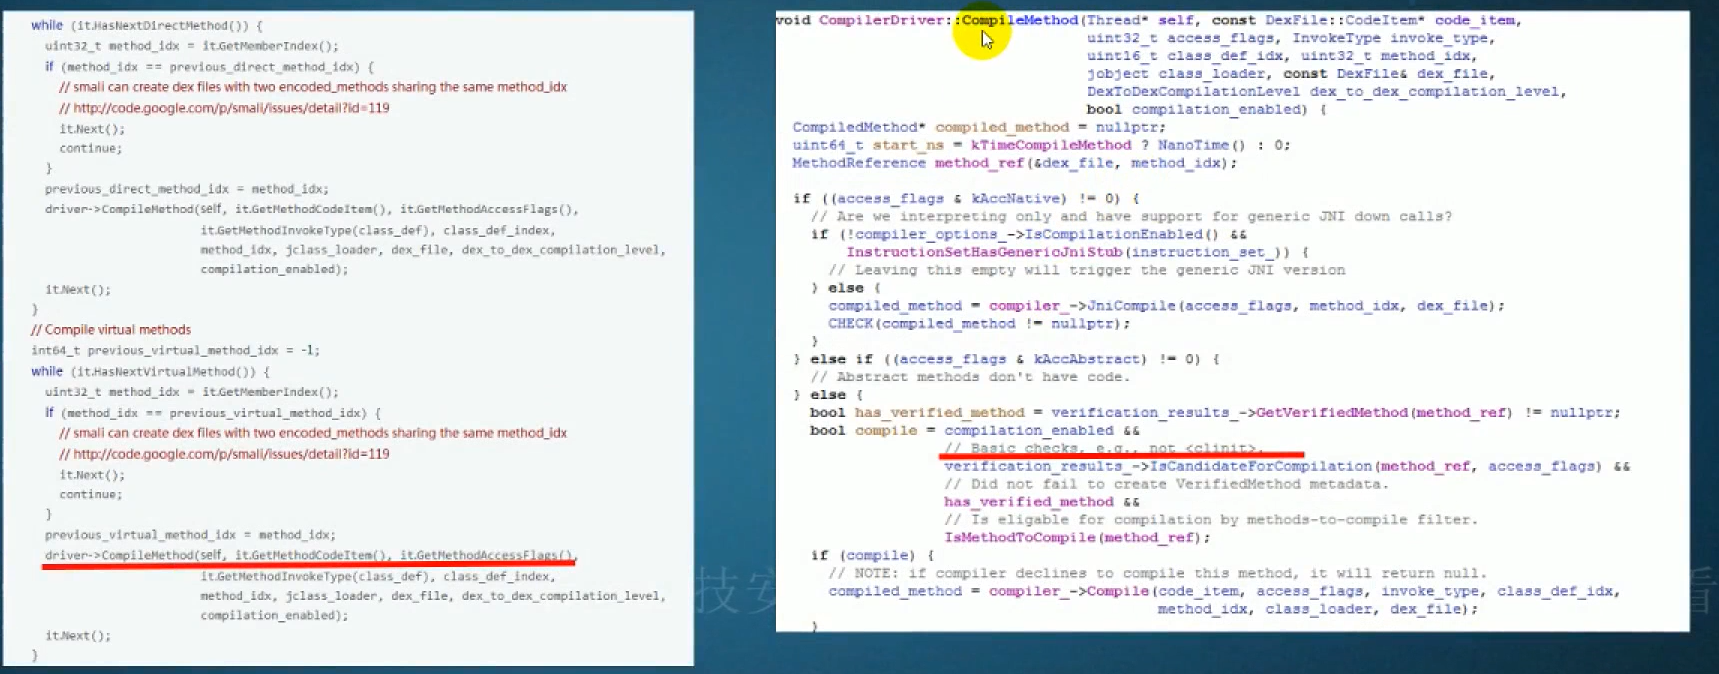
dex2oat编译流程是最终通过CompileMethod按照函数粒度进行编译,并不是所有的函数都会被编译,比如类初始化函数<clinit>。因此对于当一个类被初始化时,该类的初始化函数始终运行在interpreter模式。对于类的初始化函数并不是dex2oat编译的对象,自然该函数被编译生成二进制代码,自然类的初始化函数始终运行在解释模式下。
ART下函数执行模式:
- interpreter模式:解释模式,最后进入art下的解释器完成取址,取出对应codeItem每一条smali指令,由art下的解释器解释执行,不同版本解释器实现不一样(对于所有的类的初始化函数不管有没有禁用掉dex2oat的编译流程,都是运行在解释模式下,最后必然进入art下的解释器中)
2
3
4
5
6
7
8
9
10
237 kSwitchImplKind, // Switch-based interpreter implementation.
238 kMterpImplKind // Assembly interpreter
239 };
240
241 #if ART_USE_CXX_INTERPRETER
242 static constexpr InterpreterImplKind kInterpreterImplKind = kSwitchImplKind;
243 #else
244 static constexpr InterpreterImplKind kInterpreterImplKind = kMterpImplKind;
245 #endif
2
3
4
5
6
235 kSwitchImplKind, // Switch-based interpreter implementation.
236 kMterpImplKind // Assembly interpreter
237 };
238
239 static constexpr InterpreterImplKind kInterpreterImplKind = kMterpImplKind;
2
3
4
5
6
232 kSwitchImplKind, // Switch-based interpreter implementation.
233 kMterpImplKind // Assembly interpreter
234 };
235
236 static constexpr InterpreterImplKind kInterpreterImplKind = kMterpImplKind;
2
3
4
5
6
7
8
9
10
11
12
13
14
230 kSwitchImplKind, // Switch-based interpreter implementation.
231 kComputedGotoImplKind, // Computed-goto-based interpreter implementation.
232 kMterpImplKind // Assembly interpreter
233 };
234 static std::ostream& operator<<(std::ostream& os, const InterpreterImplKind& rhs) {
235 os << ((rhs == kSwitchImplKind)
236 ? "Switch-based interpreter"
237 : (rhs == kComputedGotoImplKind)
238 ? "Computed-goto-based interpreter"
239 : "Asm interpreter");
240 return os;
241 }
243 static constexpr InterpreterImplKind kInterpreterImplKind = kMterpImplKind;说明在8.0以后google抛弃了基于kComputedGotoImplKind的实现,而使用汇编的方式实现。ArtMethod对象中的GetDexFile获取到ArtMethod所属的dex file,可以通过Begin和Size获取该dex的内存中起始地址和大小,实现内存中dex的dump操作。
2
3
4
5
6
7
1050 return begin_;
1051 }
1052
1053 size_t Size() const {
1054 return size_;
1055 }
quick模式:直接运行dex2oat编译生成的arm模式,直接运行二进制代码
当一个壳使用dexclassloader加载一个dex文件时,如果没有禁用掉dex2oat类中初始化函数将也没有被编译,是运行在解释模式下。如果禁用掉dex2oat导致dex文件中所有的函数都运行在解释模式下。
FART脱壳点
Execute脱壳点
interpreter模式流程:
从ArtMethod类中EnterInterpreterFromInvoke开始分析Execute->ExecuteMterplmpl或者ExecuteSwitchImpl,可以看到对于任何一个运行在interpreter模式的java函数来说,最后都会进入art下的解释器中进行解释执行。
修改/art/runtime/interpreter/interpreter.cc添加static inline JValue Execute(的DCHECK(!shadow_frame.GetMethod()->IsAbstract());前面通过artmethod获取Dexfile对象从而dump下dex文件
ArtMethod* artmethod=shadow_frame.GetMethod();
// 判断是否是类初始化函数,降低调用次数,只在初始化时进行dump操作
if(strstr(artmethod->PrettyMethod().c_str(),"<clinit>"))
{

    // 很多函数抽取壳将dex2oat干掉,除了初始化函数所有的函数都进入解释模式
    //inline const DexFile* ArtMethod::GetDexFile()
    const DexFile* dexfile=artmethod->GetDexFile();
    /*  const uint8_t* Begin() const {
1050      return begin_;
1051    }
1052
1053    size_t Size() const {
1054      return size_;
1055    }*/
    // 获取dex文件的起始地址和大小
    const uint8_t* begin=dexfile->Begin();
    size_t size=dexfile->Size();
    // 写入到sdcard中
    char dexfilepath[100]={0};
    sprintf(dexfilepath,"/sdcard/%d_%d_Execute.dex",(int)size,getpid());
    int fd=open(dexfilepath,O_CREAT|O_RDWR,0666);
    if(fd>0)
    {
        int number=write(fd,begin,size);
        if(number>0){
            }
        close(fd);

        }

    }
重新编译,将out/target/product/sailfish下的system.img和system_other.img重新刷机
1 | source build/envsetup.sh |
开始刷机flash.bat
1 | fastboot flash boot boot.img |
打开加壳app后,在sdcard中查看Excute结尾的dex即为脱下来的原dex
Execute和linkcode脱壳点
源代码中找到出现DexFile的位置,添加相应代码,获取起始地址和大小dump下来。找到参数,返回值,函数执行过程中出现的dex对象都是潜在的脱壳点。或者通过artmethod对象获取到所属的dexFile对象,进入dex脱壳的流程。
拨云见日:安卓APP脱壳的本质以及如何快速发现ART下的脱壳点
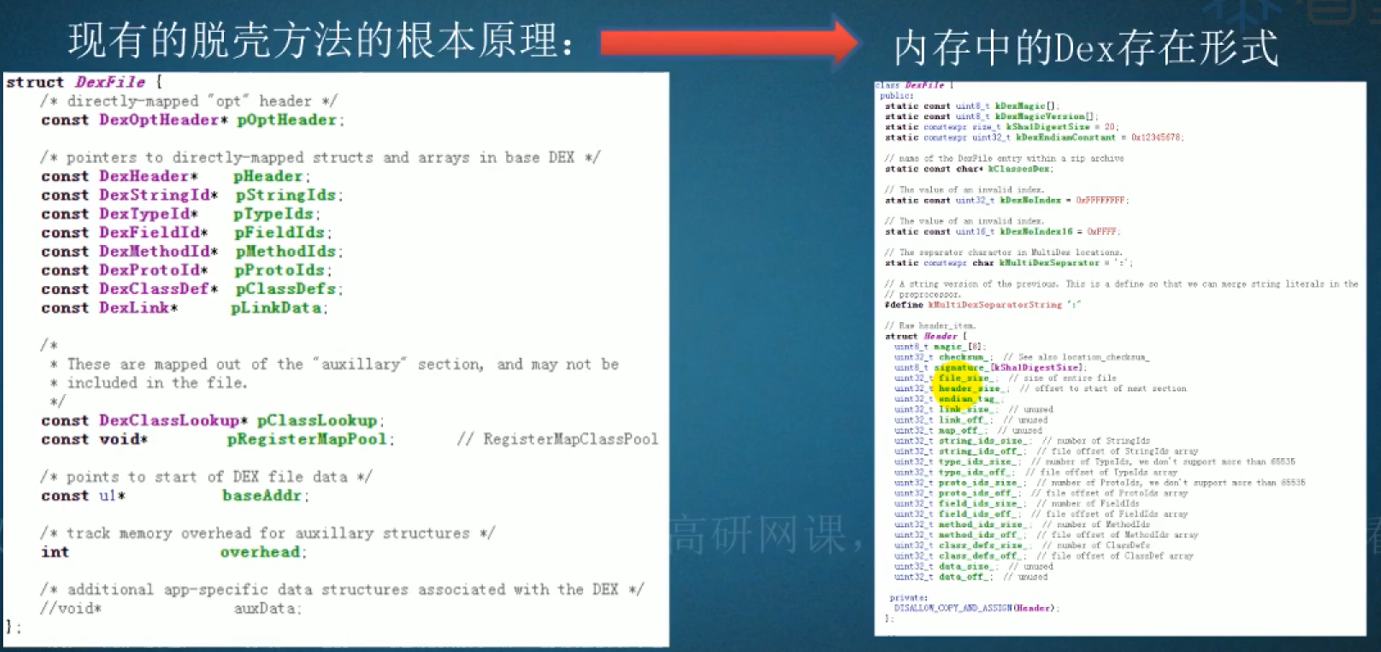
FART正餐前甜点:ART下几个通用简单高效的dump内存中dex方法
比如在dex2oat编译过程的DexFile的脱壳点,如果app的加壳厂商干掉了dex2oat流程,就不会进入到该脱壳点,自然无法在dex2oat的编译流程中dump内存中dex。故而dex2oat不是一个好的脱壳点。Execute为什么是一个好脱壳点,不管加固厂商有没有禁用dex2oat编译流程,对于dex文件类初始化都会进入到解释执行的流程当中。Execute是个内联函数,加固厂商很难通过hook修改Execute的逻辑。artmethod可以通过getDexFile获取到dexfile对象,以下都是合适的脱壳点。
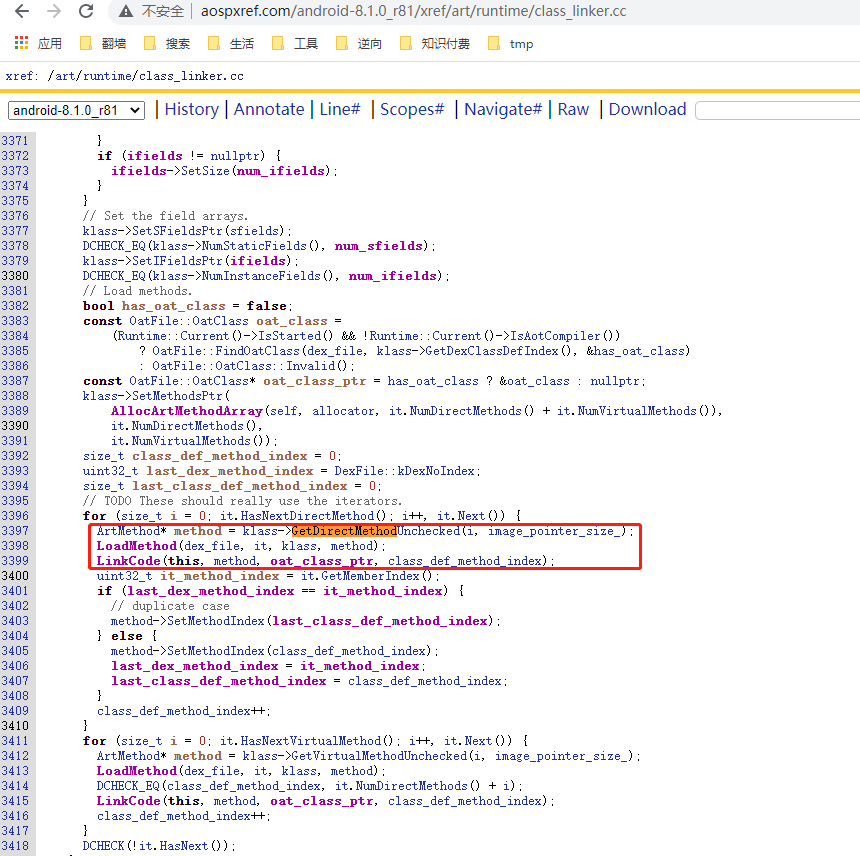
进入LinkCode
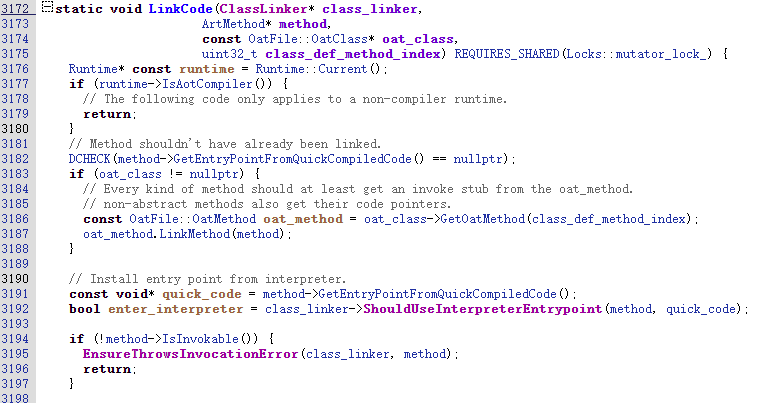
将上文中artmethod获取Dexfile对象从而dump下dex文件的代码拷贝到LinkCode中
1 | ArtMethod* artmethod=method; |
编译刷机,安装好加壳app后打开app存储权限,再打开app查看/sdcard/*_LinkCode.dex文件
1 | time make -j4 |
FART场景
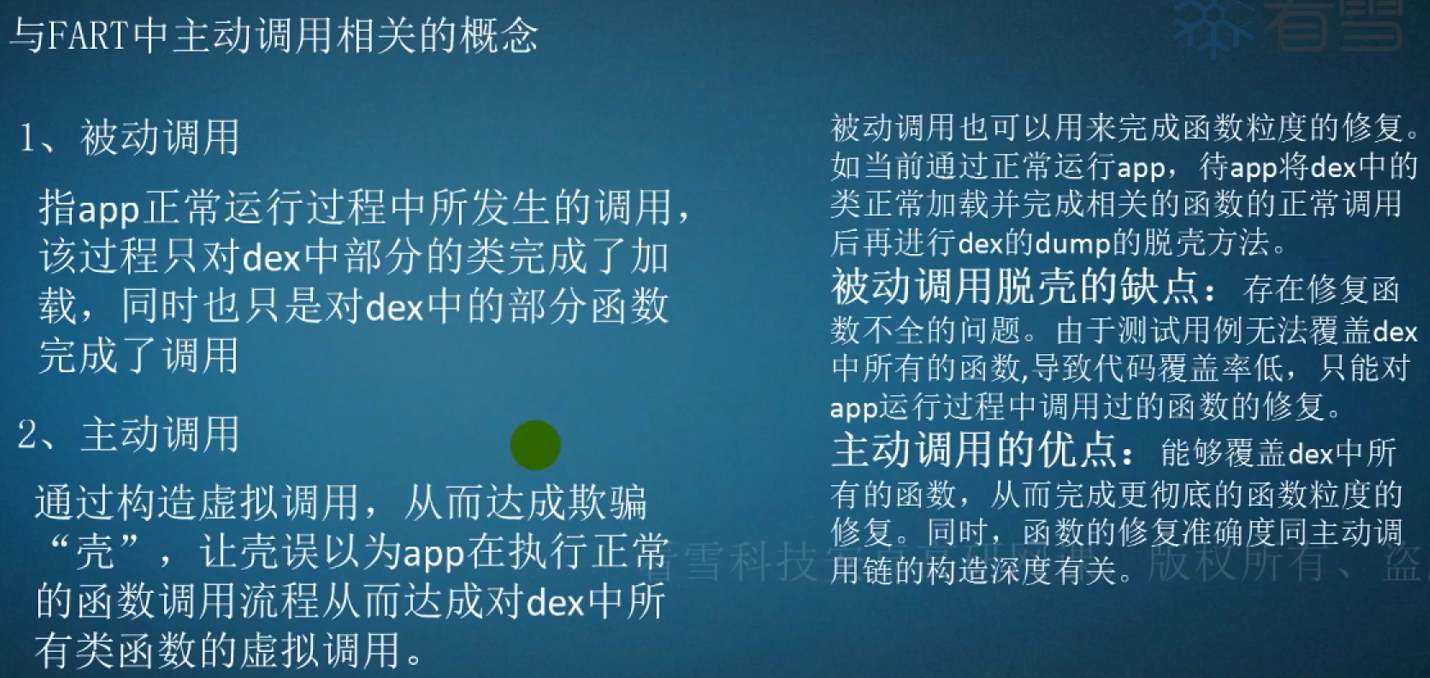
现在加固厂商对dex保护不仅仅局限在dex整体,已经进入到函数抽取中的函数粒度的保护,甚至进入到vmp和dex2c的每一条指令的保护,保护粒度越来越细化。很多工具无法应对函数粒度的加固保护方案,更别说vmp和dex2c的加固方案。dexhunter解决函数抽取通过遍历dex中全部的类进行主动加载初始化,fupk3首次使用主动调用概念,对每一个函数调用,一定程度上解决函数的抽取。但是fupk3基于Dalvik下的即Android4.4之前的,很多app已经不支持Dalvik了。
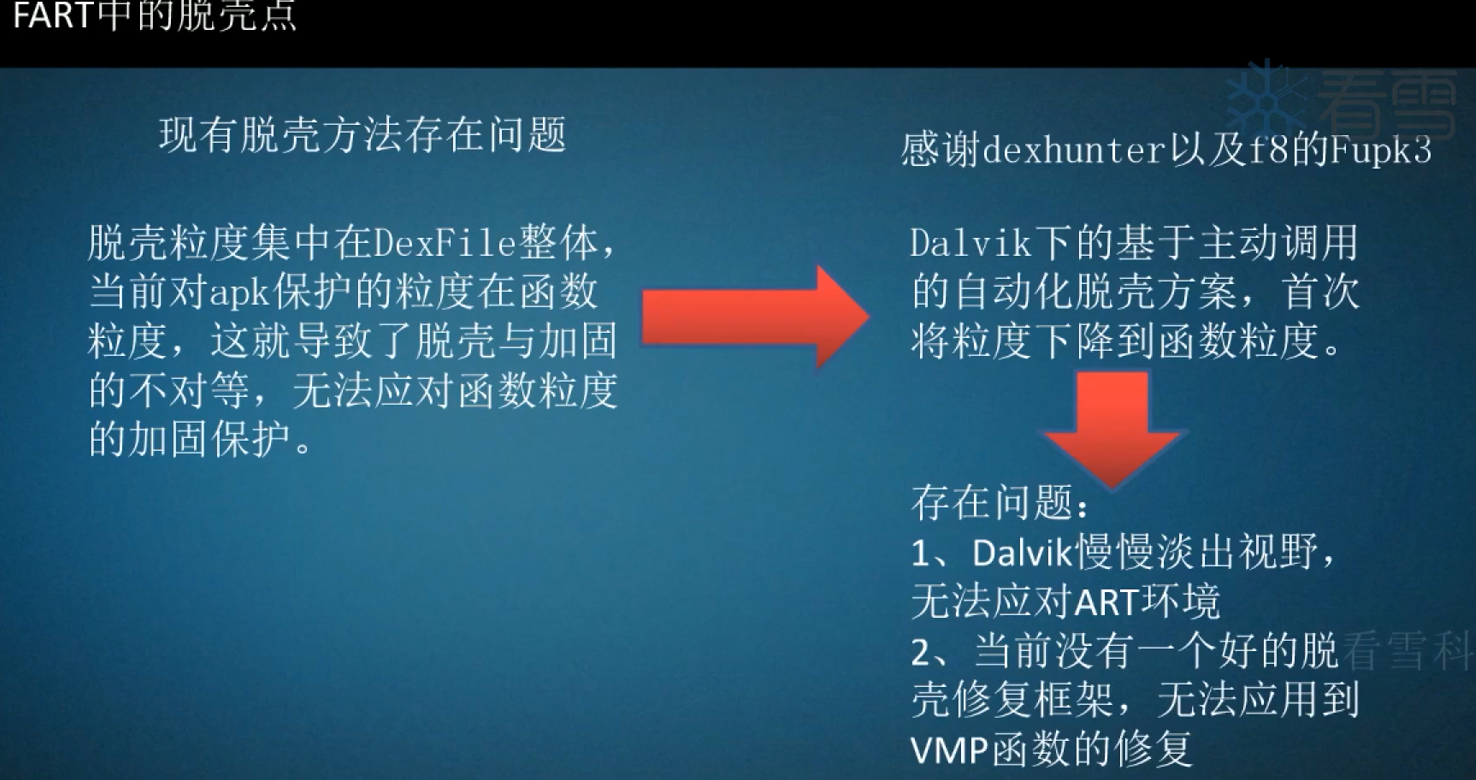
fart框架针对函数抽取,同时实现art,兼容4.4到10.0等,只要art没有被抛弃,fart都可以实现在这些系统上的脱壳。脱壳组件分离可以内存dex的整体dump加固基础的防护,主动调用组件对某一个函数或class中所有函数的指令部分,修复组件针对vmp保护的apk的修复。
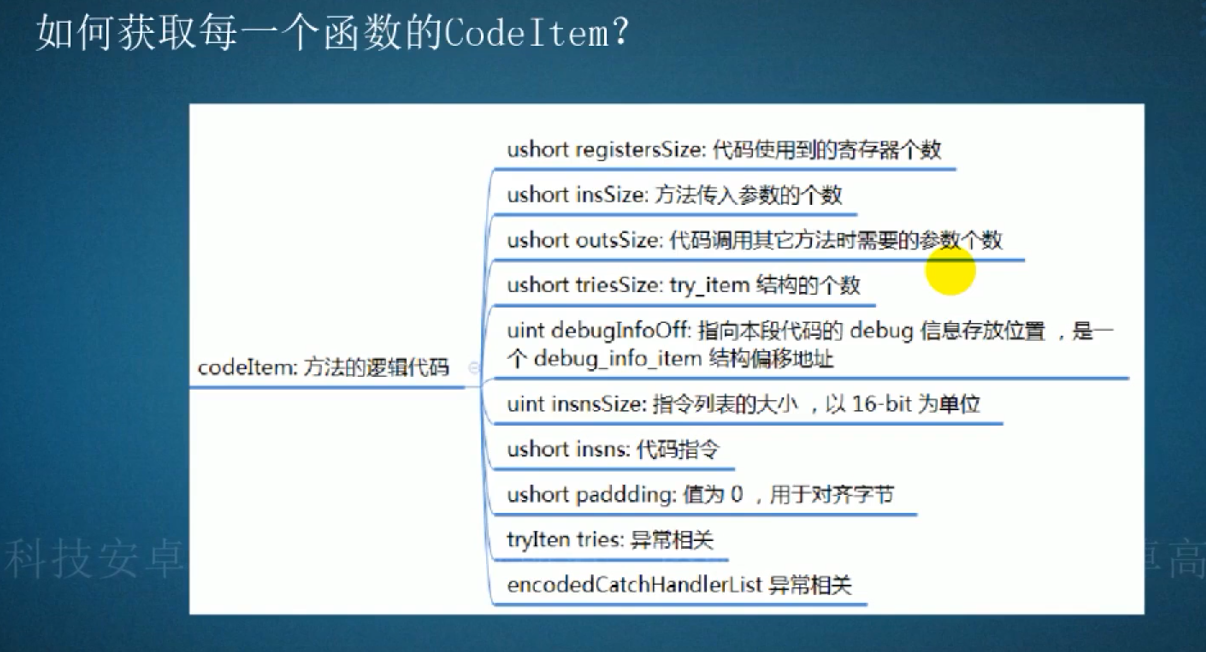
CodeItem是运行过程中解密后的指令流部分,牵扯到dex的文件格式。
新建项目codeitemtest,在MainActivity中加入如下代码,并在onCreate中调用testWithoutTry();testWithTry();
1 | public void testWithoutTry(){ |
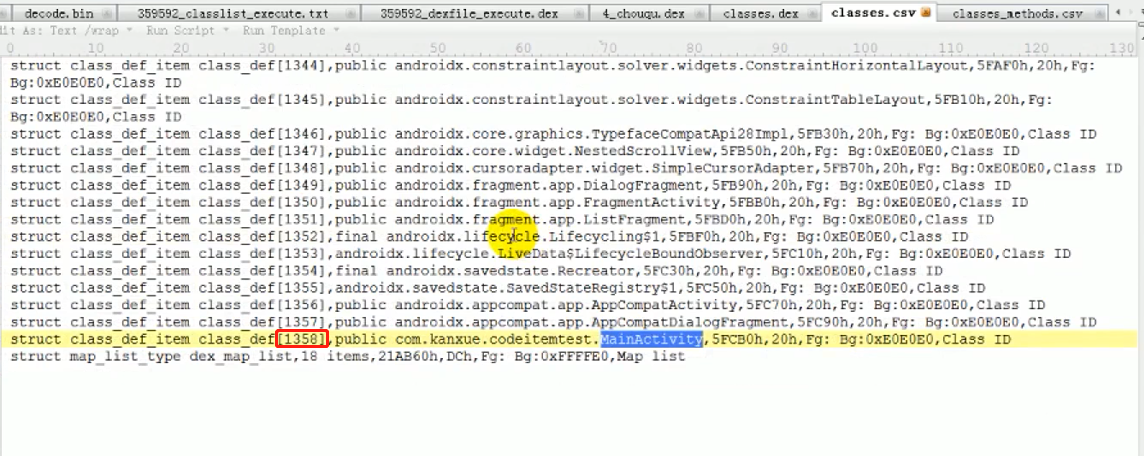
使用010Editor打开编译后的dex,找到struct_method_id_list_dex_class_ids和struct_method_id_list_dex_method_ids右键Export CSV,搜索MainActivity找到index为1358
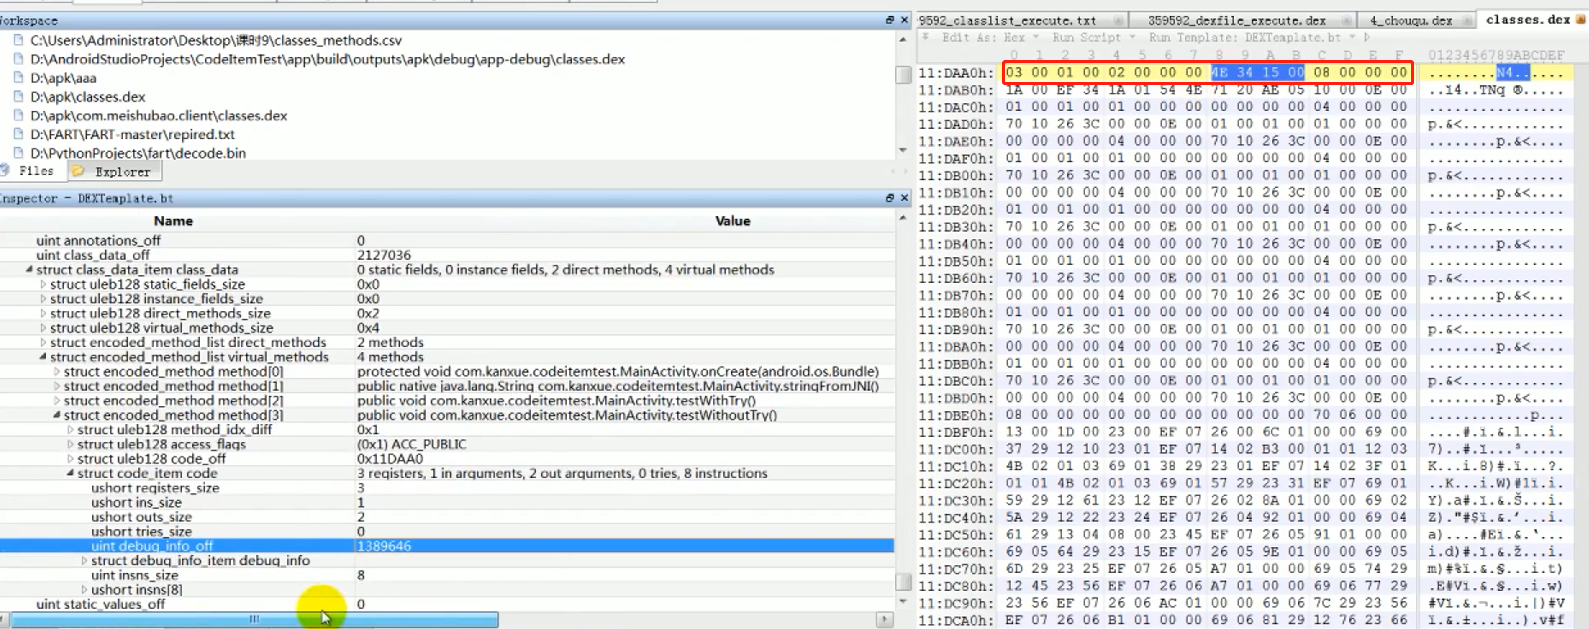
找到该MainActivity的位置,图中选中的0x11DAA0是该函数的代码偏移
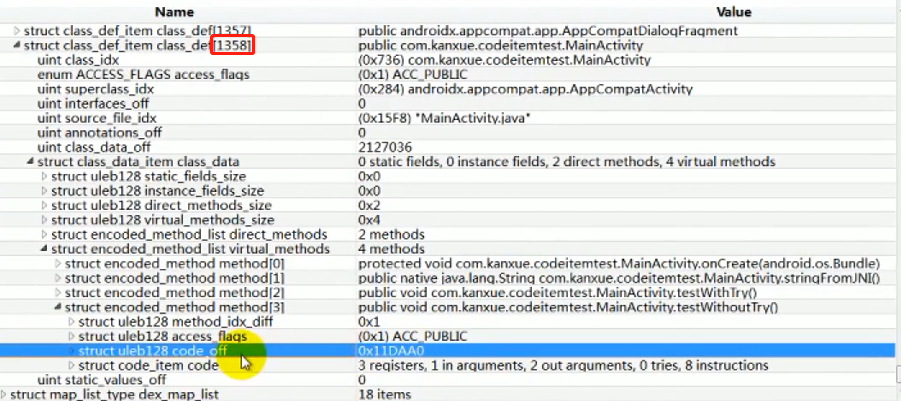
前16字节是函数头部分,寄存器个数,参数等
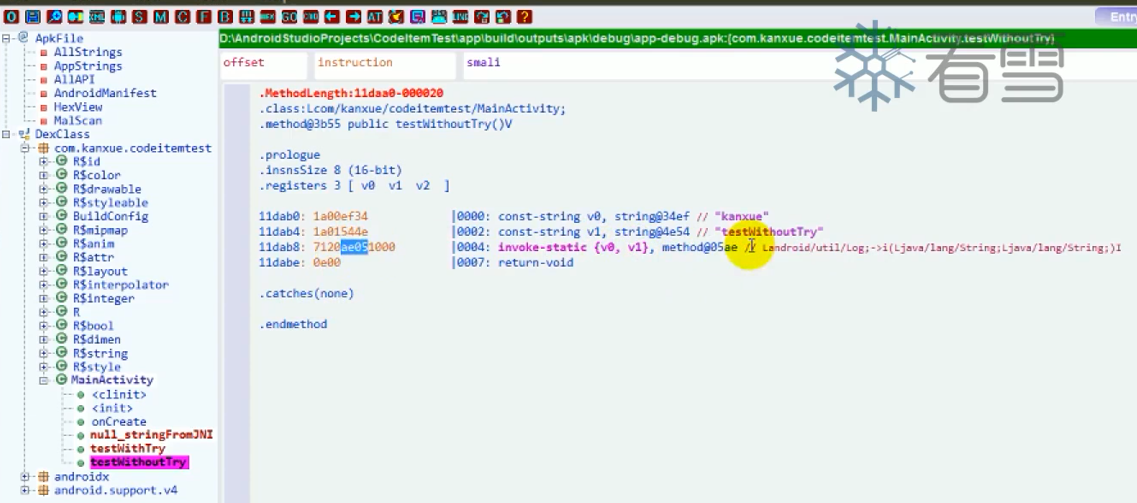
在GDA中Show ByteCode定位相关的指令,05ae转成十进制为1454,通过struct_method_id_list_dex_method_ids查看1454找到对应函数。Show In Hex定位到地址
FART生成bin文件,即CodeItem的格式
5元组填充{name:函数名,method_idx:函数索引,offset:偏移,code_item_len:长度,ins:函数体CodeItem的base64字符串},使用010Edito打开dex和bin文件对比索引,其中GDA中的地址复制到010Editor中使用Ctrl+g搜索找到dex索引位置,bin中的offset偏移转成十六进制后可以通过Ctrl+g在010Editor中找到对应代码位置,
FART脱壳结束得到的文件列表有两类:
- Execute脱壳点得到dex和dex中的所有类列表
- 主动调用时dump得到的dex和此时dex中的所有类列表,以及该dex中所有函数的CodeItem即bin文件
FART脱下来的文件只需要函数体文件以及与函数体文件名开头的对应的大小的dex,而在execute脱壳点脱下来的dex只是作为参考
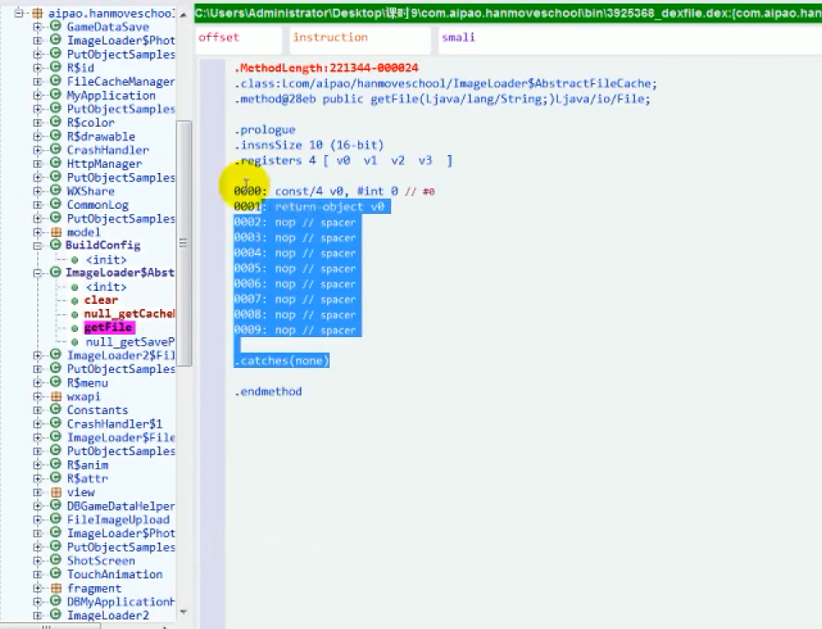
拷贝bin文件中ins的值base64编码到base64decode.py中写入checkSize.bin文件中,打开bin后将计算好的字节覆盖掉原dex中的代码,实现手动修复checkSize函数。GDA打开后找到MemoryCache的checkSize函数右键Show ByteCode查看字节码信息,
完美使用场景:整体加固壳就不说了
FART对dex的修复粒度在函数粒度,三组件结合可以完美解决基于函数抽取技术进行加固的app脱壳
案例
adb install aipao.apk
Settings—-Apps & notifications—-App permissions—-添加该app的sd卡读写权限
打开app查看logcat信息,主动调用时出现ActivityThread的信息,/sdcard/fart中已经出现execute的dex文件,bin文件不断增大,等待fart主动调用结束出现fart run over
1 | grep -r "MemoryCache" ./*.txt 找到MemoryCache类所在的txt中 |
当遇到函数被抽空时,可以使用dump下的codeItem函数体bin文件进行修复,使用python fart.py实现修复

