篇幅有限 完整内容及源码关注公众号:ReverseCode,发送 冲
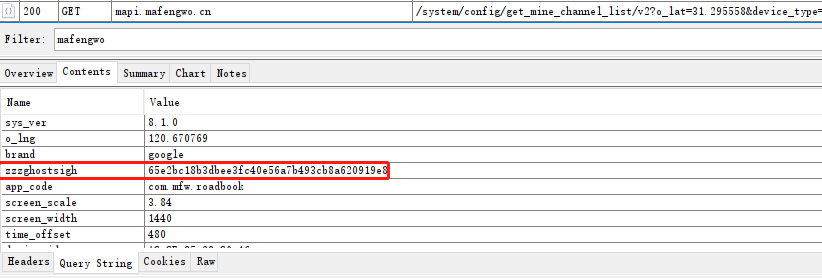
v9.3.7抓包 postern+charles
jadx反编译搜索zzzghostsigh找到params.put(LoginCommon.HTTP_BASE_PARAM_GHOSTSIGH, ghostSigh)
1
2
3
4
5
private static String appendGhostSighParams(Map<String, String> params, String encodeParams) { String ghostSigh = ghostSigh(encodeParams); params.put(LoginCommon.HTTP_BASE_PARAM_GHOSTSIGH, ghostSigh); return encodeParams + encodeUrl("&") + encodeUrl(LoginCommon.HTTP_BASE_PARAM_GHOSTSIGH) + encodeUrl("=") + encodeUrl(ghostSigh); }
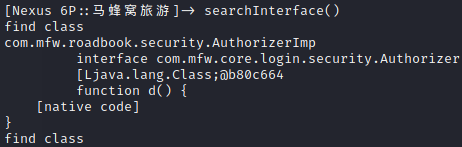
进入ghostSigh是Authorizer接口的一个方法
1
2
adb shell dumpsys activity activities|more 拿到包名com.mfw.roadbook frida -UF com.mfw.roadbook -l scripts.js 在searchInterface中使用接口名过滤name.indexOf("Authorizer")
利用frida找到该类的实现,ghostSigh的逻辑就是获取AuthorizeHelper实例house调用getSummary方法
1
2
3
4
5
public String ghostSigh(@Nullable Context context, @Nullable String params) { String summary = AuthorizeHelper.getInstance(LoginCommon.getAppPackageName()).getSummary(context, params); Intrinsics.checkExpressionValueIsNotNull(summary, "AuthorizeHelper.getInsta…tSummary(context, params)"); return summary; }
跟进getSummary,其中调用了so层的xPreAuthencode方法
1
2
3
4
5
6
7
private native String xPreAuthencode(Context context, String str, String str2); public String getSummary(Context context, String source) { return xPreAuthencode(context, source, this.packageName); } static { System.loadLibrary("mfw"); }
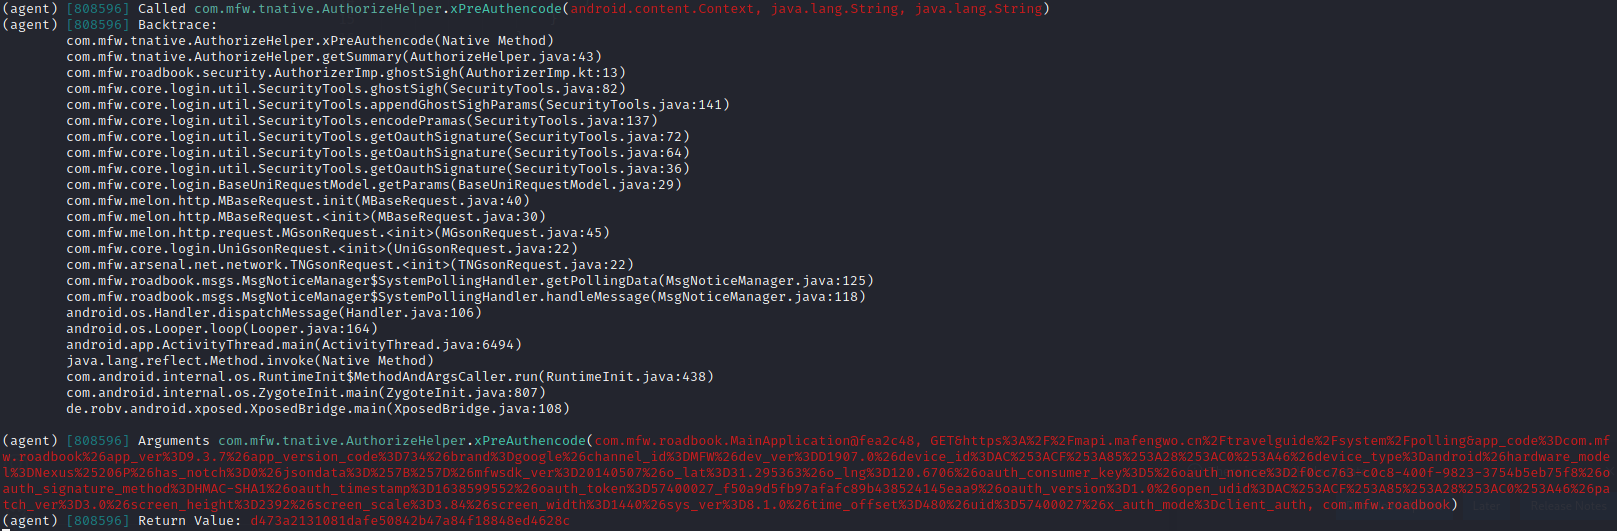
使用objection内存漫游跟踪下xPreAuthencode
1
2
objection -g com.mfw.roadbook explore -P ~/.objection/plugins android hooking watch class_method com.mfw.tnative.AuthorizeHelper.xPreAuthencode --dump-args --dump-backtrace --dump-return
它接收三个参数,参数1是一个context,参数2是输入的明文,参数3是app的包名
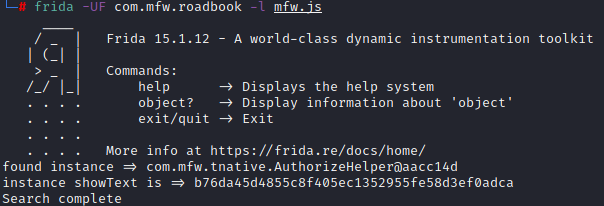
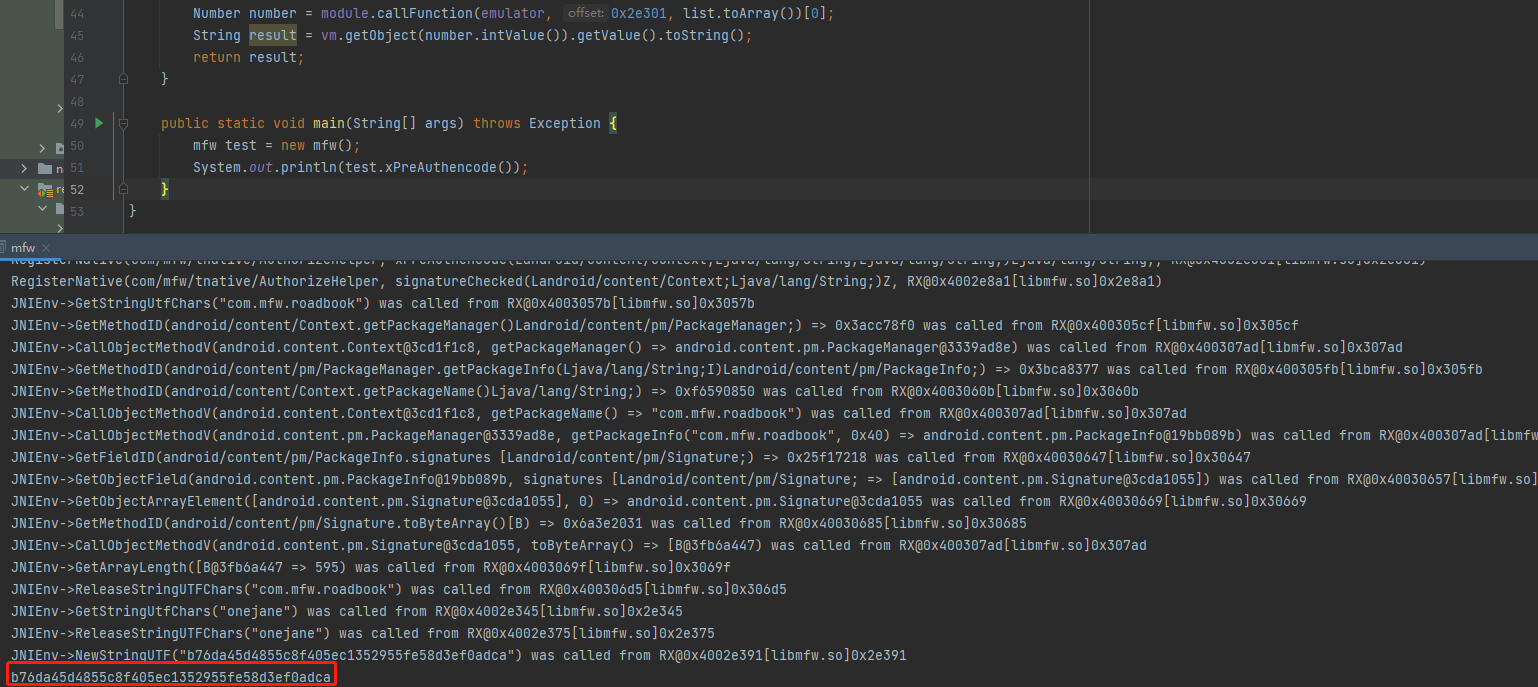
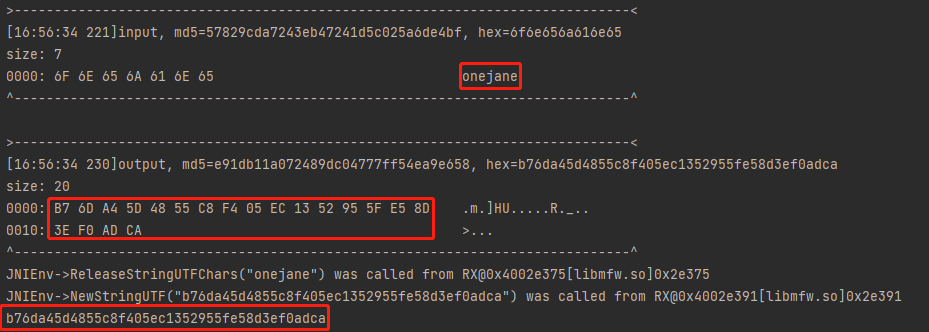
主动调用 frida 构造context,主动调用动态普通函数xPreAuthencode返回b76da45d4855c8f405ec1352955fe58d3ef0adca
1
2
3
4
5
6
7
8
9
10
11
12
13
14
15
function mfw(){ Java.perform(function(){ var currentApplication = Java.use('android.app.ActivityThread').currentApplication(); var context = currentApplication.getApplicationContext(); Java.choose("com.mfw.tnative.AuthorizeHelper",{ onMatch:function(instance){ console.log("found instance =>",instance); console.log("instance showText is =>",instance.xPreAuthencode(context,"onejane","com.mfw.roadbook")) },onComplete:function(){ console.log('Search complete') } }) }) } setImmediate(mfw)
unidbg 搭建Unidbg框架
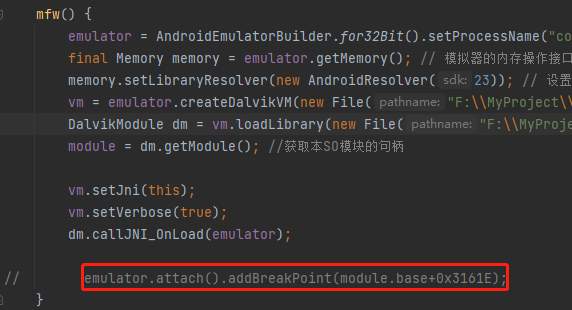
1
2
3
4
5
6
7
8
9
10
11
12
13
14
15
16
17
18
19
20
21
22
public class mfw extends AbstractJni{ private final AndroidEmulator emulator; private final VM vm; private final Module module; mfw() { emulator = AndroidEmulatorBuilder.for32Bit().setProcessName("com.mfw.roadbook").build(); // 创建模拟器实例 final Memory memory = emulator.getMemory(); // 模拟器的内存操作接口 memory.setLibraryResolver(new AndroidResolver(23)); // 设置系统类库解析 vm = emulator.createDalvikVM(new File("mafengwo_ziyouxing.apk")); // 创建Android虚拟机 DalvikModule dm = vm.loadLibrary(new File("libmfw.so"), true); // 加载so到虚拟内存 module = dm.getModule(); //获取本SO模块的句柄 vm.setJni(this); vm.setVerbose(true); dm.callJNI_OnLoad(emulator); }; public static void main(String[] args) throws Exception { mfw test = new mfw(); } }
JNI_OnLoad运行成功并打印出xPreAuthencode的地址为0x2e301
1
2
3
4
5
6
7
8
9
10
11
12
13
14
15
16
17
18
19
public String xPreAuthencode(){ List<Object> list = new ArrayList<>(10); list.add(vm.getJNIEnv()); // 第一个参数是env list.add(0); // 第二个参数,实例方法是jobject,静态方法是jclazz,直接填0,一般用不到。 Object custom = null; DvmObject<?> context = vm.resolveClass("android/content/Context").newObject(custom);// context list.add(vm.addLocalObject(context)); list.add(vm.addLocalObject(new StringObject(vm, "onejane"))); list.add(vm.addLocalObject(new StringObject(vm, "com.mfw.roadbook"))); Number number = module.callFunction(emulator, 0x2e301, list.toArray())[0]; String result = vm.getObject(number.intValue()).getValue().toString(); return result; } public static void main(String[] args) throws Exception { mfw test = new mfw(); System.out.println(test.xPreAuthencode()); }
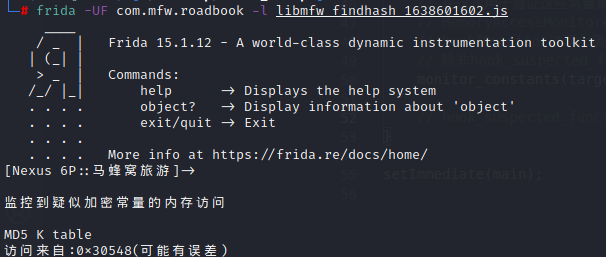
算法还原 由于明文不论多长输出固定为40位字符串,疑似哈希算法中的SHA1。使用IDA的FindHash跑完获取到自动生成的js
1 frida -UF com.mfw.roadbook -l libmfw_findhash_1638601602.js
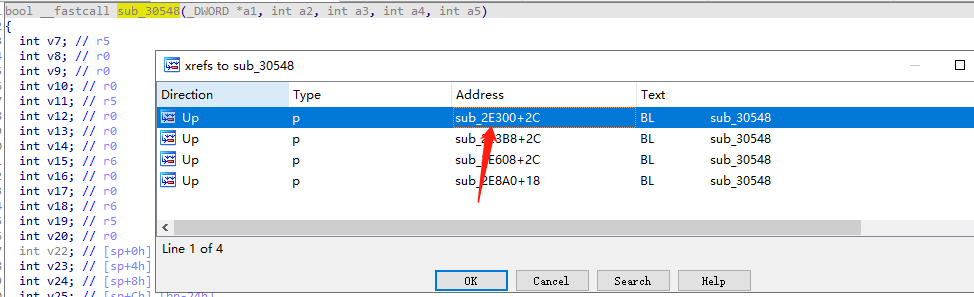
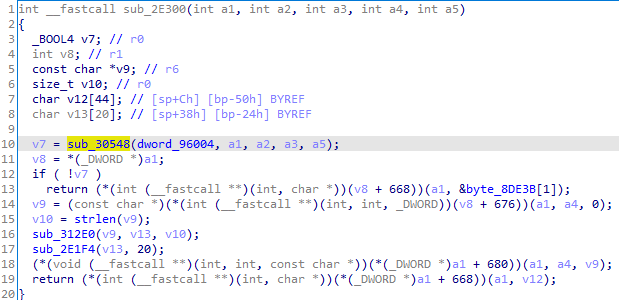
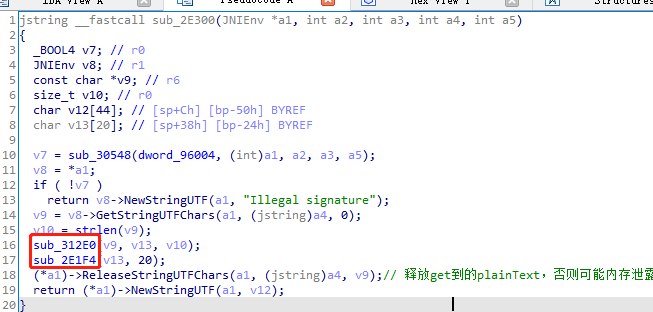
g跳转到地址0x30548,x交叉引用,进入sub_2E300函数,正是xPreAuthencode函数的位置0x2e301
y设置变量a1类型为JNIEnv*,其中sub_30548一定是签名校验函数,如果失败返回Illegal signature,这个逻辑在Unidbg模拟执行时传入的apk替我们处理了签名校验。那么加密逻辑一定存在于sub_312E0或者sub_2E1F4中。
sub_312E0第一个参数v9是字符串,第二个参数v13是字符数组,第三个参数v10是字符串长度,使用HookZz尝试对sub_312E0hook并打印参数
1
2
3
4
5
6
7
8
9
10
11
12
13
14
15
16
17
18
19
20
21
22
23
24
25
26
27
28
29
30
31
public void hook_312E0(){ // 获取HookZz对象 IHookZz hookZz = HookZz.getInstance(emulator); // 加载HookZz,支持inline hook,文档看https://github.com/jmpews/HookZz // enable hook hookZz.enable_arm_arm64_b_branch(); // 测试enable_arm_arm64_b_branch,可有可无 // hook MDStringOld hookZz.wrap(module.base + 0x312E0 + 1, new WrapCallback<HookZzArm32RegisterContext>() { // inline wrap导出函数 @Override // 方法执行前 public void preCall(Emulator<?> emulator, HookZzArm32RegisterContext ctx, HookEntryInfo info) { Pointer input = ctx.getPointerArg(0); byte[] inputhex = input.getByteArray(0, ctx.getR2Int()); // 打印第一个参数v9 字符串 Inspector.inspect(inputhex, "input"); // 将第二个参数v13放到context Pointer out = ctx.getPointerArg(1); ctx.push(out); }; @Override // 方法执行后 public void postCall(Emulator<?> emulator, HookZzArm32RegisterContext ctx, HookEntryInfo info) { Pointer output = ctx.pop(); // 打印第二个参数v13[20] byte[] outputhex = output.getByteArray(0, 20); Inspector.inspect(outputhex, "output"); } }); hookZz.disable_arm_arm64_b_branch(); }
sub_312E0第一个参数v9正是我们输入的字符串onejane,第二个参数返回就是加密的最终结果。进入sub_312E0函数
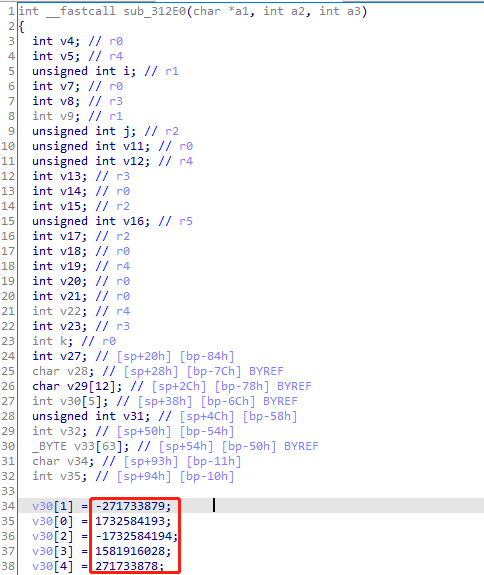
h将数值转为十六进制
1
2
3
4
5
v30[1] = 0xEFCDAB89; v30[0] = 0x67452301; v30[2] = 0x98BADCFE; v30[3] = 0x5E4A1F7C; v30[4] = 0x10325476;
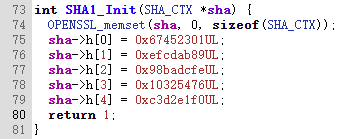
查看androidxref的sha1.c 源码,SHA1的魔数的第4个和第5个IV被改变了
我们尝试将sha1.py中的魔数成本例中的结果,很可惜结果并不是完全一致。
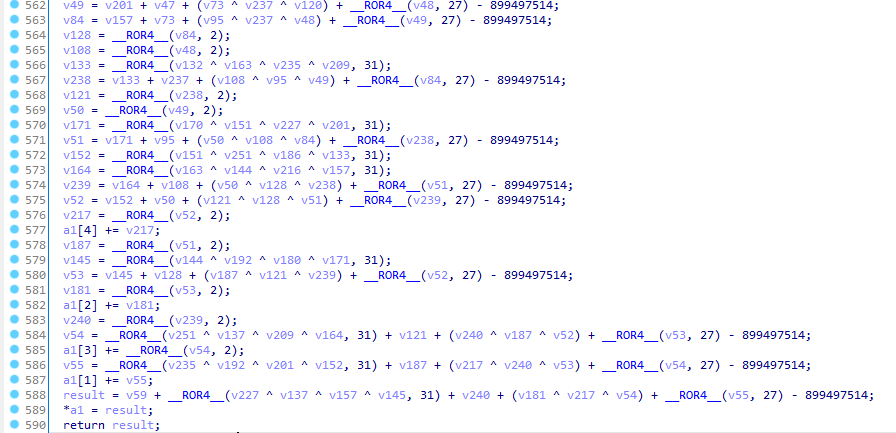
在函数sub_312E0中,n重命名入参,除了定义魔数之外,多处调用了sub_3151C函数,该函数591行,应该就是函数运算部分,加上sub_312E0共700多行,其中完成了对函数的魔改。
1
2
3
4
5
6
7
8
9
10
11
12
13
14
15
16
17
18
19
20
21
22
23
24
25
26
27
28
29
30
31
32
int __fastcall sub_312E0(char *input, int output, int length) { ... v30[1] = 0xEFCDAB89; v30[0] = 0x67452301; v30[2] = 0x98BADCFE; v30[3] = 0x5E4A1F7C; v30[4] = 0x10325476; v4 = 0; v32 = 0; v31 = 0; ... if ( (unsigned int)(v21 + 8) < 0x40 ) { v23 = 0; } else { v27 = 64 - v21; qmemcpy(&v33[v21], v29, 64 - v21); sub_3151C(v30, v33); v23 = v27; v21 = 0; } qmemcpy(&v33[v21], &v29[v23], 8 - v23); for ( k = 0; k != 20; ++k ) { *(_BYTE *)(output + k) = *(unsigned int *)((char *)v30 + (k & 0xFFFFFFFC)) >> (~(_BYTE)v22 & 0x18); v22 += 8; } return _stack_chk_guard - v35; }
一个哈希算法主要流程有数据填充、添加长度、初始化变量、数据处理、输出,我们可以尝试通过hook加密函数,观察入参判断填充部分是否发生改变。
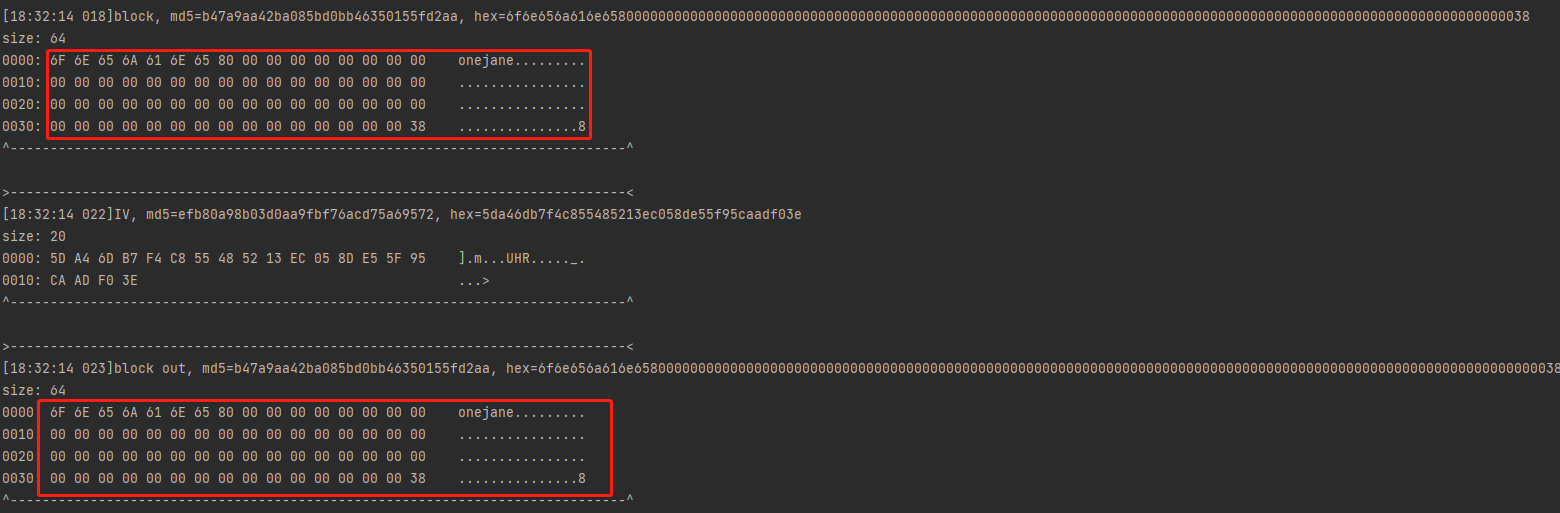
1
2
3
4
5
6
7
8
9
10
11
12
13
14
15
16
17
18
19
20
21
22
23
24
25
26
27
28
29
30
31
32
33
34
35
36
37
38
public void hook_3151C(){ // 获取HookZz对象 IHookZz hookZz = HookZz.getInstance(emulator); // 加载HookZz,支持inline hook,文档看https://github.com/jmpews/HookZz // enable hook hookZz.enable_arm_arm64_b_branch(); // 测试enable_arm_arm64_b_branch,可有可无 // hook MDStringOld hookZz.wrap(module.base + 0x3151C + 1, new WrapCallback<HookZzArm32RegisterContext>() { // inline wrap导出函数 @Override // 方法执行前 public void preCall(Emulator<?> emulator, HookZzArm32RegisterContext ctx, HookEntryInfo info) { // 类似于Frida args[0] Pointer input = ctx.getPointerArg(0); byte[] inputhex = input.getByteArray(0, 20); Inspector.inspect(inputhex, "IV"); Pointer text = ctx.getPointerArg(1); byte[] texthex = text.getByteArray(0, 64); Inspector.inspect(texthex, "block"); ctx.push(input); ctx.push(text); }; @Override // 方法执行后 public void postCall(Emulator<?> emulator, HookZzArm32RegisterContext ctx, HookEntryInfo info) { Pointer text = ctx.pop(); Pointer IV = ctx.pop(); byte[] IVhex = IV.getByteArray(0, 20); Inspector.inspect(IVhex, "IV"); byte[] outputhex = text.getByteArray(0, 64); Inspector.inspect(outputhex, "block out"); } }); hookZz.disable_arm_arm64_b_branch(); }
运算函数入参正常,都是填充的明文,不存在自定义填充或者对明文变换的可能,而出参直接返回结果,所以算法不是在标准流程后魔改,而是修改了算法本身。
SHA1和MD5采用了相同的结构,每512比特分组需要一轮运算,我们的输入长度不超过一个分组的长度,所以只用考虑一轮运算。一轮运算是80步,每隔20步是一种模式。
HookZz实现Inline hook
1
2
3
4
5
6
7
8
9
10
11
public void hook_315B0(){ IHookZz hookZz = HookZz.getInstance(emulator); hookZz.enable_arm_arm64_b_branch(); hookZz.instrument(module.base + 0x315B0 + 1, new InstrumentCallback<Arm32RegisterContext>() { @Override public void dbiCall(Emulator<?> emulator, Arm32RegisterContext ctx, HookEntryInfo info) { // 通过base+offset inline wrap内部函数,在IDA看到为sub_xxx那些 System.out.println("R2:"+ctx.getR2Long()); } }); }
但我们整体上需要进行十数次甚至数十次的inline hook,在这种情况下,用HookZz就略有些不方便,不妨试试Unidbg的console debugger。
样本中80步运算
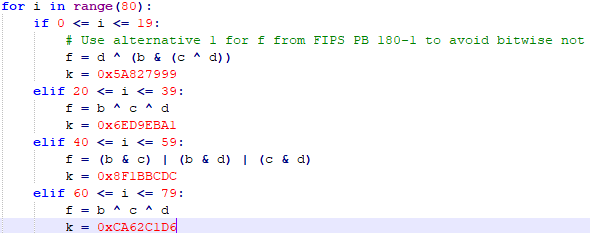
1
2
3
4
5
6
7
8
9
10
11
12
13
14
15
16
for t in range(80): if t <= 15: K = 0x5a827999 f = (b & c) ^ (~b & d) elif t <= 19: K = 0x6ed9eba1 f = b ^ c ^ d elif t <= 39: K = 0x8f1bbcdc f = (b & c) ^ (b & d) ^ (c & d) elif t <= 59: K = 0x5a827999 f = (b & c) ^ (~b & d) else: K = 0xca62c1d6 f = b ^ c ^ d
在标准流程中,20步切换一下K和非线性函数,一共4种模式,在样本中,每16步切换一下K和非线性函数,一种五种模式,但本质上依然是标准流程里的四个模式,因为一个模式用了两次。