篇幅有限 完整内容及源码关注公众号:ReverseCode,发送 冲
介绍 优点 高性能:底层C语言编写,内存数据库,通讯采用epoll非阻塞I/O多路复用机制
线程安全:单线程属于原子操作,高并发场景下保证数据安全。
redis 6.0多线程体现在网络协议解析。同步数据上,底层核心操作还是单线程的。
功能丰富:
数据结构:String,List,HashSet,SortedSet,GEO,BitMap,HyperLogLog
持久化:RDB持久化,AOF持久化,RDB-AOF混合持久化
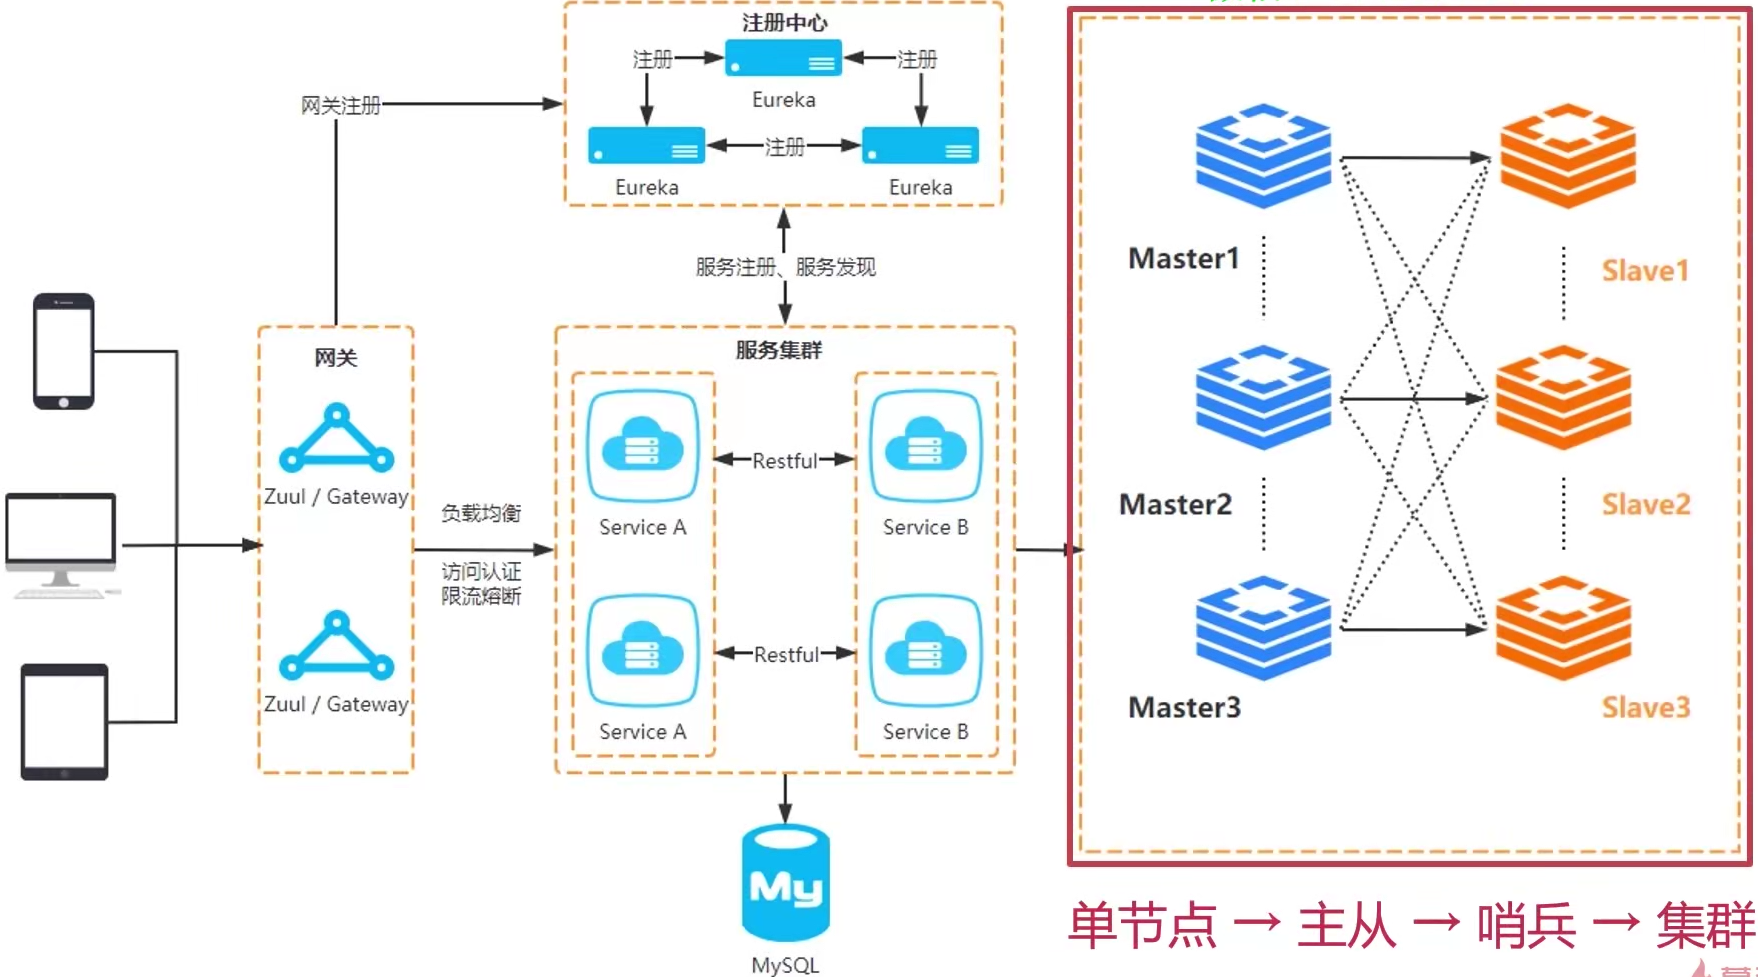
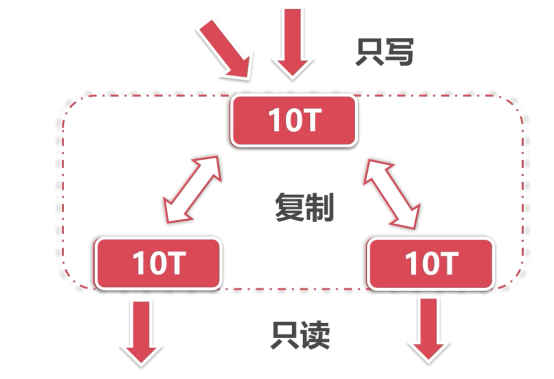
主从:Master-Slave应对高并发场景,一般单机QPS都在几万左右,如果需要支撑高并发,我们可以将Redis做成主从架构来支持读写分离。
主从架构 -> 读写分离 -> 支撑10万+读QPS
并发10w以内:单节点读11w qps 写8.1w qps
10w-20w:读写分离 主从模式,为了主节点高可用,提供哨兵监控,为了降低各节点存储数据压力,提供集群模式
哨兵:主节点不能出现单点故障,哨兵机制Sentinel监控主节点,自动主从切换
集群:数据存储压力通过cluster分片存储,模块化实现自定义实现个性化需求
场景 用户:注册,单点登录,签到
好友功能:关注,取消,互粉
排行榜:积分,热度排行榜
缓存:缓存餐厅数据
秒杀:预售,倒计时秒杀
订单:分布式锁
附近的人:地理位置搜索
Feed:添加,点赞,评论,列表
方案 Springboot整合Redis SpringCloud搭建微服务
系统响应慢:连接池优化,用合适的数据类型缓存,慢日志查询,BigKey处理
缓存异常:分布式锁,LRU淘汰算法,通过限流等处理缓存雪崩,穿透。
数据丢失不安全:主从复制数据一致性,RDB-AOF混合持久化,全量/部分同步
主从复制故障:哨兵监控,主观/客观下线
存储不够用:集群分片存储,集群内部原理,故障自动转移
服务器宕机:集群动态收缩,moved/ask转向,故障演示与恢复方案
底层原理:网络底层,事务处理,持久化原理,主从复制原理,哨兵机制,分片存储原理 底层算法:Sorted Set底层,Bitmap、Geo算法,数据过期淘汰算法,Leader选举流程,槽位定位算法,备份迁移及其算法 性能提升方案:Key与Value设计规范,避免BigKey,避免耗时操作,Pipline管道操作,连接池性能优化,子进程的开销与优化 故障解决方案:数据延迟,数据脏读,数据抖动,数据一致性,热点数据存储,RDB文件损坏 版本说明 Redis2.6 Redis2.8 可以用bind命令绑定多个IP地址 发布订阅添加了pub/sub Redis Sentienl第二版,相比于Redis2.6的RedisSentinel,已经变成生产可用 Redis3.0 添加Redis的分布式实现Redis Cluster Redis3.2 添加GEO相关功能 新List类型:quicklist Redis4.0 提供了模块系统,方便第三方开发者拓展 Redis的功能 提供了新的缓存剔除算法:LFU( Last Frequently Used),并对已有算法进行了优化。 提供了非阻塞del和 flushall/flushdb功能,有效解决删除了 bigKey可能造成的 Redis阻塞。 提供了RDB-AOF混合持久化格式,充分利用了AOF和RDB各自优势。 Redis5.0 新的 Stream数据类型。 客户经常连接和断开连接时性能更好。 Redis6.0 多线程IO,多线程部分只是用来处理网络数据的读写和协议解析,执行命令仍然是单线程。 支撑10w+qps 特点 内存数据库,速度快,也支持数据的持久化
Redis不仅仅攴持简单的 key-value类型的数据,同时还提供 Lists、 Hashes、Sets、 Sorted Sets等多种数据结构的存储。
Redis支持数据的备份( master-slave)与集群(分片存储),以及拥有哨兵监控机制。
支持事务
优势 性能极高- Redis能读的速度是110000次/s,写的速度是81000次/s
丰富的数据类型- Redis支持 Strings、 Lists、 Hashes、Sets、 Sorted Sets等数据类型操作。
原子操作- Redis的所有操作都是原子性的,同时 Redis还支持对几个操作合并后的原子性执行(事务)
丰富的特性- Redis还支持 publish/subscribe,通知,key过期等特性
主节点一旦故障,无法写入数据,哨兵机制解决,奇数哨兵>1/2重新选举主节点,避免网络波动误判 读写分离,每次写入都会复制,从节点也会拥有实际数据,每个节点都有大量重复数据,服务器压力大,集群分片解决
Redis、Memcached、Ehcache区别 Ehcache不能很好实现分布式项目缓存的同步共享的问题
Memcached数据类型单一
这三个中间件都可以应用于缓存,但目前市面上使用 Redis的场景会更多,更广泛,其原因是: Redis性能高、原子操作、支持多种数据类型,主从复制与哨兵监控,持久化操作等
Redis的高并发 官方的 bench-mark数据:测试完成了50个并发执行100000个请求,设置和获取的值是一个256字节字符串。结果:读的速度是110000次/s,写的速度是81000次/s,redis尽量少写多读,符合缓存的适用要求,单机 redis支撑万级,如果10万+可以采用主从复制的模式。
原理 Redis是纯内存数据库,没有磁盘IO,所以读取速度快。
Redis使用的是非阻塞I/O多路复用,减少了线程切换时上下文的切换和竞争。
Redis采用了单线程的模型,保证了每个操作的原子性,也减少了线程的上下文切换和竞争。
Redis存储结构多样化,不同的数据结构对数据存储进行了优化加快读取的速度。
Redis采用自己实现的事件分离器,效率比较高,内部采用非阻塞的执行方式,吞吐能力比较大
Redis的单线程 原因 不需要各种锁的性能消耗
单线程多进程集群方案
CPU消耗
优劣 单进程单线程优势
代码更清晰,处理逻辑更简单 不用去考虑各种锁的问题,不存在加锁释放锁操作,没有因为可能出现死锁而导致的性能消耗 不存在多进程或者多线程导致的切换而消耗CPU 单进程单线程弊端
无法发挥多核CPU性能,不过可以通过在单机开多个 Redis实例来完善 IO多路复用 Redis采用网络IO多路复用技术来保证在多连接的时候系统高吞吐量,提高快速的写入和读取能力。
环境 安装 1 2 3 4 5 6 7 8 9 10 11 12 13 14 15 16 17 18 19 20 21 22 23 24 25 26 27 28 29 30 31 32 wget -P /usr/local/src/ https://download.redis.io/releases/redis-6.0.9.tar.gz 下载redis-6.0.9 tar zxvf redis-6.0.9.tar.gz 解压 yum install -y gcc-c++ autoconf automake 安装redis-6.0.9必备依赖,升级gcc yum install -y centos-release-scl scl-utils-build yum install -y devtoolset-9-toolchain scl enable devtoolset-9 bash gcc -v cd redis-6.0.9/ && make 编译 mkdir -p /usr/local/redis make PREFIX=/usr/local/redis/ install 安装redis cd /usr/local/redis/bin/ ./redis-server 启动redis-server cp /usr/local/src/redis-6.0.9/redis.conf /usr/local/redis/bin/ vi redis.conf 打开守护进程daemonize yes ./redis-server redis.conf 后台运行redis vi /etc/systemd/system/redis.service [Unit] Description=redis-server After=network.target [Service] Type=forking ExecStart=/usr/local/redis/bin/redis-server /usr/local/redis/bin/redis.conf PrivateTmp=true [Install] WantedBy=multi-user.target systemctl daemon-reload systemctl start redis.service systemctl stop redis.service systemctl enable redis.service
配置 Redis支持很多的参数,但都有默认值。
daemonize 默认情况下, redis不是在后台运行的,如果需要在后台运行,把该项的值更改为yesbind 指定 Redis只接收来自于该IP地址的请求。port 监听端口,默认为6379。databases 设置数据库的个数,默认使用的数据库是0。save 设置 Redis进行数据库镜像的频率filename 镜像备份文件的文件名。dir 数据库镜像备份的文件放置的路径。requirepass 设置客户端连接后进行任何其他指定前需要使用的密码。maxclients 限制同时连接的客户数量。maxmemory 设置 redis能够使用的最大内存客户端 redis-cli 1 2 3 4 5 6 7 8 9 10 11 12 13 14 15 16 17 18 19 20 systemctl stop firewalld vi redis.conf bind 0.0.0.0 protected-mode no requirepass 123456 systemctl restart redis.service vim Vagrantfile config.vm.network "private_network", type: "dhcp" vagrant reload cd /usr/local/redis/bin/ ./redis-cli -h 172.28.128.3 -p 6379 -a 123456 ./redis-cli -a 123456 select 2 set username wj keys * info CPU info cluster info flushall
Redis Desktop Manager
jedis Redis的Java客户端也有很多:https://redis.io/clients#java,其中比较受欢迎的是 Jedis和 Lettuce。
Jedis在实现上是直接连接的 redis server,如果在多线程环境下是非线程安全的,这个时候只有使用连接池,为毎个Jedis实例增加物理连接,官方推荐 Lettuce的连接是基于Netty的,连接实例( StatefulRedisConnection)可以在多个线程间并发访问,应为StatefulRedisConnection是线程安全的,所以一个连接实例( StatefulRedisconnection)就可以满足多线程环境下的并发访问,当然这个也是可伸缩的设计,一个连接实例不够的情况也可以按需增加连接实例。 在 Spring Boot Data Redis1.X之前默认使用的是 Jedis,但目前最新版的修改成了 Lettuce。 之前公司使用 Jedis居多, Lettuce近两年在逐步上升,总的来讲 Jedis的性能会优于 Lettuce(因为它是直接操作 Redis)。 pom引入依赖
1 2 3 4 5 6 7 8 9 10 11 12 13 14 <dependencies> <!--jedis客户端--> <dependency> <groupId>redis.clients</groupId> <artifactId>jedis</artifactId> <version>3.3.0</version> </dependency> <dependency> <groupId>junit</groupId> <artifactId>junit</artifactId> <version>4.13</version> <scope>test</scope> </dependency> </dependencies>
测试
1 2 3 4 5 6 7 8 9 10 11 12 13 14 15 16 17 18 19 20 21 22 23 24 25 26 27 28 29 30 31 32 33 34 35 public class JedisTest { Jedis jedis = null; @Before public void testInit(){ jedis = new Jedis("172.28.128.3",6379); // jedis.auth("123456"); String pong = jedis.ping(); System.out.println(pong); } @Test public void testString(){ System.out.println(jedis.select(2)); System.out.println(jedis.set("username","onejane")); System.out.println(jedis.get("username")); jedis.set("user:name:1","j"); System.out.println(jedis.get("user:name:1")); } @Test public void testKeys(){ System.out.println(jedis.select(2)); System.out.println(jedis.keys("*")); System.out.println(jedis.flushAll()); } @After public void close(){ if(null != jedis){ jedis.close(); } } }
Jedis连接池优化
我们知道 Jedis是直接操作 Redis,当在并发量非常大的时候,那么 Jedis操作 Redis的连接数很有可能就会异常,因此为了提髙操作效率,引入连接池。
Jedis池化技术( JedisPool)在创建时初始化一些连接资源存储到连接池中,使用 Jadis连接资源时不需要创建,而是从连接池中获取一个资源进行 redis的操作,使用完毕后,不需要销毁该 jedis连接资源,而是将该资源归还给连接池,供其他请求使用。
1 2 3 4 5 6 7 8 9 10 11 12 13 14 15 16 17 18 19 20 21 22 23 24 25 26 public class JedisPoolConnectRedis { private static JedisPool jedisPool; static { // 创建连接池配置对象 JedisPoolConfig jedisPoolConfig = new JedisPoolConfig(); // 设置最大连接数 默认8 jedisPoolConfig.setMaxTotal(5); // 设置最大空闲数量 默认8 jedisPoolConfig.setMaxIdle(5); // 设置最少空闲数量 默认0 jedisPoolConfig.setMinIdle(0); // 设置等待时间 ms jedisPoolConfig.setMaxWaitMillis(100); // 初始化 JedisPool 对象 jedisPool = new JedisPool(jedisPoolConfig,"172.28.128.3",6379,100); // jedisPool = new JedisPool(jedisPoolConfig,"172.28.128.3",6379,100,"123456"); } /** * 获取jedis对象 * @return */ public static Jedis getJedis(){ return jedisPool.getResource(); } }
修改测试生成jedis对象
1 2 3 4 5 6 7 8 Jedis jedis = null; @Before public void testInit(){ jedis = JedisPoolConnectRedis.getJedis(); // jedis.auth("123456"); String pong = jedis.ping(); System.out.println(pong); }
spring-data pom添加依赖
1 2 3 4 5 6 7 8 9 10 11 12 13 14 15 16 17 18 19 20 21 22 23 24 25 26 27 28 29 30 31 32 33 34 <parent> <groupId>org.springframework.boot</groupId> <artifactId>spring-boot-starter-parent</artifactId> <version>2.3.10.RELEASE</version> <relativePath/> <!-- lookup parent from repository --> </parent> <dependencies> <dependency> <groupId>org.springframework.boot</groupId> <artifactId>spring-boot-starter-data-redis</artifactId> </dependency> <dependency> <groupId>org.springframework.boot</groupId> <artifactId>spring-boot-starter-web</artifactId> </dependency> <!--lettuce线程安全 打开commons-pool2依赖, spring.redis.jedis改成spring.redis.lettuce即可--> <!-- <dependency>--> <!-- <groupId>org.apache.commons</groupId>--> <!-- <artifactId>commons-pool2</artifactId>--> <!-- </dependency>--> <dependency> <groupId>org.springframework.boot</groupId> <artifactId>spring-boot-starter-test</artifactId> <scope>test</scope> <exclusions> <exclusion> <groupId>org.junit.vintage</groupId> <artifactId>junit-vintage-engine</artifactId> </exclusion> </exclusions> </dependency> </dependencies>
application.yml添加配置
1 2 3 4 5 6 7 8 9 10 11 12 13 14 15 16 17 18 19 20 spring: # redis配置 redis: host: 172.28.128.3 port: 6379 database: 5 # jedis连接池配置 jedis: pool: max-active: 8 max-idle: 8 min-idle: 0 max-wait: 1000 # password: 123456 # lettuce: # pool: # max-active: 8 # max-idle: 8 # min-idle: 0 # max-wait: 1000
启动类添加Redis序列化方法
1 2 3 4 5 6 7 8 9 10 11 12 13 14 15 16 17 18 19 20 @Bean public RedisTemplate<Object, Object> redisTemplate(RedisConnectionFactory redisConnectionFactory) { RedisTemplate<Object, Object> redisTemplate = new RedisTemplate<>(); redisTemplate.setConnectionFactory(redisConnectionFactory); // 使用Jackson2JsonRedisSerialize 替换默认序列化 Jackson2JsonRedisSerializer jackson2JsonRedisSerializer = new Jackson2JsonRedisSerializer(Object.class); ObjectMapper objectMapper = new ObjectMapper(); objectMapper.setVisibility(PropertyAccessor.ALL, JsonAutoDetect.Visibility.ANY); objectMapper.enableDefaultTyping(ObjectMapper.DefaultTyping.NON_FINAL); jackson2JsonRedisSerializer.setObjectMapper(objectMapper); // 设置value的序列化规则和 key的序列化规则 redisTemplate.setKeySerializer(new StringRedisSerializer()); redisTemplate.setValueSerializer(jackson2JsonRedisSerializer); redisTemplate.afterPropertiesSet(); return redisTemplate; }
测试
1 2 3 4 5 6 7 8 9 10 11 12 13 14 15 16 17 18 @SpringBootTest// 默认 (classes = {SpringdataDemoApplication.class}) class SpringdataDemoApplicationTests { @Autowired private RedisTemplate redisTemplate; @Test void testInit() { System.out.println(redisTemplate.getConnectionFactory().getConnection().ping()); } @Test public void testString(){ redisTemplate.opsForValue().set("username","onejane");; System.out.println(redisTemplate.opsForValue().get("username")); } }
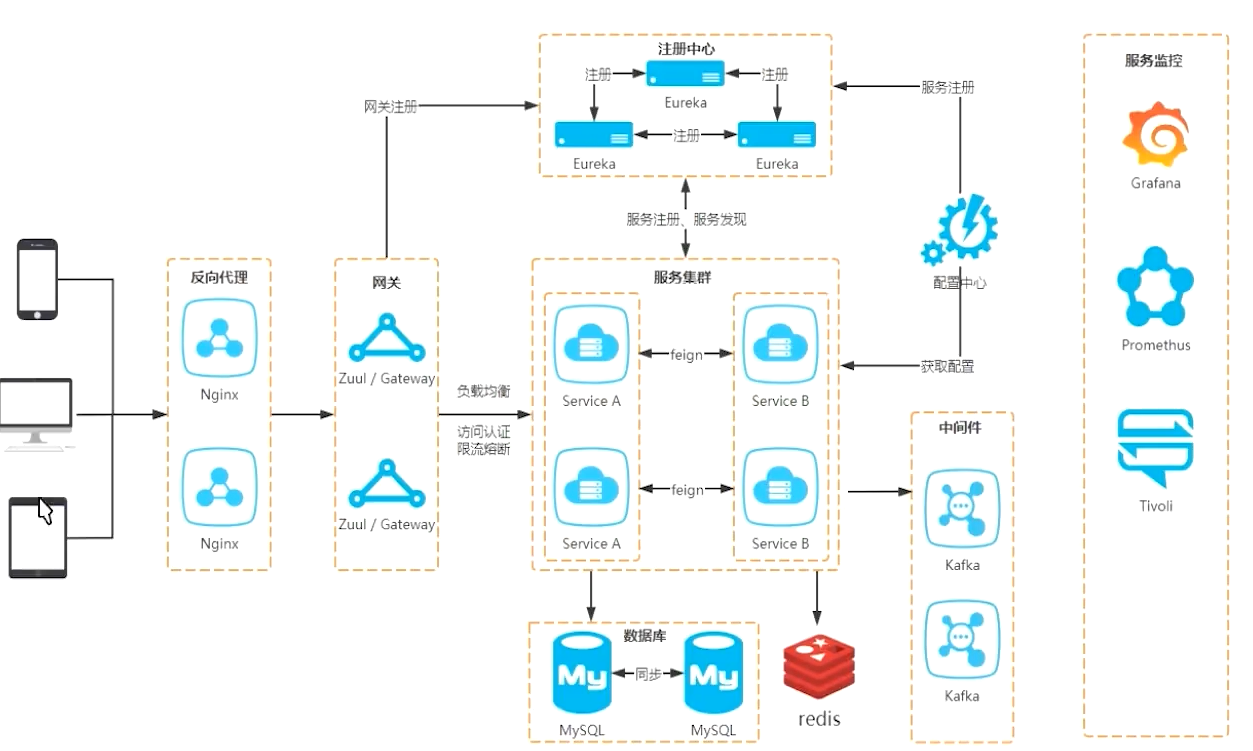
微服务架构
1 2 3 4 5 6 7 8 9 10 11 12 13 14 15 16 17 18 19 20 21 22 23 24 25 26 27 28 29 30 31 32 33 34 35 36 37 38 39 40 41 42 43 44 45 46 47 48 49 50 51 52 53 54 55 56 57 58 59 60 61 62 63 64 65 66 67 68 69 70 71 72 73 74 75 76 77 78 79 80 81 82 83 84 85 86 87 88 89 90 91 <properties> <spring-boot-version>2.3.5.RELEASE</spring-boot-version> <spring-cloud-version>Hoxton.SR8</spring-cloud-version> <lombok-version>1.18.16</lombok-version> <commons-lang-version>3.11</commons-lang-version> <mybatis-starter-version>2.1.3</mybatis-starter-version> <swagger-starter-version>2.1.5-RELEASE</swagger-starter-version> <hutool-version>5.4.7</hutool-version> <guava-version>20.0</guava-version> <maven.compiler.source>1.8</maven.compiler.source> <maven.compiler.target>1.8</maven.compiler.target> <project.build.sourceEncoding>UTF-8</project.build.sourceEncoding> </properties> <!-- 集中定义依赖,不引入 --> <dependencyManagement> <dependencies> <!-- spring boot 依赖 --> <dependency> <groupId>org.springframework.boot</groupId> <artifactId>spring-boot-dependencies</artifactId> <version>${spring-boot-version}</version> <type>pom</type> <scope>import</scope> </dependency> <!-- spring cloud 依赖 --> <dependency> <groupId>org.springframework.cloud</groupId> <artifactId>spring-cloud-dependencies</artifactId> <version>${spring-cloud-version}</version> <type>pom</type> <scope>import</scope> </dependency> <!-- lombok 依赖 --> <dependency> <groupId>org.projectlombok</groupId> <artifactId>lombok</artifactId> <version>${lombok-version}</version> </dependency> <!-- common-lang3 依赖 --> <dependency> <groupId>org.apache.commons</groupId> <artifactId>commons-lang3</artifactId> <version>${commons-lang-version}</version> </dependency> <!-- mybatis 依赖 --> <dependency> <groupId>org.mybatis.spring.boot</groupId> <artifactId>mybatis-spring-boot-starter</artifactId> <version>${mybatis-starter-version}</version> </dependency> <!-- swagger 依赖 --> <dependency> <groupId>com.battcn</groupId> <artifactId>swagger-spring-boot-starter</artifactId> <version>${swagger-starter-version}</version> </dependency> <!-- mysql 依赖 --> <dependency> <groupId>mysql</groupId> <artifactId>mysql-connector-java</artifactId> <scope>runtime</scope> </dependency> <!-- hutool 依赖 --> <dependency> <groupId>cn.hutool</groupId> <artifactId>hutool-all</artifactId> <version>${hutool-version}</version> </dependency> <!-- guava 依赖 --> <dependency> <groupId>com.google.guava</groupId> <artifactId>guava</artifactId> <version>${guava-version}</version> </dependency> </dependencies> </dependencyManagement> <!-- 集中定义项目所需插件 --> <build> <pluginManagement> <plugins> <!-- spring boot maven 项目打包插件 --> <plugin> <groupId>org.springframework.boot</groupId> <artifactId>spring-boot-maven-plugin</artifactId> </plugin> </plugins> </pluginManagement> </build>
注册中心ms-registry 1 2 3 4 5 6 <dependencies> <dependency> <groupId>org.springframework.cloud</groupId> <artifactId>spring-cloud-starter-netflix-eureka-server</artifactId> </dependency> </dependencies>
配置
1 2 3 4 5 6 7 8 9 10 11 12 13 14 server: port: 8080 spring: application: name: ms-registry # 配置 Eureka Server 注册中心 eureka: client: register-with-eureka: false fetch-registry: false service-url: defaultZone: http://localhost:8080/eureka/
启动类添加注册中心注解@EnableEurekaServer
访问http://127.0.0.1:8080/ 查看注册到eureka的实例
网关ms-gateway 1 2 3 4 5 6 7 8 9 10 <dependencies> <dependency> <groupId>org.springframework.cloud</groupId> <artifactId>spring-cloud-starter-gateway</artifactId> </dependency> <dependency> <groupId>org.springframework.cloud</groupId> <artifactId>spring-cloud-starter-netflix-eureka-client</artifactId> </dependency> </dependencies>
配置
1 2 3 4 5 6 7 8 9 10 11 12 13 14 15 16 17 18 19 20 21 22 23 24 25 26 27 server: port: 80 spring: application: name: ms-gateway cloud: gateway: discovery: locator: enabled: true # 开启配置注册中心进行路由功能 lower-case-service-id: true # 将服务名称转小写 routes: - id: ms-diners uri: lb://ms-diners predicates: - Path=/hello/** # 配置 Eureka Server 注册中心 eureka: instance: # 注册中心实例以ip显示 prefer-ip-address: true instance-id: ${spring.cloud.client.ip-address}:${server.port} client: service-url: defaultZone: http://localhost:8080/eureka/
食客ms-diners 1 2 3 4 5 6 7 8 9 10 <dependencies> <dependency> <groupId>org.springframework.cloud</groupId> <artifactId>spring-cloud-starter-netflix-eureka-client</artifactId> </dependency> <dependency> <groupId>org.springframework.boot</groupId> <artifactId>spring-boot-starter-web</artifactId> </dependency> </dependencies>
配置
1 2 3 4 5 6 7 8 9 10 11 12 13 14 15 server: port: 8081 spring: application: name: ms-diners # 配置 Eureka Server 注册中心 eureka: instance: prefer-ip-address: true instance-id: ${spring.cloud.client.ip-address}:${server.port} client: service-url: defaultZone: http://localhost:8080/eureka/
Controller
1 2 3 4 5 6 7 8 9 10 @RestController @RequestMapping("hello") public class HelloController { @GetMapping public String hello(String name) { return "hello " + name; } }
直接访问 http://localhost:8081/hello?name=redis http://localhost/hello?name=redis