爬虫基础篇之IP代理池

篇幅有限

完整内容及源码关注公众号:ReverseCode,发送

代理池介绍

由众多ip组成提供多个稳定可用代理IP的ip池。

当我们做爬虫时,最常见的反爬手段就是IP反爬,当同一个IP访问网站超出频控限制,将会被限制访问,那么代理IP池应运而生。资金充足的情况下个人建议还是付费ip代理池,比较免费ip时效性低,且难以维护。

本文将介绍通过requests库多线程抓取多个免费代理ip网站数据落库mongo后并动态维护保证IP高度可用,以API形式暴露接口获取代理IP的解决方案。

爬取流程

代理池设计思路图解

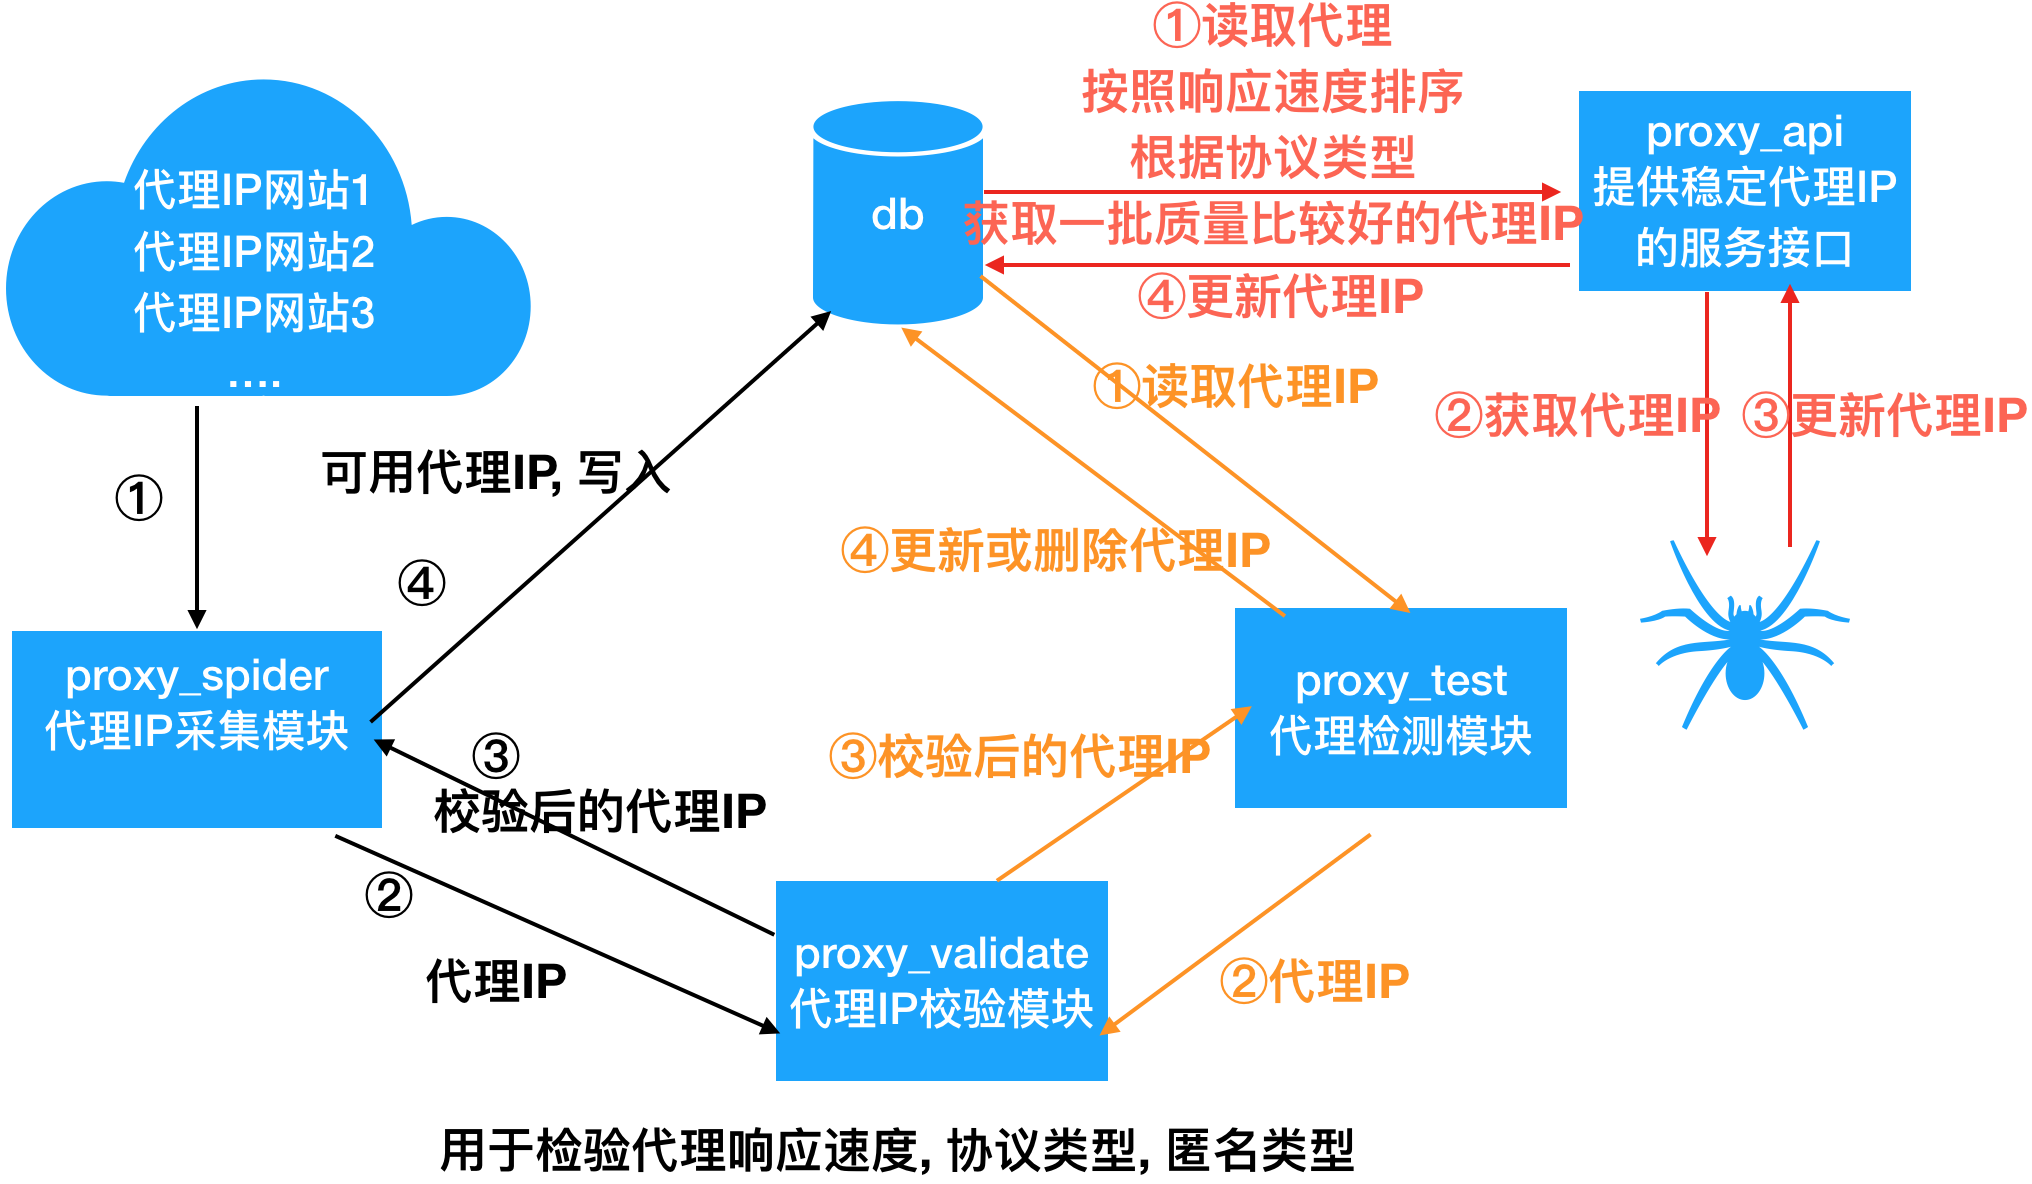
  • 代理IP采集模块: 采集代理IP -> 检测代理IP ->如果不可用用, 直接过滤掉, 如果可用, 指定默认分数 -> 存入数据库中
  • 代理IP检测模块: 从数据库中获取所有代理IP -> 检测代理IP -> 如果代理IP不可用用, 就把分数-1, 如果分数为0从数据库中删除, 否则更新数据库, 如果代理IP可用, 恢复为默认分值,更新数据库
  • 代理API模块:从数据库中高可用的代理IP给爬虫使用;

模块

爬虫模块

从代理IP网站上采集代理IP ,对抓取的ip进行校验(获取代理响应速度, 协议类型, 匿名类型), 并存储到数据库中。

校验模块

网站上所标注的响应速度,协议类型和匿名类型是不准确的,通过httpbin.org进行检测,获取指定代理的响应速度, 支持的协议以及匿名程度。

数据库模块

使用MongoDB来存储代理IP并实现对代理IP的增删改查操作。

检测模块

定时从数据库读取所有的代理IP,对代理IP进行逐一检测, 开启多个协程, 以提高检测速度,如果该代理不可用, 就让这个代理分数-1, 当代理的分数到0了, 就删除该代理; 如果检测到代理可用就恢复为满分。

API模块

根据协议类型和域名获取多个随机的高质量代理IP,根据代理IP不可用域名, 告诉代理池这个代理IP在该域名下不可用, 下次获取这个域名的代理IP时候, 就不会再获取这个代理IP了, 从而保证代理IP高可用性。

其他模块

数据模型

代理IP的数据模型, 用于封装代理IP相关信息, 比如ip,端口号, 响应速度, 协议类型, 匿名类型,分数等。

程序入口

代理池提供一个统一的启动入口

工具模块

  • 日志模块: 用于记录日志信息

  • http模块: 用于获取随机User-Agent的请求头

配置文件

用于默认代理的分数, 配置日志格式, 文件, 启动的爬虫, 检验的间隔时间 等。

实战

思路1:依据流程图,逐步实现各个模块,当需要依赖其他模块时,暂停当前模块,开发其他模块功能,实现完毕再回头开发联调。

思路2:先实现不依赖其他模块的基础模块,再逐步实现具体的功能模块,比如爬虫模块, 检测模块, 代理API模块。

这里我们选择思路2实现爬虫代理IP池,因为思路1适合个人完成,不适合分工合作,且不易维护,思路跳来跳去,必须逻辑清晰。

数据模型domain

settings.py 中 定义MAX_SCORE = 50, 表示代理IP的默认最高分数

1
2
3
4
5
6
7
8
9
10
11
12
13
14
15
16
17
18
19
20
21
22
23
24
25
class Proxy(object):

def __init__(self, ip, port, protocol=-1, nick_type=-1, speed=-1, area=None, score=MAX_SCORE, disable_domains=[]):
# ip: 代理的IP地址
self.ip = ip
# port: 代理IP的端口号
self.port = port
# protocol: 代理IP支持的协议类型, http是0, https是1, https和http都支持是2,-1不可用
self.protocol = protocol
# nick_type: 代理IP的匿名程度, 高匿: 0, 匿名: 1, 透明: 2
self.nick_type = nick_type
# speed: 代理IP的响应速度, 单位s
self.speed = speed
# area: 代理IP所在地区
self.area = area
# score: 代理IP的评分, 用于衡量代理的可用性;
self.score = score
# 默认分值可以通过配置文件进行配置.在进行代理可用性检查的时候, 每遇到一次请求失败就减1份, 减到0的时候从池中删除.如果检查代理可用, 就恢复默认分值
# disable_domains: 不可用域名列表, 有些代理IP在某些域名下不可用, 但是在其他域名下可用
self.disable_domains = disable_domains

# 3. 提供 __str__ 方法, 返回数据字符串
def __str__(self):
# 返回数据字符串
return str(self.__dict__)

日志模块log

导入settings中日志配置信息,如下
LOG_LEVEL = logging.DEBUG # 默认等级
LOG_FMT = ‘%(asctime)s %(filename)s [line:%(lineno)d] %(levelname)s: %(message)s’ # 默认日志格式
LOG_DATEFMT = ‘%Y-%m-%d %H:%M:%S’ # 默认时间格式
LOG_FILENAME = ‘log.log’ # 默认日志文件名称

1
2
3
4
5
6
7
8
9
10
11
12
13
14
15
16
17
18
19
20
21
22
23
24
25
26
27
28
29
30
31
32
33
34
35
36
37
38
39
40
class Logger(object):

def __init__(self):
# 1. 获取一个logger对象
self._logger = logging.getLogger()
# 2. 设置format对象
self.formatter = logging.Formatter(fmt=LOG_FMT,datefmt=LOG_DATEFMT)
# 3. 设置日志输出
# 3.1 设置文件日志模式
self._logger.addHandler(self._get_file_handler(LOG_FILENAME))
# 3.2 设置终端日志模式
self._logger.addHandler(self._get_console_handler())
# 4. 设置日志等级
self._logger.setLevel(LOG_LEVEL)

def _get_file_handler(self, filename):
'''返回一个文件日志handler'''
# 1. 获取一个文件日志handler
filehandler = logging.FileHandler(filename=filename,encoding="utf-8")
# 2. 设置日志格式
filehandler.setFormatter(self.formatter)
# 3. 返回
return filehandler

def _get_console_handler(self):
'''返回一个输出到终端日志handler'''
# 1. 获取一个输出到终端日志handler
console_handler = logging.StreamHandler(sys.stdout)
# 2. 设置日志格式
console_handler.setFormatter(self.formatter)
# 3. 返回handler
return console_handler

@property
def logger(self):
return self._logger

# 初始化并配一个logger对象,达到单例的
# 使用时,直接导入logger就可以使用
logger = Logger().logger

请求模块http

返回随机请求头和随机User-Agent,对抗反爬

1
2
3
4
5
6
7
8
9
10
11
12
13
14
15
16
17
18
19
20
21
22
23
24
25
26
27
28
29
30
31
32
33
34
35
36
37
38
39
40
41
42
43
44
45
46
47
48
49
#   1. 准备User-Agent的列表
USER_AGENTS = [
"Mozilla/4.0 (compatible; MSIE 6.0; Windows NT 5.1; SV1; AcooBrowser; .NET CLR 1.1.4322; .NET CLR 2.0.50727)",
"Mozilla/4.0 (compatible; MSIE 7.0; Windows NT 6.0; Acoo Browser; SLCC1; .NET CLR 2.0.50727; Media Center PC 5.0; .NET CLR 3.0.04506)",
"Mozilla/4.0 (compatible; MSIE 7.0; AOL 9.5; AOLBuild 4337.35; Windows NT 5.1; .NET CLR 1.1.4322; .NET CLR 2.0.50727)",
"Mozilla/5.0 (Windows; U; MSIE 9.0; Windows NT 9.0; en-US)",
"Mozilla/5.0 (compatible; MSIE 9.0; Windows NT 6.1; Win64; x64; Trident/5.0; .NET CLR 3.5.30729; .NET CLR 3.0.30729; .NET CLR 2.0.50727; Media Center PC 6.0)",
"Mozilla/5.0 (compatible; MSIE 8.0; Windows NT 6.0; Trident/4.0; WOW64; Trident/4.0; SLCC2; .NET CLR 2.0.50727; .NET CLR 3.5.30729; .NET CLR 3.0.30729; .NET CLR 1.0.3705; .NET CLR 1.1.4322)",
"Mozilla/4.0 (compatible; MSIE 7.0b; Windows NT 5.2; .NET CLR 1.1.4322; .NET CLR 2.0.50727; InfoPath.2; .NET CLR 3.0.04506.30)",
"Mozilla/5.0 (Windows; U; Windows NT 5.1; zh-CN) AppleWebKit/523.15 (KHTML, like Gecko, Safari/419.3) Arora/0.3 (Change: 287 c9dfb30)",
"Mozilla/5.0 (X11; U; Linux; en-US) AppleWebKit/527+ (KHTML, like Gecko, Safari/419.3) Arora/0.6",
"Mozilla/5.0 (Windows; U; Windows NT 5.1; en-US; rv:1.8.1.2pre) Gecko/20070215 K-Ninja/2.1.1",
"Mozilla/5.0 (Windows; U; Windows NT 5.1; zh-CN; rv:1.9) Gecko/20080705 Firefox/3.0 Kapiko/3.0",
"Mozilla/5.0 (X11; Linux i686; U;) Gecko/20070322 Kazehakase/0.4.5",
"Mozilla/5.0 (X11; U; Linux i686; en-US; rv:1.9.0.8) Gecko Fedora/1.9.0.8-1.fc10 Kazehakase/0.5.6",
"Mozilla/5.0 (Windows NT 6.1; WOW64) AppleWebKit/535.11 (KHTML, like Gecko) Chrome/17.0.963.56 Safari/535.11",
"Mozilla/5.0 (Macintosh; Intel Mac OS X 10_7_3) AppleWebKit/535.20 (KHTML, like Gecko) Chrome/19.0.1036.7 Safari/535.20",
"Opera/9.80 (Macintosh; Intel Mac OS X 10.6.8; U; fr) Presto/2.9.168 Version/11.52",
"Mozilla/5.0 (Windows NT 6.1; WOW64) AppleWebKit/536.11 (KHTML, like Gecko) Chrome/20.0.1132.11 TaoBrowser/2.0 Safari/536.11",
"Mozilla/5.0 (Windows NT 6.1; WOW64) AppleWebKit/537.1 (KHTML, like Gecko) Chrome/21.0.1180.71 Safari/537.1 LBBROWSER",
"Mozilla/5.0 (compatible; MSIE 9.0; Windows NT 6.1; WOW64; Trident/5.0; SLCC2; .NET CLR 2.0.50727; .NET CLR 3.5.30729; .NET CLR 3.0.30729; Media Center PC 6.0; .NET4.0C; .NET4.0E; LBBROWSER)",
"Mozilla/4.0 (compatible; MSIE 6.0; Windows NT 5.1; SV1; QQDownload 732; .NET4.0C; .NET4.0E; LBBROWSER)",
"Mozilla/5.0 (Windows NT 6.1; WOW64) AppleWebKit/535.11 (KHTML, like Gecko) Chrome/17.0.963.84 Safari/535.11 LBBROWSER",
"Mozilla/4.0 (compatible; MSIE 7.0; Windows NT 6.1; WOW64; Trident/5.0; SLCC2; .NET CLR 2.0.50727; .NET CLR 3.5.30729; .NET CLR 3.0.30729; Media Center PC 6.0; .NET4.0C; .NET4.0E)",
"Mozilla/5.0 (compatible; MSIE 9.0; Windows NT 6.1; WOW64; Trident/5.0; SLCC2; .NET CLR 2.0.50727; .NET CLR 3.5.30729; .NET CLR 3.0.30729; Media Center PC 6.0; .NET4.0C; .NET4.0E; QQBrowser/7.0.3698.400)",
"Mozilla/4.0 (compatible; MSIE 6.0; Windows NT 5.1; SV1; QQDownload 732; .NET4.0C; .NET4.0E)",
"Mozilla/4.0 (compatible; MSIE 7.0; Windows NT 5.1; Trident/4.0; SV1; QQDownload 732; .NET4.0C; .NET4.0E; 360SE)",
"Mozilla/4.0 (compatible; MSIE 6.0; Windows NT 5.1; SV1; QQDownload 732; .NET4.0C; .NET4.0E)",
"Mozilla/4.0 (compatible; MSIE 7.0; Windows NT 6.1; WOW64; Trident/5.0; SLCC2; .NET CLR 2.0.50727; .NET CLR 3.5.30729; .NET CLR 3.0.30729; Media Center PC 6.0; .NET4.0C; .NET4.0E)",
"Mozilla/5.0 (Windows NT 5.1) AppleWebKit/537.1 (KHTML, like Gecko) Chrome/21.0.1180.89 Safari/537.1",
"Mozilla/5.0 (Windows NT 6.1; WOW64) AppleWebKit/537.1 (KHTML, like Gecko) Chrome/21.0.1180.89 Safari/537.1",
"Mozilla/5.0 (iPad; U; CPU OS 4_2_1 like Mac OS X; zh-cn) AppleWebKit/533.17.9 (KHTML, like Gecko) Version/5.0.2 Mobile/8C148 Safari/6533.18.5",
"Mozilla/5.0 (Windows NT 6.1; Win64; x64; rv:2.0b13pre) Gecko/20110307 Firefox/4.0b13pre",
"Mozilla/5.0 (X11; Ubuntu; Linux x86_64; rv:16.0) Gecko/20100101 Firefox/16.0",
"Mozilla/5.0 (Windows NT 6.1; WOW64) AppleWebKit/537.11 (KHTML, like Gecko) Chrome/23.0.1271.64 Safari/537.11",
"Mozilla/5.0 (X11; U; Linux x86_64; zh-CN; rv:1.9.2.10) Gecko/20100922 Ubuntu/10.10 (maverick) Firefox/3.6.10"
]

# 实现一个方法, 获取随机User-Agent的请求头
def get_request_headers():
headers = {
'User-Agent': random.choice(USER_AGENTS),
'Accept': 'text/html,application/xhtml+xml,application/xml;q=0.9,*/*;q=0.8',
'Accept-Language': 'en-US,en;q=0.5',
'Connection': 'keep-alive',
'Accept-Encoding': 'gzip, deflate',
}

return headers

校验模块httpbin_validator

  • 检查代理IP速度 和 匿名程度;
    • 代理IP速度: 就是从发送请求到获取响应的时间间隔
    • 匿名程度检查:
      • http://httpbin.org/gethttps://httpbin.org/get 发送请求
      • 如果 响应的origin 中有’,’分割的两个IP就是透明代理IP
      • 如果 响应的headers 中包含 Proxy-Connection 说明是匿名代理IP
      • 否则就是高匿代理IP
  • 检查代理IP协议类型
    • 如果 http://httpbin.org/get 发送请求可以成功, 说明支持http协议
    • 如果 https://httpbin.org/get 发送请求可以成功, 说明支持https协议
1
2
3
4
5
6
7
8
9
10
11
12
13
14
15
16
17
18
19
20
21
22
23
24
25
26
27
28
29
30
31
32
33
34
35
36
37
38
39
40
41
42
43
44
45
46
47
48
49
50
51
52
53
54
55
56
57
58
59
60
61
62
63
64
65
66
67
68
69
70
71
72
73
74
75
76
77
78
def check_proxy(proxy):
"""
用于检查指定 代理IP 响应速度, 匿名程度, 支持协议类型
:param proxy: 代理IP模型对象
:return: 检查后的代理IP模型对象
"""

# 准备代理IP字典
proxies = {
'http':'http://{}:{}'.format(proxy.ip, proxy.port),
'https':'https://{}:{}'.format(proxy.ip, proxy.port),
}

# 测试该代理IP
http, http_nick_type, http_speed = __check_http_proxies(proxies)
https, https_nick_type, https_speed = __check_http_proxies(proxies, False)
# 代理IP支持的协议类型, http是0, https是1, https和http都支持是2
if http and https:
proxy.protocol = 2
proxy.nick_type = http_nick_type
proxy.speed = http_speed
elif http:
proxy.protocol = 0
proxy.nick_type = http_nick_type
proxy.speed = http_speed
elif https:
proxy.protocol = 1
proxy.nick_type = https_nick_type
proxy.speed = https_speed
else:
proxy.protocol = -1
proxy.nick_type = -1
proxy.speed = -1

return proxy


def __check_http_proxies(proxies, is_http=True):
# 匿名类型: 高匿: 0, 匿名: 1, 透明: 2
nick_type = -1
# 响应速度, 单位s
speed = -1

if is_http:
test_url = 'http://httpbin.org/get'
else:
test_url = 'https://httpbin.org/get'

try:
# 获取开始时间
start = time.time()
# 发送请求, 获取响应数据
response = requests.get(test_url, headers=get_request_headers(), proxies=proxies, timeout=TEST_TIMEOUT)

if response.ok:
# 计算响应速度
speed = round(time.time() - start, 2)
# 匿名程度
# 把响应的json字符串, 转换为字典
dic = json.loads(response.text)
# 获取来源IP: origin
origin = dic['origin']
proxy_connection = dic['headers'].get('Proxy-Connection', None)
if ',' in origin:
# 1. 如果 响应的origin 中有','分割的两个IP就是透明代理IP
nick_type = 2
elif proxy_connection:
# 2. 如果 响应的headers 中包含 Proxy-Connection 说明是匿名代理IP
nick_type = 1
else:
# 3. 否则就是高匿代理IP
nick_type = 0

return True, nick_type, speed
return False, nick_type, speed
except Exception as ex:
# logger.exception(ex)
return False, nick_type, speed

数据库模块mongo_pool

  1. init中, 建立数据连接, 获取要操作的集合, 在 del 方法中关闭数据库连接
  2. 提供基础的增删改查功能
  3. 提供代理API模块使用的功能
  4. 实现查询功能: 根据条件进行查询, 可以指定查询数量, 先分数降序, 速度升序排, 保证优质的代理IP在上面.
  5. 实现根据协议类型 和 要访问网站的域名, 获取代理IP列表
  6. 实现根据协议类型 和 要访问网站的域名, 随机获取一个代理IP
  7. 实现把指定域名添加到指定IP的disable_domain列表中.
1
2
3
4
5
6
7
8
9
10
11
12
13
14
15
16
17
18
19
20
21
22
23
24
25
26
27
28
29
30
31
32
33
34
35
36
37
38
39
40
41
42
43
44
45
46
47
48
49
50
51
52
53
54
55
56
57
58
59
60
61
62
63
64
65
66
67
68
69
70
71
72
73
74
75
76
77
78
79
80
81
82
83
84
85
86
87
88
89
90
91
92
93
94
95
96
97
98
99
100
101
102
103
104
105
106
107
108
109
110
111
112
113
114
115
116
117
118
119
120
121
class MongoPool(object):

def __init__(self):
# 1.1. 在init中, 建立数据连接
self.client = MongoClient(MONGO_URL)
# 1.2 获取要操作的集合
self.proxies = self.client['proxies_pool']['proxies']

def __del__(self):
# 1.3 关闭数据库连接
self.client.close()

def insert_one(self, proxy):
"""2.1 实现插入功能"""

count = self.proxies.count_documents({'_id': proxy.ip})
if count == 0:
# 我们使用proxy.ip作为, MongoDB中数据的主键: _id
dic = proxy.__dict__
dic['_id'] = proxy.ip
self.proxies.insert_one(dic)
logger.info('插入新的代理:{}'.format(proxy))
else:
logger.warning("已经存在的代理:{}".format(proxy))


def update_one(self, proxy):
"""2.2 实现修改该功能"""
self.proxies.update_one({'_id': proxy.ip}, {'$set':proxy.__dict__})

def delete_one(self, proxy):
"""2.3 实现删除代理: 根据代理的IP删除代理"""
self.proxies.delete_one({'_id': proxy.ip})
logger.info("删除代理IP: {}".format(proxy))

def find_all(self):
"""2.4 查询所有代理IP的功能"""
cursor = self.proxies.find()
for item in cursor:
# 删除_id这个key
item.pop('_id')
proxy = Proxy(**item)
yield proxy

def find(self, conditions={}, count=0):
"""
3.1 实现查询功能: 根据条件进行查询, 可以指定查询数量, 先分数降序, 速度升序排, 保证优质的代理IP在上面.
:param conditions: 查询条件字典
:param count: 限制最多取出多少个代理IP
:return: 返回满足要求代理IP(Proxy对象)列表
"""
cursor = self.proxies.find(conditions, limit=count).sort([
('score', pymongo.DESCENDING),('speed', pymongo.ASCENDING)
])

# 准备列表, 用于存储查询处理代理IP
proxy_list = []
# 遍历 cursor
for item in cursor:
item.pop('_id')
proxy = Proxy(**item)
proxy_list.append(proxy)

# 返回满足要求代理IP(Proxy对象)列表
return proxy_list

def get_proxies(self, protocol=None, domain=None, count=0, nick_type=0):
"""
3.2 实现根据协议类型 和 要访问网站的域名, 获取代理IP列表
:param protocol: 协议: http, https
:param domain: 域名: jd.com
:param count: 用于限制获取多个代理IP, 默认是获取所有的
:param nick_type: 匿名类型, 默认, 获取高匿的代理IP
:return: 满足要求代理IP的列表
"""
# 定义查询条件
conditions = {'nick_type': nick_type}
# 根据协议, 指定查询条件
if protocol is None:
# 如果没有传入协议类型, 返回支持http和https的代理IP
conditions['protocol'] = 2
elif protocol.lower() == 'http':
conditions['protocol'] = {'$in': [0, 2]}
else:
conditions['protocol'] = {'$in': [1, 2]}

if domain:
conditions['disable_domains'] = {'$nin': [domain]}


# 满足要求代理IP的列表
return self.find(conditions, count=count)

def random_proxy(self, protocol=None, domain=None, count=0, nick_type=0):
"""
3.3 实现根据协议类型 和 要访问网站的域名, 随机获取一个代理IP
:param protocol: 协议: http, https
:param domain: 域名: jd.com
:param count: 用于限制获取多个代理IP, 默认是获取所有的
:param nick_type: 匿名类型, 默认, 获取高匿的代理IP
:return: 满足要求的随机的一个代理IP(Proxy对象)
"""
proxy_list = self.get_proxies(protocol=protocol, domain=domain, count=count, nick_type=nick_type)
# 从proxy_list列表中, 随机取出一个代理IP返回
return random.choice(proxy_list)


def disable_domain(self, ip, domain):
"""
3.4 实现把指定域名添加到指定IP的disable_domain列表中.
:param ip: IP地址
:param domain: 域名
:return: 如果返回True, 就表示添加成功了, 返回False添加失败了
"""
# print(self.proxies.count_documents({'_id': ip, 'disable_domains':domain}))

if self.proxies.count_documents({'_id': ip, 'disable_domains':domain}) == 0:
# 如果disable_domains字段中没有这个域名, 才添加
self.proxies.update_one({'_id':ip}, {'$push': {'disable_domains': domain}})
return True
return False

爬虫模块base_spider

  1. 在base_spider.py文件中,定义一个BaseSpider类, 继承object
  2. 提供三个类成员变量:
    • urls: 代理IP网址的URL的列表
    • group_xpath: 分组XPATH, 获取包含代理IP信息标签列表的XPATH
    • detail_xpath: 组内XPATH, 获取代理IP详情的信息XPATH, 格式为: {‘ip’:’xx’, ‘port’:’xx’, ‘area’:’xx’}
  3. 提供初始方法, 传入爬虫URL列表, 分组XPATH, 详情(组内)XPATH
  4. 对外提供一个获取代理IP的方法
    • 遍历URL列表, 获取URL
    • 根据发送请求, 获取页面数据
    • 解析页面, 提取数据, 封装为Proxy对象
    • 返回Proxy对象列表
1
2
3
4
5
6
7
8
9
10
11
12
13
14
15
16
17
18
19
20
21
22
23
24
25
26
27
28
29
30
31
32
33
34
35
36
37
38
39
40
41
42
43
44
45
46
47
48
49
50
51
52
53
54
55
56
57
58
59
60
# 1. 在base_spider.py文件中,定义一个BaseSpider类, 继承object
class BaseSpider(object):

# 2. 提供三个类成员变量:
# urls: 代理IP网址的URL的列表
urls = []
# group_xpath: 分组XPATH, 获取包含代理IP信息标签列表的XPATH
group_xpath = ''
# detail_xpath: 组内XPATH, 获取代理IP详情的信息XPATH, 格式为: {'ip':'xx', 'port':'xx', 'area':'xx'}
detail_xpath = {}

# 3. 提供初始方法, 传入爬虫URL列表, 分组XPATH, 详情(组内)XPATH
def __init__(self, urls=[], group_xpath='', detail_xpath={}):

if urls:
self.urls = urls

if group_xpath:
self.group_xpath = group_xpath

if detail_xpath:
self.detail_xpath = detail_xpath

def get_page_from_url(self, url):
"""根据URL 发送请求, 获取页面数据"""
response = requests.get(url, headers=get_request_headers())
print(url)
print(response.status_code)
return response.content

def get_first_from_list(self, lis):
# 如果列表中有元素就返回第一个, 否则就返回空串
return lis[0] if len(lis) != 0 else ''

def get_proxies_from_page(self, page):
"""解析页面, 提取数据, 封装为Proxy对象"""
element = etree.HTML(page)
# 获取包含代理IP信息的标签列表
trs = element.xpath(self.group_xpath)
# 遍历trs, 获取代理IP相关信息
for tr in trs:
ip = self.get_first_from_list(tr.xpath(self.detail_xpath['ip']))
port = self.get_first_from_list(tr.xpath(self.detail_xpath['port']))
area = self.get_first_from_list(tr.xpath(self.detail_xpath['area']))
proxy = Proxy(ip, port, area=area)
# print(proxy)
# 使用yield返回提取到的数据
yield proxy

def get_proxies(self):
# 4. 对外提供一个获取代理IP的方法
# 4.1 遍历URL列表, 获取URL
for url in self.urls:
# print(url)
# 4.2 根据发送请求, 获取页面数据
page = self.get_page_from_url(url)
# 4.3 解析页面, 提取数据, 封装为Proxy对象
proxies = self.get_proxies_from_page(page)
# 4.4 返回Proxy对象列表
yield from proxies

具体爬虫实现proxy_spiders

  1. 实现西刺代理爬虫: http://www.xicidaili.com/nn/1

    • 定义一个类,继承通用爬虫类(BasicSpider)
    • 提供urls, group_xpath 和 detail_xpath
  2. 实现ip3366代理爬虫: http://www.ip3366.net/free/?stype=1&page=1

    • 定义一个类,继承通用爬虫类(BasicSpider)
    • 提供urls, group_xpath 和 detail_xpath
  3. 实现快代理爬虫: https://www.kuaidaili.com/free/inha/1/

    • 定义一个类,继承通用爬虫类(BasicSpider)
    • 提供urls, group_xpath 和 detail_xpath
  4. 实现proxylistplus代理爬虫: https://list.proxylistplus.com/Fresh-HTTP-Proxy-List-1

    • 定义一个类,继承通用爬虫类(BasicSpider)
    • 提供urls, group_xpath 和 detail_xpath
  5. 实现66ip爬虫: http://www.66ip.cn/1.html

    • 定义一个类,继承通用爬虫类(BasicSpider)
    • 提供urls, group_xpath 和 detail_xpath
    • 由于66ip网页进行js + cookie反爬, 需要重写父类的get_page_from_url方法

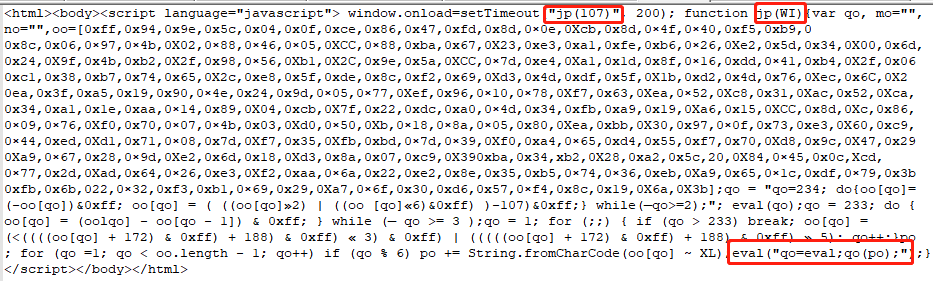
    访问http://www.66ip.cn/1.html 时返回一堆js,并不返回具体ip信息,通过逐步增加请求头中的Cookie时发现真正生效的Cookie为_ydclearance,控制台打开Preserve log发现页面第一次1.html做了跳转,历史请求中都没有出现_ydclearance的cookie,第二次请求1.html时已经携带了_ydclearance说明该cookie已经不是服务端响应生成,而是由客户端js生成。

66ip逆向分析.png

一开始我们访问http://www.66ip.cn/1.html 时返回一堆js,执行这段js,就是用来生成_ydclearance的。那么分析这段js本身做了加密,js中通过定义函数jp并调用后,由于qo=eval,那么等同于最终调用了eval(po),真正js在 “po” 中。

1
result = re.findall('window.onload=setTimeout\("(.+?)", 200\);\s*(.+?)\s*</script>' ,text)

通过正则提取 jp(107) 调用函数方法, 以及函数内容 function jp(WI) { var qo, mo="" ...,通过将替换eval拿到返回的真实js

1
2
func_str = result[0][1]
func_str = func_str.replace('eval("qo=eval;qo(po);")', 'return po')

执行js并将返回作为Cookie添加到请求头中

1
2
3
4
5
context = js2py.EvalJs()
context.execute(func_str)
context.execute('code = {};'.format(result[0][0]))
cookie_str = re.findall("document.cookie='(.+?); ", context.code)[0]
headers['Cookie'] = cookie_str
1
2
3
4
5
6
7
8
9
10
11
12
13
14
15
16
17
18
19
20
21
22
23
24
25
26
27
28
29
30
31
32
33
34
35
36
37
38
39
40
41
42
43
44
45
46
47
48
49
50
51
52
53
54
55
56
57
58
59
60
61
62
63
64
65
66
67
68
69
70
71
72
73
74
75
76
77
78
79
80
81
82
83
84
85
86
87
88
89
90
91
92
93
94
95
96
97
98
99
100
101
102
103
104
105
106
107
108
109
110
111
112
113
114
115
116
117
118
119
120
121
122
123
124
125
class XiciSpider(BaseSpider):
# 准备URL列表
urls = ['https://www.xicidaili.com/nn/{}'.format(i) for i in range(1, 11)]
# 分组的XPATH, 用于获取包含代理IP信息的标签列表
group_xpath = '//*[@id="ip_list"]/tr[position()>1]'
# 组内的XPATH, 用于提取 ip, port, area
detail_xpath = {
'ip':'./td[2]/text()',
'port':'./td[3]/text()',
'area':'./td[4]/a/text()'
}

"""
2. 实现ip3366代理爬虫: http://www.ip3366.net/free/?stype=1&page=1
定义一个类,继承通用爬虫类(BasicSpider)
提供urls, group_xpath 和 detail_xpath
"""
class Ip3366Spider(BaseSpider):
# 准备URL列表
urls = ['http://www.ip3366.net/free/?stype={}&page={}'.format(i, j) for i in range(1, 4, 2) for j in range(1, 8)]
# # 分组的XPATH, 用于获取包含代理IP信息的标签列表
group_xpath = '//*[@id="list"]/table/tbody/tr'
# 组内的XPATH, 用于提取 ip, port, area
detail_xpath = {
'ip':'./td[1]/text()',
'port':'./td[2]/text()',
'area':'./td[5]/text()'
}

"""
3. 实现快代理爬虫: https://www.kuaidaili.com/free/inha/1/
定义一个类,继承通用爬虫类(BasicSpider)
提供urls, group_xpath 和 detail_xpath
"""
class KaiSpider(BaseSpider):
# 准备URL列表
urls = ['https://www.kuaidaili.com/free/inha/{}/'.format(i) for i in range(1, 6)]
# # 分组的XPATH, 用于获取包含代理IP信息的标签列表
group_xpath = '//*[@id="list"]/table/tbody/tr'
# 组内的XPATH, 用于提取 ip, port, area
detail_xpath = {
'ip':'./td[1]/text()',
'port':'./td[2]/text()',
'area':'./td[5]/text()'
}

# 当我们两个页面访问时间间隔太短了, 就报错了; 这是一种反爬手段.
def get_page_from_url(self, url):
# 随机等待1,3s
time.sleep(random.uniform(1, 3))
# 调用父类的方法, 发送请求, 获取响应数据
return super().get_page_from_url(url)

"""
4. 实现proxylistplus代理爬虫: https://list.proxylistplus.com/Fresh-HTTP-Proxy-List-1
定义一个类,继承通用爬虫类(BasicSpider)
提供urls, group_xpath 和 detail_xpath
"""

class ProxylistplusSpider(BaseSpider):
# 准备URL列表
urls = ['https://list.proxylistplus.com/Fresh-HTTP-Proxy-List-{}'.format(i) for i in range(1, 7)]
# # 分组的XPATH, 用于获取包含代理IP信息的标签列表
group_xpath = '//*[@id="page"]/table[2]/tbody/tr[position()>2]'
# 组内的XPATH, 用于提取 ip, port, area
detail_xpath = {
'ip':'./td[2]/text()',
'port':'./td[3]/text()',
'area':'./td[5]/text()'
}

"""
5. 实现66ip爬虫: http://www.66ip.cn/1.html
定义一个类,继承通用爬虫类(BasicSpider)
提供urls, group_xpath 和 detail_xpath
由于66ip网页进行js + cookie反爬, 需要重写父类的get_page_from_url方法
"""

class Ip66Spider(BaseSpider):
# 准备URL列表
urls = ['http://www.66ip.cn/{}.html'.format(i) for i in range(1, 11)]
# # 分组的XPATH, 用于获取包含代理IP信息的标签列表
group_xpath = '//*[@id="main"]/div/div[1]/table/tbody/tr[position()>1]'
# 组内的XPATH, 用于提取 ip, port, area
detail_xpath = {
'ip':'./td[1]/text()',
'port':'./td[2]/text()',
'area':'./td[3]/text()'
}

# 重写方法, 解决反爬问题
def get_page_from_url(self, url):
headers = get_request_headers()
response = requests.get(url, headers=headers)
if response.status_code == 521:
# 生成cookie信息, 再携带cookie发送请求
# 生成 `_ydclearance` cookie信息,控制台preserve log,第一个页面就是加密页面521用来做反爬跳转
# 1. 确定 _ydclearance 是从哪里来的;
# 观察发现: 这个cookie在前两个页面都没有返回,说明信息不使用通过服务器响应设置过来的; 那么他就是通过js生成.
# 2. 第一次发送请求的页面中, 有一个生成这个cookie的js; 执行这段js, 生成我们需要的cookie
# 这段js是经过加密处理后的js, 真正js在 "po" 中.
# 提取 `jp(107)` 调用函数的方法, 以及函数
result = re.findall('window.onload=setTimeout\("(.+?)", 200\);\s*(.+?)\s*</script> ', response.content.decode('GBK'))
# print(result)
# 我希望执行js时候, 返回真正要执行的js
# 把 `eval("qo=eval;qo(po);")` 替换为 return po
func_str = result[0][1]
func_str = func_str.replace('eval("qo=eval;qo(po);")', 'return po')
# print(func_str)
# 获取执行js的环境
context = js2py.EvalJs()
# 加载(执行) func_str
context.execute(func_str)
# 执行这个方法, 生成我们需要的js
# code = gv(50)
context.execute('code = {};'.format(result[0][0]))
# 打印最终生成的代码
# print(context.code)
cookie_str = re.findall("document.cookie='(.+?); ", context.code)[0]
# print(cookie_str)
headers['Cookie'] = cookie_str
response = requests.get(url, headers=headers)
return response.content.decode('GBK')
else:
return response.content.decode('GBK')

运行爬虫模块run_spiders

  • 创建RunSpider类
  • 提供一个运行爬虫的run方法
  • 根据配置文件信息, 加载爬虫, 把爬虫对象放到列表中
  • 遍历爬虫对象列表, 获取代理, 检测代理(代理IP检测模块), 写入数据库(数据库模块)
  • 使用异步来执行每一个爬虫任务
  • 每隔一定的时间, 执行一次爬取任务

settings配置RUN_SPIDERS_INTERVAL作为爬虫运行时间间隔的配置, 单位为小时

1
2
3
4
5
6
7
8
9
10
11
12
13
14
15
16
17
18
19
20
21
22
23
24
25
26
27
28
29
30
31
32
33
34
35
36
37
38
39
40
41
42
43
44
45
46
47
48
49
50
51
52
53
54
55
56
57
58
59
60
61
62
63
64
65
66
67
68
class RunSpider(object):

def __init__(self):
# 创建MongoPool对象
self.mongo_pool = MongoPool()
# 3.1 在init方法中创建协程池对象
self.coroutine_pool = Pool()

def get_spider_from_settings(self):
"""根据配置文件信息, 获取爬虫对象列表."""
# 遍历配置文件中爬虫信息, 获取每个爬虫全类名
for full_class_name in PROXIES_SPIDERS:
# core.proxy_spider.proxy_spiders.Ip66Spider
# 获取模块名 和 类名
module_name, class_name = full_class_name.rsplit('.', maxsplit=1)
# 根据模块名, 导入模块
module = importlib.import_module(module_name)
# 根据类名, 从模块中, 获取类
cls = getattr(module, class_name)
# 创建爬虫对象
spider = cls()
# print(spider)
yield spider


def run(self):
# 2.1 根据配置文件信息, 获取爬虫对象列表.
spiders = self.get_spider_from_settings()
# 2.2 遍历爬虫对象列表, 获取爬虫对象, 遍历爬虫对象的get_proxies方法, 获取代理IP
for spider in spiders:
# 2.5 处理异常, 防止一个爬虫内部出错了, 影响其他的爬虫.
# 3.3 使用异步执行这个方法
# self.__execute_one_spider_task(spider)
self.coroutine_pool.apply_async(self.__execute_one_spider_task,args=(spider, ))

# 3.4 调用协程的join方法, 让当前线程等待 协程 任务的完成.
self.coroutine_pool.join()

def __execute_one_spider_task(self, spider):
# 3.2 把处理一个代理爬虫的代码抽到一个方法
# 用于处理一个爬虫任务的.
try:
# 遍历爬虫对象的get_proxies方法, 获取代理I
for proxy in spider.get_proxies():
# print(proxy)
# 2.3 检测代理IP(代理IP检测模块)
proxy = check_proxy(proxy)
# 2.4 如果可用,写入数据库(数据库模块)
# 如果speed不为-1, 就说明可用
if proxy.speed != -1:
# 写入数据库(数据库模块)
self.mongo_pool.insert_one(proxy)
except Exception as ex:
logger.exception(ex)

@classmethod
def start(cls):
# 4. 使用schedule模块, 实现每隔一定的时间, 执行一次爬取任务
# 4.1 定义一个start的类方法
# 4.2 创建当前类的对象, 调用run方法
rs = RunSpider()
rs.run()
# 4.3 使用schedule模块, 每隔一定的时间, 执行当前对象的run方法
# 4.3.1 修改配置文件, 增加爬虫运行时间间隔的配置, 单位为小时
schedule.every(RUN_SPIDERS_INTERVAL).hours.do(rs.run)
while True:
schedule.run_pending()
time.sleep(1)

检测模块proxy_test

  1. 创建ProxyTester类,检查代理IP可用性, 保证代理池中代理IP基本可用
  2. 提供一个 run 方法, 用于处理检测代理IP核心逻辑
    1. 从数据库中获取所有代理IP
    2. 遍历代理IP列表
    3. 检查代理可用性
      • 如果代理不可用, 让代理分数-1, 如果代理分数等于0就从数据库中删除该代理, 否则更新该代理IP
      • 如果代理可用, 就恢复该代理的分数, 更新到数据库中
  3. 为了提高检查的速度, 使用异步来执行检测任务
    1. 把要检测的代理IP, 放到队列中
    2. 把检查一个代理可用性的代码, 抽取到一个方法中; 从队列中获取代理IP, 进行检查; 检查完毕, 调度队列的task_done方法
    3. 通过异步回调, 使用死循环不断执行这个方法,
    4. 开启多个一个异步任务, 来处理代理IP的检测; 可以通过配置文件指定异步数量
  4. 使用schedule模块, 每隔一定的时间, 执行一次检测任务
    1. 定义类方法 start, 用于启动检测模块
    2. start方法中
      1. 创建本类对象
      2. 调用run方法
      3. 每间隔一定时间, 执行一下, run方法

setting.py 文件, 检查代理IP可用性间隔时间的配置

RUN_SPIDERS_INTERVAL = 2 # 修改配置文件, 增加爬虫运行时间间隔的配置, 单位为小时
TEST_PROXIES_ASYNC_COUNT = 10 # 配置检测代理IP的异步数量
TEST_PROXIES_INTERVAL = 2 # 配置检查代理IP的时间间隔, 单位是小时

1
2
3
4
5
6
7
8
9
10
11
12
13
14
15
16
17
18
19
20
21
22
23
24
25
26
27
28
29
30
31
32
33
34
35
36
37
38
39
40
41
42
43
44
45
46
47
48
49
50
51
52
53
54
55
56
57
58
59
60
61
62
63
64
class ProxyTester(object):

def __init__(self):
# 创建操作数据库的MongoPool对象
self.mongo_pool = MongoPool()
# 3.1 在`init`方法, 创建队列和协程池
self.queue = Queue()
self.coroutine_pool = Pool()

def __check_callback(self, temp):
self.coroutine_pool.apply_async(self.__check_one_proxy, callback=self.__check_callback)

def run(self):
# 提供一个 run 方法, 用于处理检测代理IP核心逻辑
# 2.1 从数据库中获取所有代理IP
proxies = self.mongo_pool.find_all()
# 2.2 遍历代理IP列表
for proxy in proxies:
# 3.2 把要检测的代理IP, 放到队列中
self.queue.put(proxy)

# 3.5 开启多个一个异步任务, 来处理代理IP的检测; 可以通过配置文件指定异步数量
for i in range(TEST_PROXIES_ASYNC_COUNT):
# 3.4 通过异步回调, 使用死循环不断执行这个方法,
self.coroutine_pool.apply_async(self.__check_one_proxy, callback=self.__check_callback)

# 让当前线程, 等待队列任务完成
self.queue.join()

def __check_one_proxy(self):
# 检查一个代理IP的可用性
# 3.3 把检查一个代理可用性的代码, 抽取到一个方法中;
# 从队列中获取代理IP, 进行检查; 检查完毕
proxy = self.queue.get()
# 2.3 检查代理可用性
proxy = check_proxy(proxy)
# 2.4 如果代理不可用, 让代理分数-1,
if proxy.speed == -1:
proxy.score -= 1
# 如果代理分数等于0就从数据库中删除该代理
if proxy.score == 0:
self.mongo_pool.delete_one(proxy)
else:
# 否则更新该代理IP
self.mongo_pool.update_one(proxy)
else:
# 2.5 如果代理可用, 就恢复该代理的分数, 更新到数据库中
proxy.score = MAX_SCORE
self.mongo_pool.update_one(proxy)
# 调度队列的task_done方法
self.queue.task_done()

@classmethod
def start(cls):
# 4.2.1 创建本类对象
proxy_tester = cls()
# 4.2.2 调用run方法
proxy_tester.run()

# 4.2.3 每间隔一定时间, 执行一下, run方法
schedule.every(TEST_PROXIES_INTERVAL).hours.do(proxy_tester.run)
while True:
schedule.run_pending()
time.sleep(1)

API模块proxy_api

  • 创建ProxyApi类,为爬虫提供高可用代理IP的服务接口
  • 实现初始方法
    • 初始一个Flask的Web服务
    • 实现根据协议类型和域名, 提供随机的获取高可用代理IP的服务
      • 可用通过 protocoldomain 参数对IP进行过滤
      • protocol: 当前请求的协议类型
      • domain: 当前请求域名
    • 实现根据协议类型和域名, 提供获取多个高可用代理IP的服务
      • 可用通过protocoldomain 参数对IP进行过滤
    • 实现给指定的IP上追加不可用域名的服务
      • 如果在获取IP的时候, 有指定域名参数, 将不在获取该IP, 从而进一步提高代理IP的可用性.
  • 实现run方法, 用于启动Flask的WEB服务
  • 实现start的类方法, 用于通过类名, 启动服务

settings中配置PROXIES_MAX_COUNT配置获取的代理IP最大数量; 这个越小可用性就越高; 但是随机性越差

1
2
3
4
5
6
7
8
9
10
11
12
13
14
15
16
17
18
19
20
21
22
23
24
25
26
27
28
29
30
31
32
33
34
35
36
37
38
39
40
41
42
43
44
45
46
47
48
49
50
51
52
53
54
55
56
57
58
59
60
61
62
63
64
65
66
67
68
69
70
71
72
73
74
class ProxyApi(object):

def __init__(self):
# 2. 实现初始方法
# 2.1 初始一个Flask的Web服务
self.app = Flask(__name__)
# 创建MongoPool对象, 用于操作数据库
self.mongo_pool = MongoPool()

@self.app.route('/random')
def random():
"""
localhost:6868/random?protocol=https&domain=jd.com
2.2 实现根据协议类型和域名, 提供随机的获取高可用代理IP的服务
可用通过 protocol 和 domain 参数对IP进行过滤
protocol: 当前请求的协议类型
domain: 当前请求域名
"""
protocol = request.args.get('protocol')
domain = request.args.get('domain')
proxy = self.mongo_pool.random_proxy(protocol, domain, count=PROXIES_MAX_COUNT)

if protocol:
return '{}://{}:{}'.format(protocol, proxy.ip, proxy.port)
else:
return '{}:{}'.format(proxy.ip, proxy.port)

@self.app.route('/proxies')
def proxies():
"""
localhost:6868/proxies?protocol=https&domain=jd.com
2.3 实现根据协议类型和域名, 提供获取多个高可用代理IP的服务
可用通过protocol 和 domain 参数对IP进行过滤
实现给指定的IP上追加不可用域名的服务
"""
# 获取协议: http/https
protocol = request.args.get('protocol')
# 域名: 如:jd.com
domain = request.args.get('domain')

proxies = self.mongo_pool.get_proxies(protocol, domain, count=PROXIES_MAX_COUNT)
# proxies 是一个 Proxy对象的列表, 但是Proxy对象不能进行json序列化, 需要转换为字典列表
# 转换为字典列表
proxies = [proxy.__dict__ for proxy in proxies]
# 返回json格式值串
return json.dumps(proxies)

@self.app.route('/disable_domain')
def disable_domain():
"""
localhost:6868/disable_domain?ip=120.92.174.12&domain=jd.com
2.4 如果在获取IP的时候, 有指定域名参数, 将不在获取该IP, 从而进一步提高代理IP的可用性.
"""
ip = request.args.get('ip')
domain = request.args.get('domain')

if ip is None:
return '请提供ip参数'
if domain is None:
return '请提供域名domain参数'

self.mongo_pool.disable_domain(ip, domain)
return "{} 禁用域名 {} 成功".format(ip, domain)


def run(self):
"""3. 实现run方法, 用于启动Flask的WEB服务"""
self.app.run('0.0.0.0', port=6868)

@classmethod
def start(cls):
# 4. 实现start的类方法, 用于通过类名, 启动服务
proxy_api = cls()
proxy_api.run()

启动入口main

  • 定义一个run方法用于启动动代理池,开启三个进程, 分别用于启动爬虫, 检测代理IP, WEB服务
    • 定义一个列表, 用于存储要启动的进程
    • 创建 启动爬虫 的进程, 添加到列表中
    • 创建 启动检测 的进程, 添加到列表中
    • 创建 启动提供API服务 的进程, 添加到列表中
    • 遍历进程列表, 启动所有进程
    • 遍历进程列表, 让主进程等待子进程的完成
  • if __name__ == '__main__': 中调用run方法
1
2
3
4
5
6
7
8
9
10
11
12
13
14
15
16
17
18
19
20
21
22
def run():
# 1. 定义一个列表, 用于存储要启动的进程
process_list = []
# 2. 创建 启动爬虫 的进程, 添加到列表中
process_list.append(Process(target=RunSpider.start))
# 3. 创建 启动检测 的进程, 添加到列表中
process_list.append(Process(target=ProxyTester.start))
# 4. 创建 启动提供API服务 的进程, 添加到列表中
process_list.append(Process(target=ProxyApi.start))

# 5. 遍历进程列表, 启动所有进程
for process in process_list:
# 设置守护进程
process.daemon = True
process.start()

# 6. 遍历进程列表, 让主进程等待子进程的完成
for process in process_list:
process.join()

if __name__ == '__main__':
run()

爬虫代理池实现

完整源码请关注微信公众号:ReverseCode,回复:爬虫基础

文章作者: J
文章链接: http://onejane.github.io/2021/03/30/爬虫基础篇之IP代理池/
版权声明: 本博客所有文章除特别声明外,均采用 CC BY-NC-SA 4.0 许可协议。转载请注明来自 万物皆可逆向
支付宝打赏
微信打赏