篇幅有限
完整内容及源码关注公众号:ReverseCode,发送 冲
Dalvik4.4.4
dex加载源码分析
虽然加壳技术有所不同,第一步依然是dump内存中dex,虽然安卓4.4后Dalvik淡出视野,但是影响深远。Dalvik系统DexClassLoader加载dex具体流程:
在libcore目录下搜索DexClassLoader源码只有一个构造函数
dexPath:需要加载的dex路径
optimizedDirectory:dex优化过程中产生的odex的存放路径
libraryPath:当前classloader需要加载so的路径
parent:双亲委派中的当前dexclassloader的父节点设置的classloader
1 | public DexClassLoader(String dexPath, String optimizedDirectory, |
由于只调用了父类的构造函数,我们进入父类BaseDexClassLoader封装大量的函数,真正逻辑存在BaseDexClassLoader的构造函数中实现,调用了父类的构造函数,该类存在与/libcore/libart和/libcore/libdvm,说明在安卓4.4中已经开始引入art相关逻辑。
1 | public BaseDexClassLoader(String dexPath, File optimizedDirectory, |
进入Dalvik的ClassLoader的构造函数,将当前的ClassLoader的父节点作为传入的parent。
1 | ClassLoader(ClassLoader parentLoader, boolean nullAllowed) { |
再进入new DexPathList再初始化pathList实例,进入DexPathList构造函数,前面对参数校验,真正起作用this.dexElements = makeDexElements(splitDexPath(dexPath), optimizedDirectory,suppressedExceptions);,makeDexElements方法调用了loadDexFile返回的dex添加到element数组并返回数组。
loadDexFile中再度调用了DexFile.loadDex(file.getPath(), optimizedPath, 0),该方法新建了一个DexFile对象,return new DexFile(sourcePathName, outputPathName, flags);,在Dexfile中调用了openDexFile(sourceName, outputName, flags)完成了对dex的处理,openDexFile中调用了openDexFileNative,其中又调用openDexFileNative方法,跟进openDexFileNative发现是一个使用c/c++实现的native函数,native private static int openDexFileNative。该方法处理类/libcore/dalvik/src/main/java/dalvik/system/DexFile.java中,对应的实现文件就是dalvik_system_DexFile查看方法Dalvik_dalvik_system_DexFile_openDexFileNative,其中调用了dvmRawDexFileOpen实现对dex文件的打开。
1 | if (hasDexExtension(sourceName) // 对当前文件后缀的校验 |
在dvmRawDexFileOpen中dexFd = open(fileName, O_RDONLY);打开dex文件,verifyMagicAndGetAdler32(dexFd, &adler32) < 0对dex魔术字校验,cachedName = dexOptGenerateCacheFileName(fileName, NULL);生成优化后的odex文件路径,dvmOptimizeDexFile(optFd, dexOffset, fileSize,fileName, modTime, adler32, isBootstrap);优化当前的dex,跟进发现存在于DexPrepare.cpp中的dvmOptimizeDexFile(int fd, off_t dexOffset, long dexLength,const char* fileName, u4 modWhen, u4 crc, bool isBootstrap),该方法中pid = fork();fd为打开的dex文件的id,dexLength为dex文件的大小,pid=fork()新建了子进程用于调用/bin/dexopt对当前dex文件进行优化,结果生成odex文件。bin/dexopt的main方法中传入的文件校验是dex时,调用static int fromDex(int argc, char* const argv[])首先调用dvmPrepForDexOpt对当前优化环境准备,再调用dvmContinueOptimization对当前的fd文件进行优化
1 | dexLength < (int) sizeof(DexHeader) 字节长度判断 |
查看static bool rewriteDex(u1* addr, int len, bool doVerify, bool doOpt,DexClassLookup** ppClassLookup, DvmDex** ppDvmDex)方法参数有加载到内存中dex的起始地址,字节数。该方法中暴露出在Dalvik中脱壳点的相关函数,dvmDexFileOpenPartial函数中出现dexFileParse,参数包含起始地址和字节数。
以上即是dexclassloader在动态加载dex时Dalvik实现的逻辑处理,很多时机点都出现了加载的dex的起始地址,就是最好的脱壳时机。很多脱壳方法都是对**dvmDexFileOpenPartial和dexFileParse进行下断点或者进行hook,取出第一个参数(起始地址)和第二个参数(dex长度),在第一次DexPrepare.cpp中,其实在mmap对dex内存映射时包含dex文件,对当前映射区域进行dump也可以脱下从文件形式加载dex,在rewriteDex**时也出现了dex文件加载的起始地址和大小,自然也是可以进行dump等等。通过Cydia、xposed、frida都可以对实现对关键时机的hook,取出前两个参数,拿到起始地址和长度,dump下来内存区域即可实现脱壳。
定制源码脱壳
对新的一些加壳厂商的产品依然有效,除非厂商对这些函数进行hook修改,或者参考Dalvik修改实现自己的逻辑。进入Ubuntu 1604x64_4.4的编译环境虚拟机,tom/admin,4.4的源码为hammerhead及其驱动。通过编译源码的方式实现以下为部分脱壳点:
dvmDexFileOpenPartial
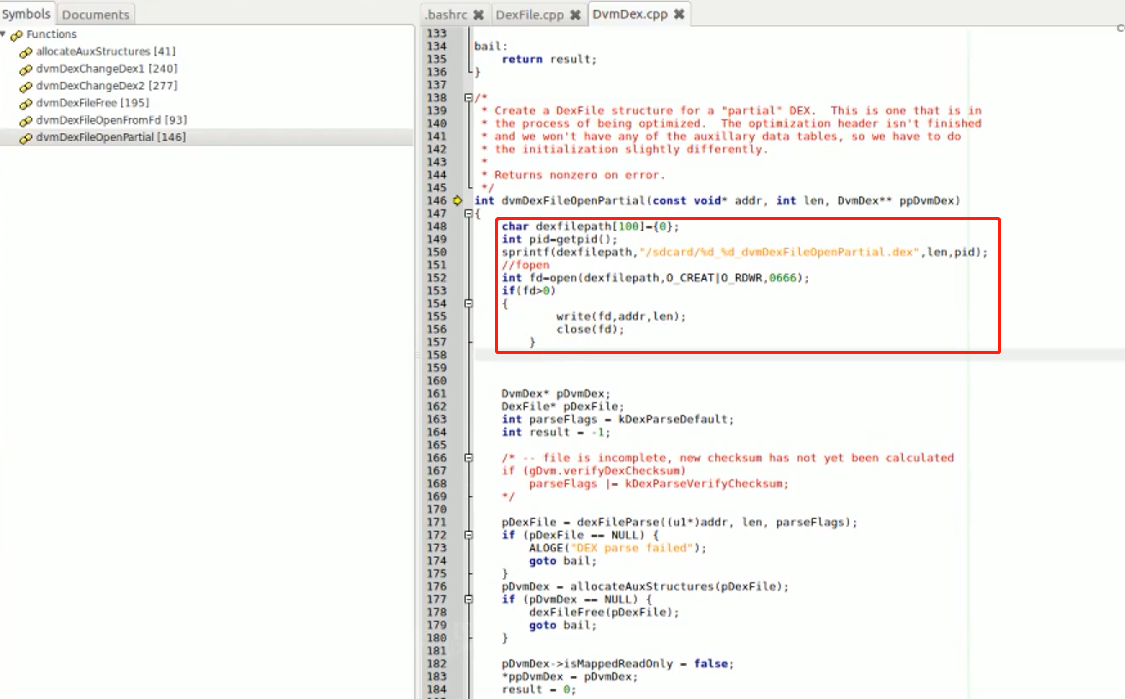
搜索 dvmDexFileOpenPartial 发现在/dalvik/vm/DvmDex.cpp文件中,使用Geany打开 ~/SourceCode/android-4.4.4_r1/dalvik/vm/DvmDex.cpp,找到dvmDexFileOpenPartial方法,只需要保存起始地址和大小即可。
修改int dvmDexFileOpenPartial(const void* addr, int len, DvmDex** ppDvmDex)
1 | #include <sys/stat.h> |
dexFileParse
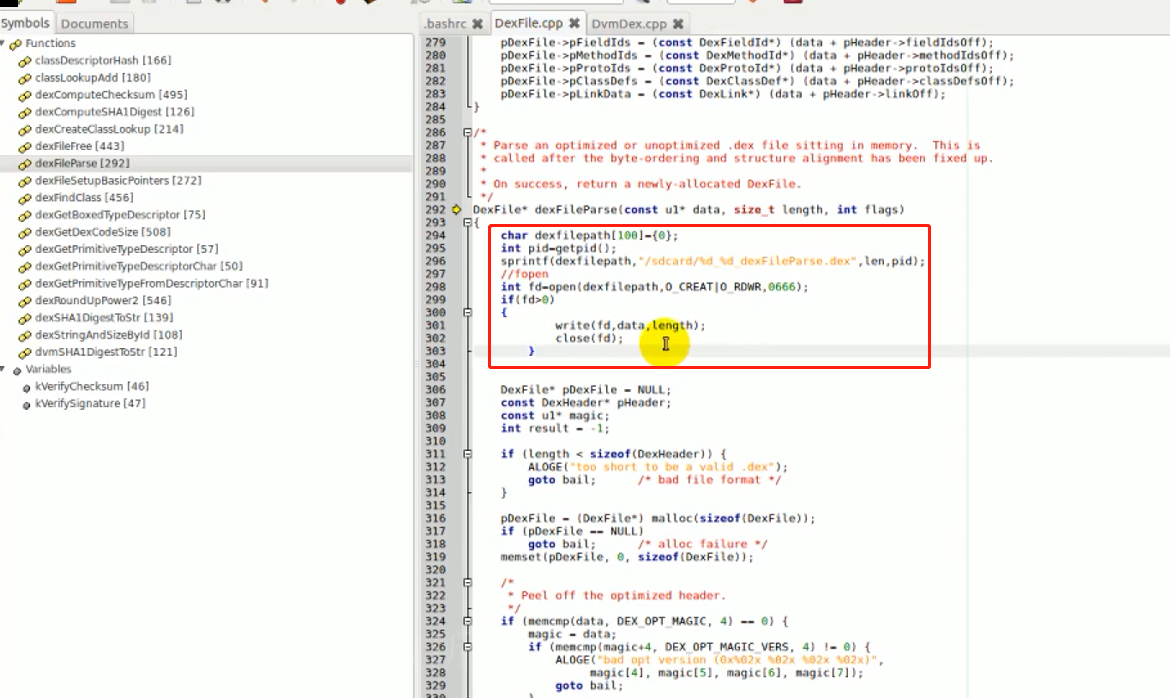
搜索**dexFileParse**发现存在/dalvik/libdex/DexFile.cpp中,使用geany编辑器打开DexFile.cpp
修改DexFile* dexFileParse(const u1* data, size_t length, int flags)
1 | #include <sys/stat.h> |
mmap
搜索 mmap 存在于/dalvik/vm/analysis/DexPrepare.cpp的中,
修改bool dvmContinueOptimization(int fd, off_t dexOffset, long dexLength, const char* fileName, u4 modWhen, u4 crc, bool isBootstrap)
1 | char dexfilepath[100]={0}; |

第一次映射到内存中需要将dex通过010Editor修正,删除64 65 78 0A前的字符。
rewriteDex
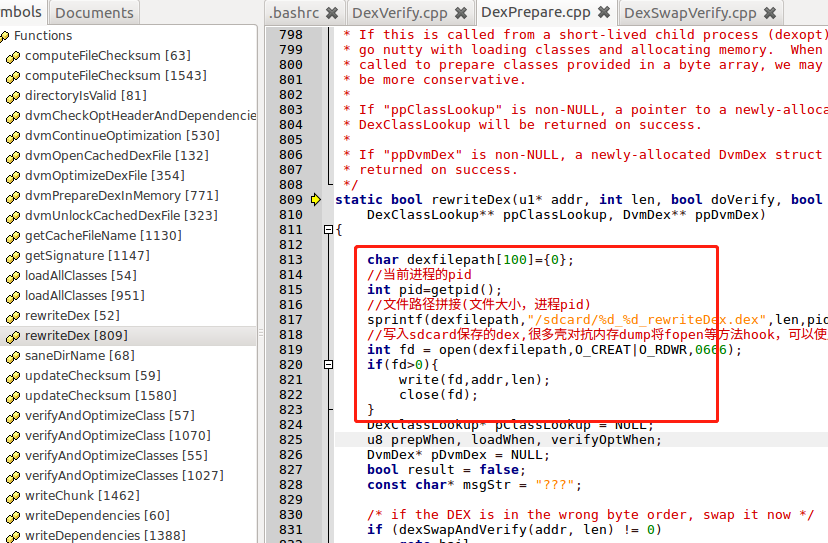
搜索rewriteDex位于/dalvik/vm/analysis/DexPrepare.cpp,
修改static bool rewriteDex(u1* addr, int len, bool doVerify, bool doOpt, DexClassLookup** ppClassLookup, DvmDex** ppDvmDex)
1 | char dexfilepath[100]={0}; |
dexSwapVerify
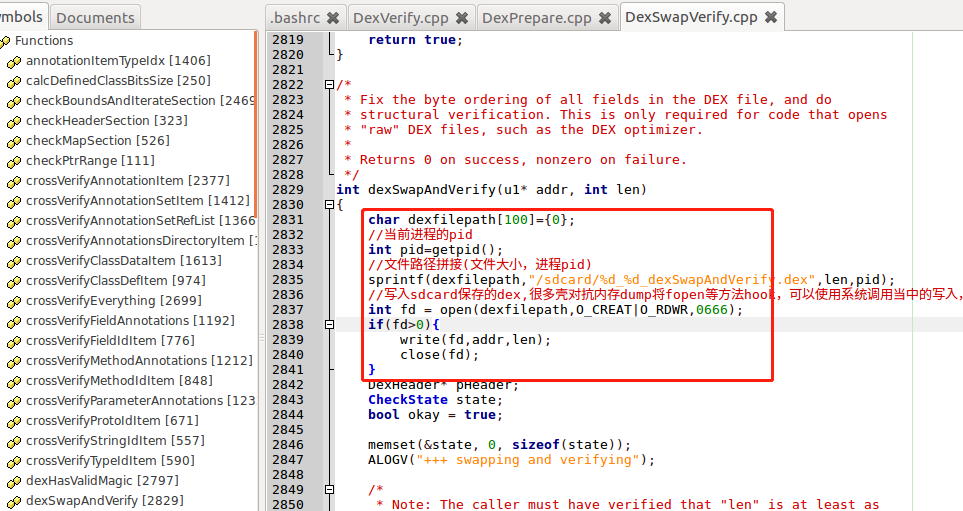
搜索dexSwapVerify存在于/dalvik/libdex/DexSwapVerify.cpp
修改int dexSwapAndVerify(u1* addr, int len)
1 | char dexfilepath[100]={0}; |
编译
1 | ~/SourceCode/android-4.4.4_r1$ source build/envsetup.sh |
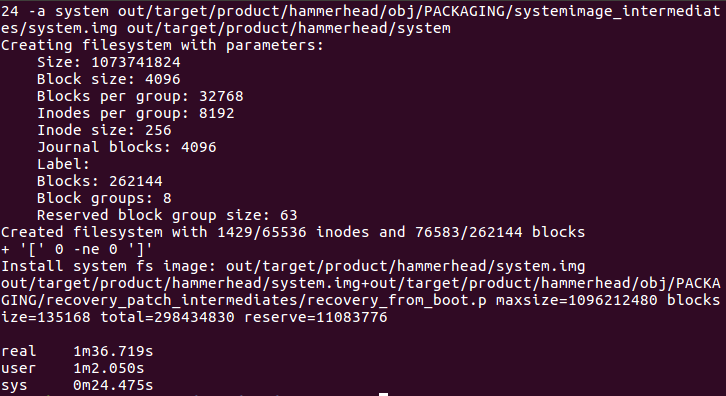
生成路径~/SourceCode/android/4.4.4_r1/out/target/product/hammerhead,将boot.img,cache.img,ramdisk.img,system.img,userdata.img拷出来
adb reboot bootloader
fastboot flash system system.img 常用的img有boot,cache,ramdisk,system,userdata
安装LoadDex.apk,并把ClassLoaderTest生成的classes.dex放入/sdcard。在Activity启动的时候加载/sdcard的classes.dex的TestActivity并打印I'm from TestActivity.onCreate,这就是一代壳的基本原理。
重启系统后/sdcard中已经出现一些系统中脱下的dex,启动LoadDex,grep -ril "TestActivity" ./*.dex 找到LoadDex中脱下的dex,gda可以看到优化后的odex的TestActivity中onCreate方法
真实案例
a.apk 快递100 《百度》加固
启动后进入/sdcard , grep -ril “SplashActivity” ./*.dex
b.apk 货拉拉司机版《爱加密》企业版本加固
启动后进入/sdcard , grep -ril “mvp/ui/SplashActivity” ./*.dex,内容都为null,说明用了函数抽取。
ART8.0.0
InMemoryDexClassLoader源码分析
加载内存中的解密字节流过程art的具体流程:
在Android 8.0中libcore搜索InMemoryDexClassLoader两个构造函数,分别加载一个或多个dex,super(dexBuffers, parent);调用了父类的构造函数。进入父类BaseDexClassLoader.java的构造函数
1 | public BaseDexClassLoader(ByteBuffer[] dexFiles, ClassLoader parent) { |
跟进public DexPathList(ClassLoader definingContext, ByteBuffer[] dexFiles)构造函数,前几步对传参判断,紧接着对传入的so库的处理
1 | this.definingContext = definingContext; |
传入的dex只需要看this.dexElements = makeInMemoryDexElements(dexFiles, suppressedExceptions);摘除核心代码如下:
1 | private static Element[] makeInMemoryDexElements(ByteBuffer[] dexFiles, |
进入DexFile(buf)的构造函数中,发现openInMemoryDexFile将buf在内存中打开返回了mCookie
1 | DexFile(ByteBuffer buf) throws IOException { |
查看openInMemoryDexFile方法,分别根据条件创建了两次cookie
1 | private static Object openInMemoryDexFile(ByteBuffer buf) throws IOException { |
分别查看createCookieWithDirectBuffer和createCookieWithArray两个方法,发现是两个native函数
1 | private static native Object createCookieWithDirectBuffer(ByteBuffer buf, int start, int end); |
在art模块中Full Search createCookieWithDirectBuffer,进入DexFile_createCookieWithDirectBuffer
1 | static jobject DexFile_createCookieWithDirectBuffer(JNIEnv* env, |
createCookieWithDirectBuffer和createCookieWithArray都进行了CreateSingleDexFileCookie
1 | static jobject CreateSingleDexFileCookie(JNIEnv* env, std::unique_ptr<MemMap> data) { |
通过CreateDexFile创建DexFile对象
1 | static const DexFile* CreateDexFile(JNIEnv* env, std::unique_ptr<MemMap> dex_mem_map) { // 返回dex文件在内存中映射的地址 |
进入DexFile::Open,其中又调用了OpenCommon函数
1 | std::unique_ptr<const DexFile> DexFile::Open(const std::string& location, // 加载dex文件的路径 |
进入OpenCommon函数
1 | std::unique_ptr<DexFile> DexFile::OpenCommon(const uint8_t* base, // 加载dex文件的起始地址 |
说明InMemoryDexClassLoader在对内存中bytebuffer的dex信息进行加载流程中涉及很多函数逻辑都包含dex信息的起始地址和大小。InMemoryDexClassLoader并没有对内存中dex信息进行编译生成相应的oat文件,这是与DexClassLoader的不同。
InMemoryDexClassLoader通用脱壳点:
DexClassLoader加载dex源码分析
DexClassLoader只有一个构造函数
1 | public DexClassLoader(String dexPath, String optimizedDirectory, |
进入父类BaseDexClassLoader.java的构造函数
1 | public BaseDexClassLoader(String dexPath, File optimizedDirectory, |
同样的进入DexPathList的核心逻辑this.dexElements = makeDexElements(splitDexPath(dexPath), optimizedDirectory,suppressedExceptions, definingContext);,调用了makeDexElements,其中加载dex文件loadDexFile(file, optimizedDirectory, loader, elements);
1 | private static DexFile loadDexFile(File file, File optimizedDirectory, ClassLoader loader, |
DexFile.loadDex(file.getPath(), optimizedPath, 0, loader, elements)调用了5个参数的loadDex,进入loadDex函数
1 | static DexFile loadDex(String sourcePathName, String outputPathName, |
进入DexFile五参数构造函数
1 | DexFile(String fileName, ClassLoader loader, DexPathList.Element[] elements) throws IOException { |
进入openDexFile中调用了native函数private static native Object openDexFileNative(String sourceName, String outputName, int flags, ClassLoader loader, DexPathList.Element[] elements);
1 | return openDexFileNative(new File(sourceName).getAbsolutePath(), |
Full Search搜索art目录下的openDexFileNative,
1 | static jobject DexFile_openDexFileNative(JNIEnv* env, |
DexClassLoader第一次动态加载解密的dex时必然没有进行编译生成oat,查看OpenDexFilesFromOat,首先OatFileAssistant oat_file_assistant(dex_location,kRuntimeISA,!runtime->IsAotCompiler());新建了OatFileAssistant 对象,if (!oat_file_assistant.IsUpToDate())由于没有生成oat对象的,进入判断中的MakeUpToDate函数,其中调用了return GenerateOatFileNoChecks(info, target, error_msg);GenerateOatFileNoChecks最终进入调用dex2oat编译生成oat的流程
1 | if (!Dex2Oat(args, error_msg)) { |
Dex2Oat中准备相关二进制程序参数的相关信息,最终调用return Exec(argv, error_msg);实现dex2oat编译的过程,进入Exec中调用了ExecAndReturnCode,其中首次pid_t pid=fork()进行了进程fork,在子进程当中使用execve(program, &args[0], envp);执行dex2oat实际执行流程。
说明我们在整个流程中其中某个函数进行修改或者hook都会导致dex2oat流程结束,强制结束dex2oat流程,可以让我们在DexClassLoader在加载dex时过程变的很有效率,减少dex2oat编译的流程,要想实现art下的函数抽取技术,也是要阻断dex2oat的流程。当我们阻断了dex2oat会导致openDexFileNative中 oat_file 文件无法生成,在调用OatFileManager::OpenDexFilesFromOat中进入尝试判断原始dex文件oat_file_assistant.HasOriginalDexFiles()并通过DexFile::Open进行加载dex
1 | if (dex_files.empty()) { |
进入DexFile::Open中可看到File fd = OpenAndReadMagic(filename, &magic, error_msg);到此出现了第一个脱壳点OpenAndReadMagic,此时dex还未加载到内存当中。紧接着开始判断dex魔术头,并进入DexFile::OpenFile函数
1 | if (IsDexMagic(magic)) { |
进入DexFile::OpenFile函数发现通过MemMap::MapFile将dex进行了内存映射
1 | map.reset(MemMap::MapFile(length, |
再进入OpenCommon函数中,参数中也包含了dex文件的映射区域的起始地址,出现了第二个脱壳点。
1 | std::unique_ptr<DexFile> dex_file = OpenCommon(map->Begin(), |
跟进DexFile::OpenCommon中,发现其中调用了DexFile的构造函数
1 | std::unique_ptr<DexFile> dex_file(new DexFile(base, |
至此出现了第三个脱壳点DexFile::DexFile
1 | DexFile::DexFile(const uint8_t* base, |
通用脱壳点:
通过对比:InMemoryDexClassLoader和DexClassLoader的脱壳点,发现OpenCommon是两者通用脱壳点。
定制源码脱壳
DexFile::OpenCommon
修改/art/runtime/dex_file.cc中DexFile::OpenCommon方法
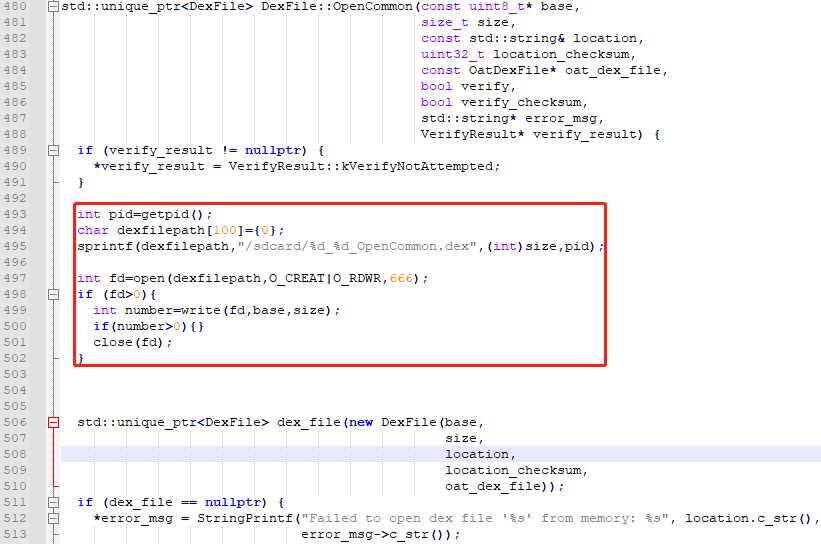
1 | int pid=getpid(); |
DexFile::DexFile
修改/art/runtime/dex_file.cc中DexFile::DexFile方法
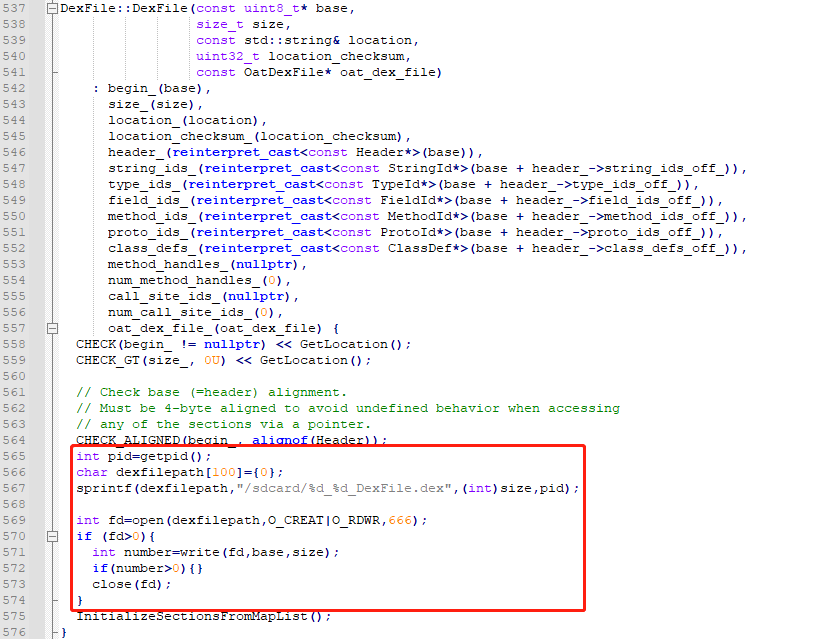
1 | int pid=getpid(); |
编译
1 | ~/Android8.0/android-8.0.0_r1$ source build/envsetup.sh |
生成路径~/Android8.0/android-8.0.0_r1/out/target/product/sailfish,将boot.img,ramdisk.img,system.img,system_other.img,userdata.img,vendor.img拷出来
1 | fastboot flash boot boot.img |
安装LoadDex.apk,并把ClassLoaderTest生成的classes.dex放入/sdcard。并在设置中授予该app读写sdcard的权限。在Activity启动的时候加载/sdcard的classes.dex的TestActivity并打印I'm from TestActivity.onCreate,这就是一代壳的基本原理。
重启系统后/sdcard中已经出现一些系统中脱下的dex,启动LoadDex,grep -ril "TestActivity" ./*.dex 找到LoadDex中脱下的dex,DexClassLoader加载的插件dex已经被dump下来,gda可以看到优化后的odex的TestActivity中onCreate方法。
真实案例
a.apk 《百度》加固
启动后进入/sdcard , grep -ril “SplashActivity” ./*.dex
b.apk 《爱加密》企业版本加固
启动后进入/sdcard , grep -ril “mvp/ui/SplashActivity” ./*.dex,内容都为null,说明用了函数抽取,这就是需要fart解决的问题。
以上方案都是针对于没有dex2oat的情况,实际上对于一些壳没有禁用dex2oat的编译过程,且使用dexclassloader进行编译,最终会进入dex2oat流程,这个流程也是可以进行脱壳的。
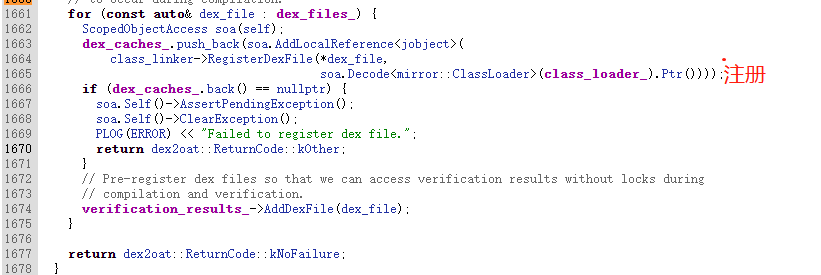
ExecAndReturnCode中调用
execve(program, &args[0], envp);调用dex2oat二进制程序对dex的文件加载。,dex2oat流程也可以脱壳,main函数中调用了Dex2oat,int result = static_cast<int>(art::Dex2oat(argc, argv));,跟进Setup()方法最后会出现对要编译dex文件的处理,如下代码对当前要编译的文件进行遍历,逐个进行注册,这个地方可以完成dex的脱壳。CompileApp也出现了DexFile对象等等非常多的流程出现Dexfile对象,都可以成为脱壳点
除了对dex加载过程中还有其他脱壳点,比如对class进行load过程中,对art method的准备阶段,甚至每个函数的执行过程中都可以进行脱壳,这就是art下众多脱壳点的原因,因为非常多的流程都可以获取到dex文件的位置信息。
- Dalvik下一代壳通用解决方案
- ART下一代壳通用解决方案

