篇幅有限 完整内容及源码关注公众号:ReverseCode,发送 冲
三板斧:
先hook、看参数和返回值,利用命令行定位 再利用命令行/写代码构造参数、主动调用 最后规模化利用PYTHON配RPC导出结果 基于内存漫游定位 案例一 adb install -r -t movetv.apk 移动tv onejane/123456,-r强制升级,-t允许装debug版本
jadx打开发现com.tecent.StubShell加壳,找不到MainActivity
1
2
3
4
5
6
pyenv local 3.8.0 adb shell ./data/local/tmp/fs128arm64 objection -g com.cz.babySister explore android hooking search classes com.wrapper.proxyapplication android hooking watch class com.wrapper.proxyapplication.WrapperProxyApplication 该类在启动则被调用,attach将无法hook
Frida附加app的两种模式:
SPAWN:创建进程时就hook,有壳的话就不行 ATTACH:应用运行过程中hook,有壳也是ok 分析 1 2 3 android hooking list activities android intent launch_activity com.cz.babySister.activity.LoginActivity 指定启动Activity ps -ef|grep baby 进程一直自动启动
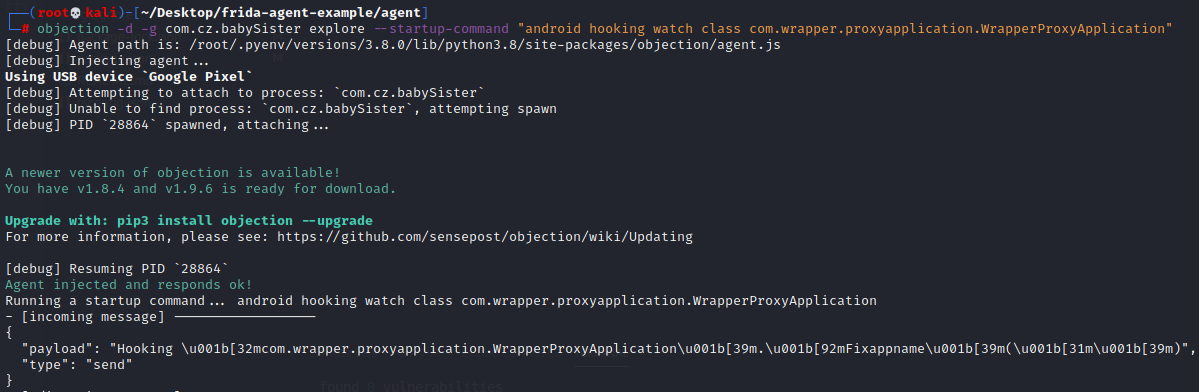
objection -d -g com.cz.babySister explore --startup-command "android hooking watch class com.wrapper.proxyapplication.WrapperProxyApplication" 开启debug -d
由于该app会自动后台启动
需要在前台启动时立即使用objection漫游
批量hook android hooking search classes com.wrapper.proxyapplication 枚举包中所有类
1 2 3 4 5 com.wrapper.proxyapplication.CustomerClassLoader com.wrapper.proxyapplication.MultiDex com.wrapper.proxyapplication.MultiDex$V19 com.wrapper.proxyapplication.Util com.wrapper.proxyapplication.WrapperProxyApplication
如何使用objection去批量hook和trace?
把~/.objection/objection.log删掉; 到objection界面中运行android hooking list classes,列出所有的类; 对新生成的~/.objection/objection.log文件进行过滤,比如只关心http相关的。cat objection.log|grep -i http 将输出结果保存到一个excel列中,前面补全android hooking watch class xxxxx,另存为文本文件 加载这个文件:objection -g com.android.settings explore -c “2.txt” ,这样一下子就hook上了几千个相关类的所有方法及其所有重载。 如果trace感兴趣的方法也是同理,android hooking search methods * ,会打印出所有的方法。 vim hooklist.txt
1 2 3 4 5 android hooking watch class com.wrapper.proxyapplication.CustomerClassLoader android hooking watch class com.wrapper.proxyapplication.MultiDex android hooking watch class com.wrapper.proxyapplication.MultiDex$V19 android hooking watch class com.wrapper.proxyapplication.Util android hooking watch class com.wrapper.proxyapplication.WrapperProxyApplication
objection -g com.cz.babySister explore -c “hooklist.txt” 批量hook
android hooking list class_methods com.wrapper.proxyapplication.Util 枚举类中所有方法
Zentracer adb shell && top 根据负载查看包名
java.net.HttpUrlConnection
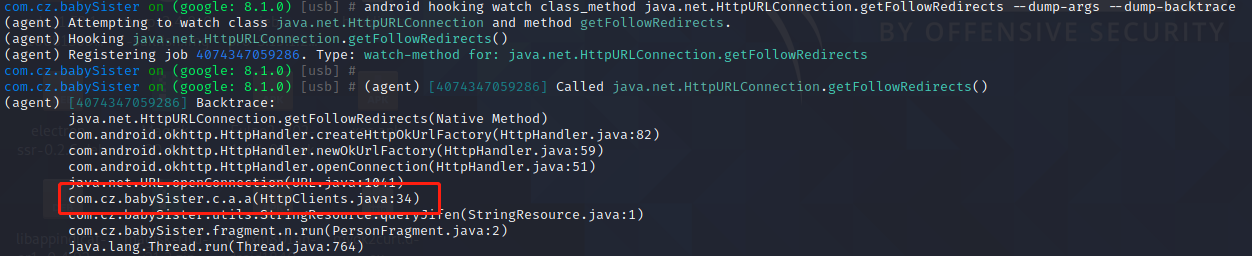
1 2 3 4 objection -g com.cz.babySister explore --startup-command "android hooking watch class java.net.HttpURLConnection" jobs list jobs kill id android hooking watch class_method java.net.HttpURLConnection.getFollowRedirects --dump-args 登录发现堆栈来自于com.cz.babySister.c.a.a
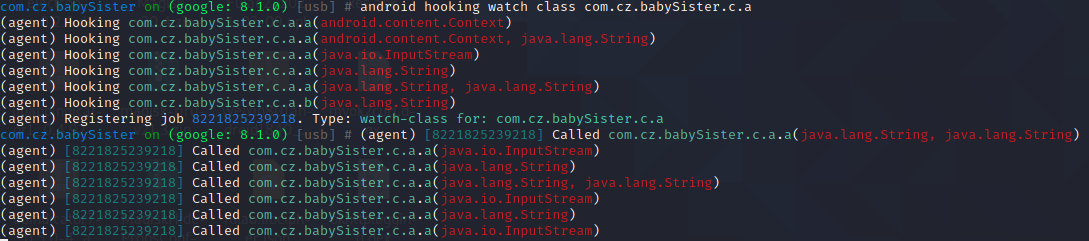
通过jadx搜索com.cz.babySister.c.a.a所在类,通过android hooking watch class com.cz.babySister.c.a进行trace类
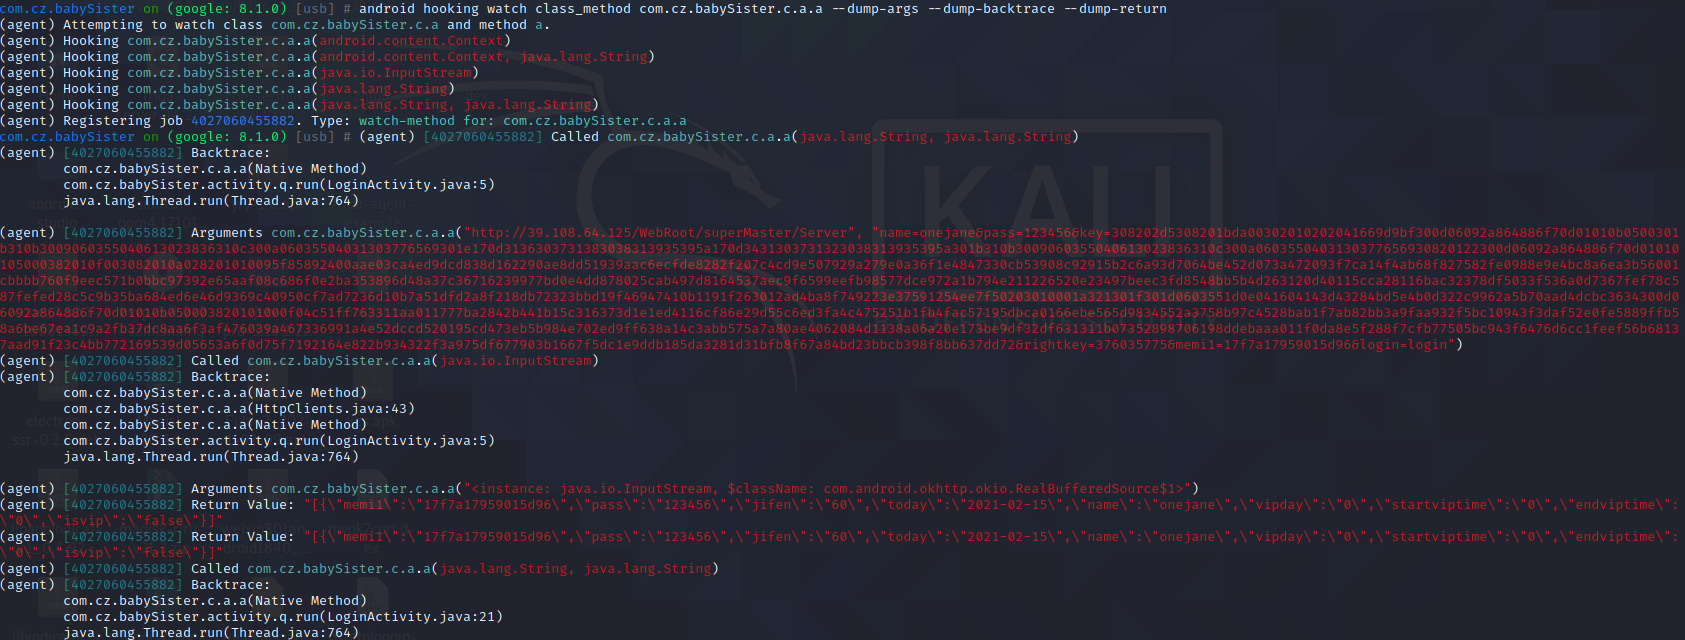
通过android hooking watch class_method com.cz.babySister.c.a.a --dump-args --dump-backtrace --dump-return 进行trace方法
什么叫trace?hook多了就成了trace
系统框架是不可能被混淆的,基于枚举的内存漫游定位思路的含义是:怀疑你使用了什么框架API、怀疑你经过了哪个包哪处地方、就去那里埋伏起来,等待经过。
针对混淆后的okhttp3,通过Frida实现的拦截okhttp脚本
./data/local/tmp/fs1428arm64
cd ZenTracer && proxychains pip install PyQt5 && python ZenTracer.py
报错:Could not load the Qt platform plugin “xcb” in “” even though it was found
1 export QT_DEBUG_PLUGINS=1
python ZenTracer.py
ldd libqxcb.so 查看具体哪个so文件为not found
apt install libxcb-util1 libxcb-xinerama0
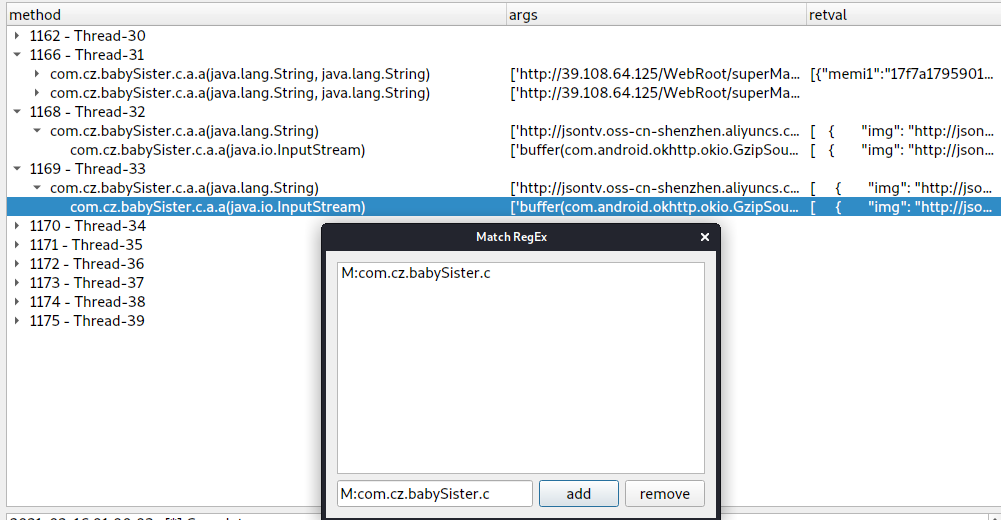
Action-Match RegEx
Action-Start 启动trace,登录trace保存为json
thunar . 打开当前目录 查看babySister查看json
极端情况 :Match RegEx 填写com.cz.babySister主包名,trace所有的方法
1 2 3 4 objection -g com.cz.babySister explore android hooking search classes com.cz.babySister cat ~/.objection/objection.log|grep com.cz.babySister 拿到所有的类 在前面添加命令 android hooking watch class保存到classes.txt中 objection -g com.cz.babySister explore -c classes.txt 实现批量hook
案例二 adb install xes.apk
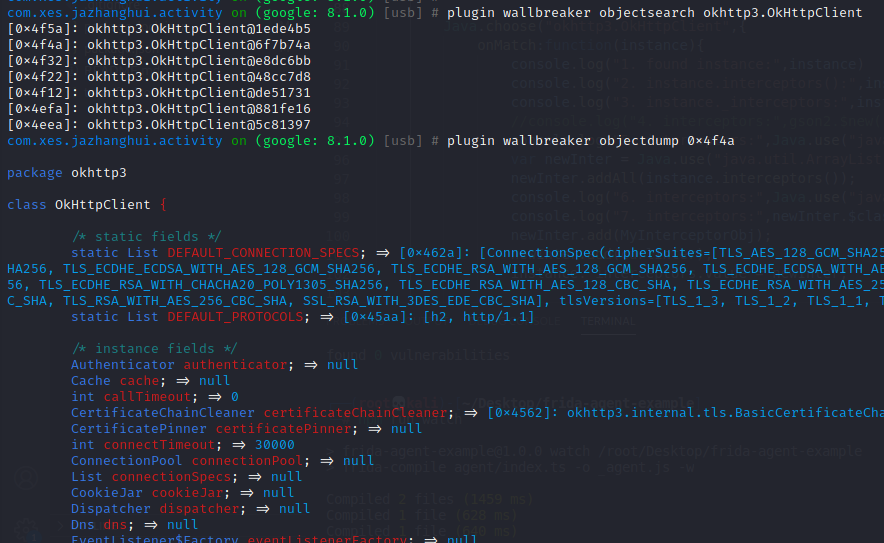
1 2 3 4 5 6 objection -g com.xes.jazhanghui.activity explore -P ~/.objection/plugins 启动objection加载所有插件 android hooking search classes okhttp3 android hooking list class_methods okhttp3.OkHttpClient android heap search instances okhttp3.OkHttpClient 找到对象实例 plugin wallbreaker objectsearch okhttp3.OkHttpClient 拿到ok3对象的地址,如混淆在jadx中找到ok3的类注释中的rename plugin wallbreaker objectdump --fullname 0x37d2
分析 adb push okhttplogging.dex /data/local/tmp
adb push myok2curl.dex /data/local/tmp
cd ~/Desktop/frida-agent-example && npm run watch
frida -UF -l hookOkhttp3.js 通过adb logcat | grep “okhttpGet”查看log
原生:离解释器更近:安卓原生就是dex被libart.so来解释、linux原生就是CPU直接解释的机器码
1 2 3 ps -e |grep -i chrome objection -g com.android.chrome explore memory list modules 发现dex被libart.so加载解析执行
脱壳 frida_fart
1 2 cd frida_fart && adb push lib/* /data/local/tmp cd /data/local/tmp/ && cp fart* /data/app && cd /data/app && chmod 777 fart* 加权限
修改源码dex保存路径:var savepath = “/sdcard/com.cz.babySister.activity/“;
1 2 3 4 mkdir /sdcard/com.cz.babySister.activity/ frida -U -f com.cz.babySister -l frida_fart_reflection.js --no-pause frida -UF -l frida_fart_reflection.js frida -U -f com.cz.babySister -l frida_fart_hook.js --no-pause 基于安卓8,生成dex
frida-dexdump
核心原理:进程级别的内存漫游
cd ~/.objection/plugins/dexdump && python main.py 自动脱壳(前台运行的学而思app)
cd com.xes.jazhanghui.activity && grep -ril “okhttp3.OkHttpClient” *
du -h * 查看文件最大的dex使用jadx打开
objection -g com.xes.jazhanghui.activity explore -P ~/.objection/plugins
android hooking list activities 在jadx中查找到dex包含com.xes.jazhanghui.activity.mvp.live.activity.LiveMainActivity
同理:脱壳移动TV,grep -ril “MainActivity” *,grep -ril “LoginActivity” *,找到唯一入口dex
案例三 adb install 免费电影院v2.1.0_210.apk
分析 静态:通过jadx搜索OkHttpClient,或者apktool d 免费电影院v2.1.0_210.apk && grep -ril "OkHttpClient" *
动态:
1 2 3 4 5 cat smali/فمضﺝ/ﻙﺫتك$ﺯﺵتﻝ.smali 拿到.class public Lفمضﺝ/ﻙﺫتك;类名 objection -g com.singleman.freevideo explore -P /root/.objection/plugins 点击登录调用ok3 plugin wallbreaker objectsearch فمضﺝ.ﻙﺫتك plugin wallbreaker objectdump --fullname 0x2452 查看该类是否ok3Client,获取其中List<Interceptor>地址,用wallbreaker dump下来class为Collections$UnmodifiableRandomAccessList 即为OkHttpClient类
在hookOkhttp3.js中实现hook
1 2 3 4 5 6 7 8 9 10 11 12 13 14 15 16 17 18 19 20 21 22 Java.choose("فمضﺝ.ﻙﺫتك",{ onMatch:function(instance){ console.log("1. found instance:",instance) //console.log("2. instance.interceptors():",instance.interceptors().$className) console.log("3. instance._interceptors:",instance.ﻭﻍﺫﻉ.value.$className) //console.log("4. interceptors:",gson2.$new().toJson(instance.interceptors())) console.log("5. interceptors:",Java.use("java.util.Arrays").toString(instance.ﻭﻍﺫﻉ.value.toArray())) /* var newInter = Java.use("java.util.ArrayList").$new(); newInter.addAll(instance.interceptors()); console.log("6. interceptors:",Java.use("java.util.Arrays").toString(newInter.toArray())); console.log("7. interceptors:",newInter.$className); newInter.add(MyInterceptorObj); newInter.add(curlInter); instance._interceptors.value = newInter; */ },onComplete:function(){ console.log("Search complete!") } })
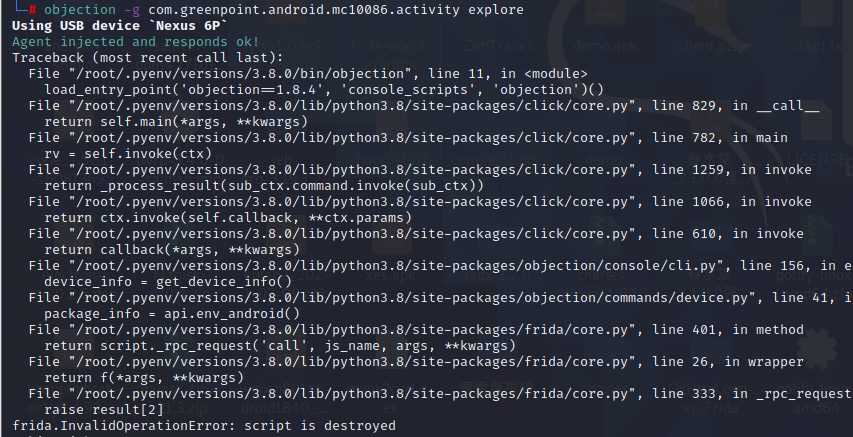
案例四 1 2 3 4 5 6 7 adb install 中国移动7.0.0.apk adb shell 打开app前台运行,top查看包名 ps -ef|grep green pm -l | grep green 查看包名 pyenv local 3.9.0 ./fs14216arm64 objection -g com.greenpoint.android.mc10086.activity explore
该样本是多进程
1 2 3 4 cat /proc/11929/status 发现该进程被子进程进行attach了,TracerPid: 11958 frida -U -f com.greenpoint.android.mc10086.activity 因为frida比子进程快,attch后没有释放父进程 %resume 会直接挂掉Process terminated frida -UF 报双进程错unable to access process with pid 13250 due to system restrictions;
wget hluda-server-14.2.16-android-arm64
1 2 3 4 5 ./hluda14216arm64 frida -U -f com.greenpoint.android.mc10086.activity %resume proxychains git clone https://github.com/r0ysue/r0tracer.git frida -U -f com.greenpoint.android.mc10086.activity -l r0tracer.js -o cmcc.txt
frida是app进程启动时spawn注入比任何程序都快,注入成功就dettach掉,trace id为父进程,子进程就可以回头调试主进程。 frida server和脚本是进程间通信,即socket通信。
用objection不管是spawn还是attach都失败的双进程,frida命令的话可以先不加--no-pause,然后手动%resume就可以使用hluda进行hook上了。
基于Frida的Hook 案例一 adb install -r -t junior.apk 开启远程调用frida -UF -l demo.js
像素显示dip2px 1 2 3 4 5 6 7 8 9 10 11 12 13 14 15 16 17 18 objection -g com.example.junior explore -P ~/.objection/plugins 加载所有插件 android hooking list activities 查看用于展示的界面 android intent launch_activity com.example.junior.CalculatorActivity 启动计算器界面 cat objection.log | grep com.example.junior.util.Utils android hooking list class_methods com.example.junior.util.Utils 打印来中所有可hook的函数 android hooking watch class_method com.example.junior.util.Utils.dip2px --dump-args --dump-return --dump-backtrace hook方法并打印像素显示出入参与调用栈 function main() { Java.perform(function () {//只要是java的代码都要跑在Java.perform里面 console.log("Entering Hook!") Java.use("com.example.junior.util.Utils").dip2px.implementation = function (context, float) { //return null; var result = this.dip2px(context, 100) console.log("context,float,result ==> ", context, float, result); console.log(Java.use("android.util.Log").getStackTraceString(Java.use("java.lang.Throwable").$new())); return 26; } }) }
分辨率显示setText hook用不上Java.choose的,hook函数时不分动静态
1 2 3 4 5 6 7 8 9 10 11 12 13 14 15 16 17 18 19 20 21 22 23 24 25 26 27 28 29 30 android intent launch_activity com.example.junior.ScreenActivity cat objection.log|grep -i android.widget.TextView android hooking list class_methods android.widget.TextView 打印来中所有可hook的函数 android hooking watch class_method android.widget.TextView.setText --dump-args --dump-backtrace --dump-return hook公共方法setText android heap search instances com.example.junior.ScreenActivity 搜索activity类内存地址 android heap execute 0x6f72 showScreenInfo 主动调用该类的指定方法,frida端hook自动执行 function Screen() { Java.perform(function () { // 重载 Java.use("android.widget.TextView").setText.overload('java.lang.CharSequence').implementation = function (text) { var javaString = Java.use("java.lang.String"); var newString = javaString.$new("onejane") var result = null; var realText = String(text); console.log("real text is ==> ",realText); if (realText.indexOf("junior") >= 0) { var result = this.setText(newString); console.log("text,result ==> ", newString, result); } else { var result = this.setText(text); console.log("text,result ==> ", text, result); } console.log(Java.use("android.util.Log").getStackTraceString(Java.use("java.lang.Throwable").$new())); return result; } }) }
计算器 1 2 3 4 5 6 7 8 9 10 11 12 13 14 15 16 17 18 19 20 21 22 23 24 cat objection.log|grep -i com.example.junior.util.Arith android hooking list class_methods com.example.junior.util.Arith 查看Arith类有哪些hook的方法 android hooking watch class_method com.example.junior.util.Arith.sub --dump-args --dump-backtrace --dump-return hook静态方法sub function Equals(){ Java.perform(function(){ Java.use("java.lang.String").equals.implementation = function(obj){ var result = this.equals(obj); console.log("obj,result ==> ",obj,result); return result; } }) } function sub(){ Java.perform(function(){ Java.use("com.example.junior.util.Arith").sub.overload('java.lang.String', 'java.lang.String').implementation = function(str1,str2){ var javaString = Java.use("java.lang.String") var result = this.sub(str1,javaString.$new("2")); // 本质上属于主动调用构造函数 console.log("str1,str2,result==>",str1,str2,result) return javaString.$new("10"); } }) }
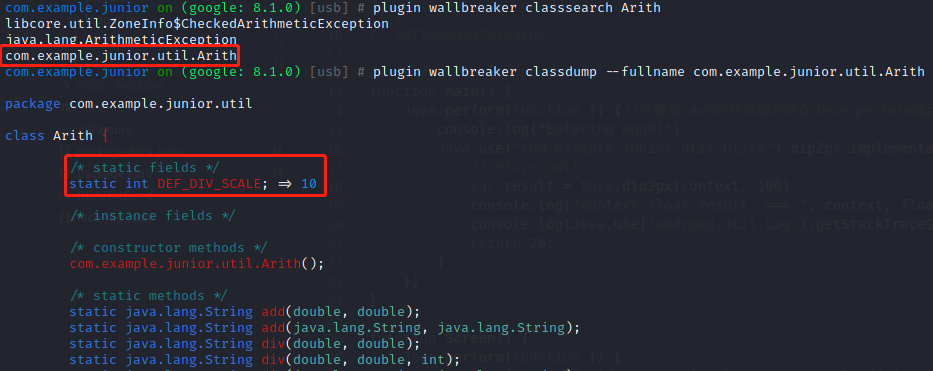
静态变量 运行junior的计算器
1 2 plugin wallbreaker classsearch Arith 内存漫游搜索Arith类 plugin wallbreaker classdump --fullname com.example.junior.util.Arith 将Arith类dump发现有静态变量
通过frida获取静态变量DEF_DIV_SCALE并修改值为20,内存中的静态变量DEF_DIV_SCALE即变为20
1 2 3 4 5 6 7 8 9 function staticField(){ Java.perform(function(){ var divscale = Java.use("com.example.junior.util.Arith").DEF_DIV_SCALE.value; console.log("divscale1 is =>",divscale); Java.use("com.example.junior.util.Arith").DEF_DIV_SCALE.value=20; divscale = Java.use("com.example.junior.util.Arith").DEF_DIV_SCALE.value; console.log("divscale2 is =>",divscale); }) }
静态主动调用 frida -UF -l demo.js主动调用Arith.add方法
1 2 3 4 5 6 function operate(){ Java.perform(function(){ var Arith = Java.use("com.example.junior.util.Arith"); console.log("addResult is =>",Arith.add("1","1")); }) }
plugin wallbreaker classsearch Build 搜索含有Build的类
plugin wallbreaker classdump --fullname android.os.Build 将Build类dump下来
1 2 3 4 5 6 7 8 9 function fingerPrint(){ Java.perform(function(){ var Build = Java.use("android.os.Build"); console.log(Build.DEVICE.value,Build.ID.value,Build.MODEL.value,Build.SERIAL.value); Build.SERIAL.value = 'F123456'; console.log(Build.SERIAL.value,Build.getSerial()); // 若app无权限getSerial(),换设置重新主动调用 console.log('sdk is ',Build.getString("ro.build.version.sdk")); }) }
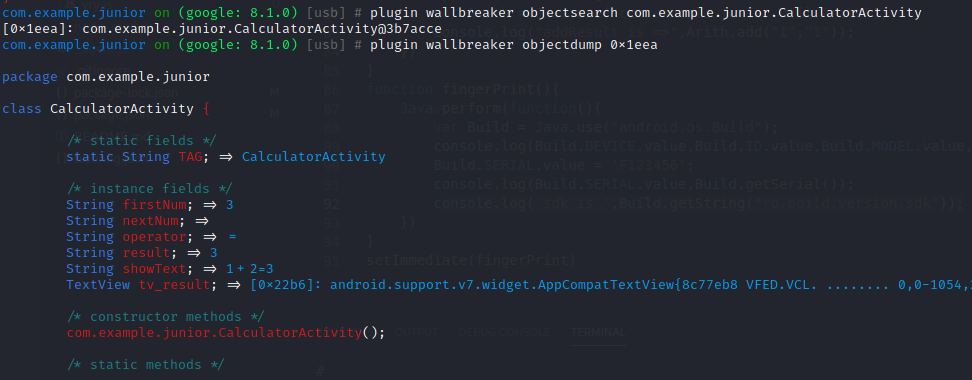
动态变量 plugin wallbreaker objectsearch com.example.junior.CalculatorActivity 获取该类地址
plugin wallbreaker objectdump 0x1eea 计算1+2=3后查看该类的动态变量
寻找CalculatorActivity实例,通过frida动态hook,通过修改showText值时内存中变量变为123
1 2 3 4 5 6 7 8 9 10 11 12 13 function dynamicField(){ Java.perform(function(){ Java.choose("com.example.junior.CalculatorActivity",{ onMatch:function(instance){ console.log("found instance =>",instance); console.log("instance showText is =>",instance.showText.value) instance.showText.value = "123" },onComplete:function(){ console.log('Search complete') } }) }) }
动态主动调用 动态调用有参函数,计算机显示666,打印666
1 2 3 4 5 6 7 8 9 10 11 12 13 function dynamic(){ Java.perform(function(){ Java.choose("com.example.junior.CalculatorActivity",{ onMatch:function(instance){ console.log("found instance =>",instance); console.log("instance showText is =>",instance.clear("666")) console.log("instance showText is =>",instance.showText.value) },onComplete:function(){ console.log('Search complete') } }) }) }
RPC调用 1 2 3 4 5 6 7 8 9 10 11 12 13 14 15 16 17 18 19 import frida # device=frida.get_device_manager().add_remote_device('192.168.0.100:5555') 远程连接./fs128arm64 -l 0.0.0.0:5555,可定义多个device实现批量自动化群控 device = frida.get_usb_device() ### attach pid=device.get_frontmost_application().pid # 若双进程保护,指定pid进行hook session = device.attach(pid) ### spawn #pid = device.spawn(["com.example.junior"]) #device.resume(pid) #time.sleep(1) #session = device.attach(pid) with open("demo.js") as f: script = session.create_script(f.read()) script.load() input()
键盘操作 input keyevent 4 表示后退
1 2 3 4 5 6 7 function subcommand(){ Java.perform(function(){ // adb input api var process = Java.use('java.lang.Runtime').getRuntime().exec('input keyevent 4'); console.log('subcommand success process is ', process) }) }
循环调用
demo.js中导出指定方法
1 2 3 rpc.exports = { subcommand: subcommand }
demo.py中开启循环
1 2 3 4 5 6 7 command = "" while 1 == 1: command = input("Enter command:\n1: Exit\n2: Call secret function\nchoice:") if command == "1": break elif command == "2": # 在这里调用,可以设置多个条件判断 script.exports.subcommand()
输入2对当前进程持续后退
案例二 利用nps实现启动了frida-server和nps-client的device的内网穿透,真正意义上实现批量自动化群控
案例三 利用ssr通过nps内网穿透实现4G作为出口ip代理供request/scrapy调用
objection和frida不可同时hook一个函数,
hook Non-ASCII
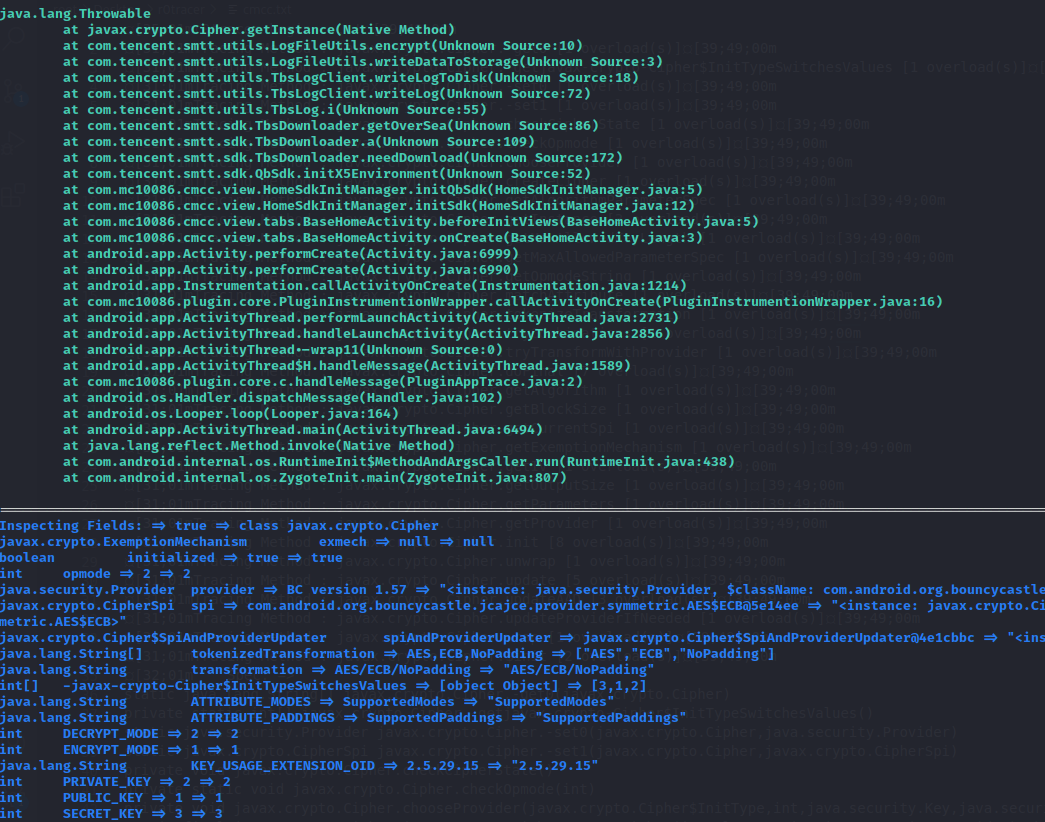
对于有些混淆后不可见或乱码的函数名,可以先编码打印出来, 再用编码后的字符串去 hook.
1 2 3 4 5 6 7 8 9 10 11 12 13 14 15 16 17 18 19 20 21 Java.perform( function x() { var targetClass = "com.example.hooktest.MainActivity"; var hookCls = Java.use(targetClass); var methods = hookCls.class.getDeclaredMethods(); for (var i in methods) { console.log(methods[i].toString()); console.log(encodeURIComponent(methods[i].toString().replace(/^.*?\.([^\s\.\(\)]+)\(.*?$/, "$1"))); } hookCls[decodeURIComponent("%D6%8F")] .implementation = function (x) { console.log("original call: fun(" + x + ")"); var result = this[decodeURIComponent("%D6%8F")](900); return result; } } )
hook Intent
MainActivity中Intent intent2 = new Intent(this, Class.forName("com.shimeng.qq2693533893.MyServiceOne"));我们通过frida打印Intent
参考资料: